Click to Download User Manual. - Home
Click to Download User Manual. - Home
Click to Download User Manual. - Home
- No tags were found...

Create successful ePaper yourself
Turn your PDF publications into a flip-book with our unique Google optimized e-Paper software.
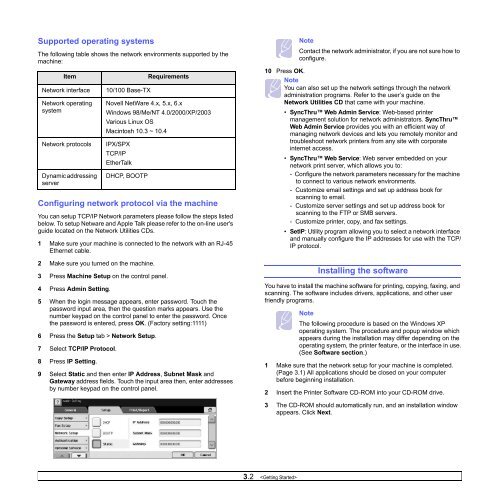
Supported operating systemsThe following table shows the network environments supported by themachine:ItemNetwork interfaceNetwork operatingsystemNetwork pro<strong>to</strong>colsDynamic addressingserverConfiguring network pro<strong>to</strong>col via the machineYou can setup TCP/IP Network parameters please follow the steps listedbelow. To setup Netware and Apple Talk please refer <strong>to</strong> the on-line user'sguide located on the Network Utilities CDs.1 Make sure your machine is connected <strong>to</strong> the network with an RJ-45Ethernet cable.2 Make sure you turned on the machine.3 Press Machine Setup on the control panel.4 Press Admin Setting.5 When the login message appears, enter password. Touch thepassword input area, then the question marks appears. Use thenumber keypad on the control panel <strong>to</strong> enter the password. Oncethe password is entered, press OK. (Fac<strong>to</strong>ry setting:1111)6 Press the Setup tab > Network Setup.7 Select TCP/IP Pro<strong>to</strong>col.8 Press IP Setting.10/100 Base-TXRequirementsNovell NetWare 4.x, 5.x, 6.xWindows 98/Me/NT 4.0/2000/XP/2003Various Linux OSMacin<strong>to</strong>sh 10.3 ~ 10.4IPX/SPXTCP/IPEtherTalkDHCP, BOOTP9 Select Static and then enter IP Address, Subnet Mask andGateway address fields. Touch the input area then, enter addressesby number keypad on the control panel.NoteContact the network administra<strong>to</strong>r, if you are not sure how <strong>to</strong>configure.10 Press OK.NoteYou can also set up the network settings through the networkadministration programs. Refer <strong>to</strong> the user’s guide on theNetwork Utilities CD that came with your machine.• SyncThru Web Admin Service: Web-based printermanagement solution for network administra<strong>to</strong>rs. SyncThruWeb Admin Service provides you with an efficient way ofmanaging network devices and lets you remotely moni<strong>to</strong>r andtroubleshoot network printers from any site with corporateinternet access.• SyncThru Web Service: Web server embedded on yournetwork print server, which allows you <strong>to</strong>:- Configure the network parameters necessary for the machine<strong>to</strong> connect <strong>to</strong> various network environments.- Cus<strong>to</strong>mize email settings and set up address book forscanning <strong>to</strong> email.- Cus<strong>to</strong>mize server settings and set up address book forscanning <strong>to</strong> the FTP or SMB servers.- Cus<strong>to</strong>mize printer, copy, and fax settings.• SetIP: Utility program allowing you <strong>to</strong> select a network interfaceand manually configure the IP addresses for use with the TCP/IP pro<strong>to</strong>col.Installing the softwareYou have <strong>to</strong> install the machine software for printing, copying, faxing, andscanning. The software includes drivers, applications, and other userfriendly programs.NoteThe following procedure is based on the Windows XPoperating system. The procedure and popup window whichappears during the installation may differ depending on theoperating system, the printer feature, or the interface in use.(See Software section.)1 Make sure that the network setup for your machine is completed.(Page 3.1) All applications should be closed on your computerbefore beginning installation.2 Insert the Printer Software CD-ROM in<strong>to</strong> your CD-ROM drive.3 The CD-ROM should au<strong>to</strong>matically run, and an installation windowappears. <strong>Click</strong> Next.3.2