National Norms and Standards relating to Environmental Health
National Norms and Standards relating to Environmental Health
National Norms and Standards relating to Environmental Health
Create successful ePaper yourself
Turn your PDF publications into a flip-book with our unique Google optimized e-Paper software.
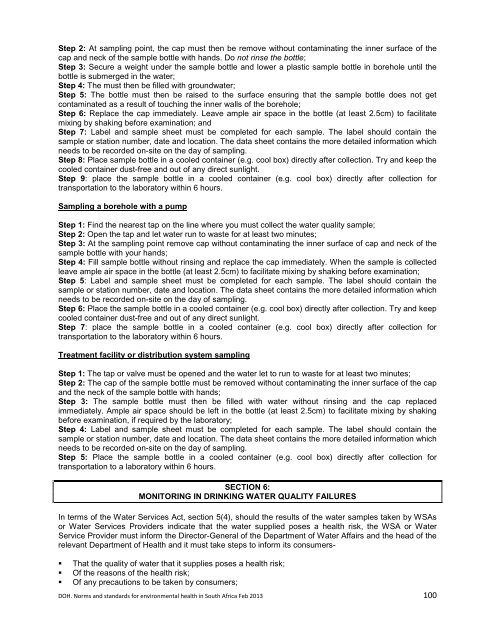
Step 2: At sampling point, the cap must then be remove without contaminating the inner surface of thecap <strong>and</strong> neck of the sample bottle with h<strong>and</strong>s. Do not rinse the bottle;Step 3: Secure a weight under the sample bottle <strong>and</strong> lower a plastic sample bottle in borehole until thebottle is submerged in the water;Step 4: The must then be filled with groundwater;Step 5: The bottle must then be raised <strong>to</strong> the surface ensuring that the sample bottle does not getcontaminated as a result of <strong>to</strong>uching the inner walls of the borehole;Step 6: Replace the cap immediately. Leave ample air space in the bottle (at least 2.5cm) <strong>to</strong> facilitatemixing by shaking before examination; <strong>and</strong>Step 7: Label <strong>and</strong> sample sheet must be completed for each sample. The label should contain thesample or station number, date <strong>and</strong> location. The data sheet contains the more detailed information whichneeds <strong>to</strong> be recorded on-site on the day of sampling.Step 8: Place sample bottle in a cooled container (e.g. cool box) directly after collection. Try <strong>and</strong> keep thecooled container dust-free <strong>and</strong> out of any direct sunlight.Step 9: place the sample bottle in a cooled container (e.g. cool box) directly after collection fortransportation <strong>to</strong> the labora<strong>to</strong>ry within 6 hours.Sampling a borehole with a pumpStep 1: Find the nearest tap on the line where you must collect the water quality sample;Step 2: Open the tap <strong>and</strong> let water run <strong>to</strong> waste for at least two minutes;Step 3: At the sampling point remove cap without contaminating the inner surface of cap <strong>and</strong> neck of thesample bottle with your h<strong>and</strong>s;Step 4: Fill sample bottle without rinsing <strong>and</strong> replace the cap immediately. When the sample is collectedleave ample air space in the bottle (at least 2.5cm) <strong>to</strong> facilitate mixing by shaking before examination;Step 5: Label <strong>and</strong> sample sheet must be completed for each sample. The label should contain thesample or station number, date <strong>and</strong> location. The data sheet contains the more detailed information whichneeds <strong>to</strong> be recorded on-site on the day of sampling.Step 6: Place the sample bottle in a cooled container (e.g. cool box) directly after collection. Try <strong>and</strong> keepcooled container dust-free <strong>and</strong> out of any direct sunlight.Step 7: place the sample bottle in a cooled container (e.g. cool box) directly after collection fortransportation <strong>to</strong> the labora<strong>to</strong>ry within 6 hours.Treatment facility or distribution system samplingStep 1: The tap or valve must be opened <strong>and</strong> the water let <strong>to</strong> run <strong>to</strong> waste for at least two minutes;Step 2: The cap of the sample bottle must be removed without contaminating the inner surface of the cap<strong>and</strong> the neck of the sample bottle with h<strong>and</strong>s;Step 3: The sample bottle must then be filled with water without rinsing <strong>and</strong> the cap replacedimmediately. Ample air space should be left in the bottle (at least 2.5cm) <strong>to</strong> facilitate mixing by shakingbefore examination, if required by the labora<strong>to</strong>ry;Step 4: Label <strong>and</strong> sample sheet must be completed for each sample. The label should contain thesample or station number, date <strong>and</strong> location. The data sheet contains the more detailed information whichneeds <strong>to</strong> be recorded on-site on the day of sampling.Step 5: Place the sample bottle in a cooled container (e.g. cool box) directly after collection fortransportation <strong>to</strong> a labora<strong>to</strong>ry within 6 hours.SECTION 6:MONITORING IN DRINKING WATER QUALITY FAILURESIn terms of the Water Services Act, section 5(4), should the results of the water samples taken by WSAsor Water Services Providers indicate that the water supplied poses a health risk, the WSA or WaterService Provider must inform the Direc<strong>to</strong>r-General of the Department of Water Affairs <strong>and</strong> the head of therelevant Department of <strong>Health</strong> <strong>and</strong> it must take steps <strong>to</strong> inform its consumers-• That the quality of water that it supplies poses a health risk;• Of the reasons of the health risk;• Of any precautions <strong>to</strong> be taken by consumers;DOH. <strong>Norms</strong> <strong>and</strong> st<strong>and</strong>ards for environmental health in South Africa Feb 2013 100




![A monograph of the management of postpartum haemorrhage [2011]](https://img.yumpu.com/15578784/1/184x260/a-monograph-of-the-management-of-postpartum-haemorrhage-2011.jpg?quality=85)
