BRIDGE REPAIR/REHABILITATION FEASIBILITY STUDY
Bridge Repair_Rehabilitation Feasibility Study - Town to Chatham
Bridge Repair_Rehabilitation Feasibility Study - Town to Chatham

You also want an ePaper? Increase the reach of your titles
YUMPU automatically turns print PDFs into web optimized ePapers that Google loves.
glulam member and replaced with new laminations that are epoxied in<br />
place. The laminations in the replacement section are lapped over existing<br />
laminations a sufficient distance to develop the required shear strength at<br />
the epoxied joint. There is evidence that variations in the moisture content<br />
of timber members can in time cause a significant reduction in the bonding<br />
strength of epoxy. Therefore, splicing repairs in members exposed to<br />
weathering or significant fluctuations in moisture content are not recommended.<br />
Also, epoxy splicing should not be used on material treated with<br />
oil-type preservatives because of poor bonding between the wood and the<br />
epoxy.<br />
Pile Rehabilitation<br />
Pile rehabilitation employs epoxy (using grouting and splicing) for the<br />
repair of timber piles loaded primarily in axial compression. The two<br />
methods of pile rehabilitation most commonly used are pile posting and<br />
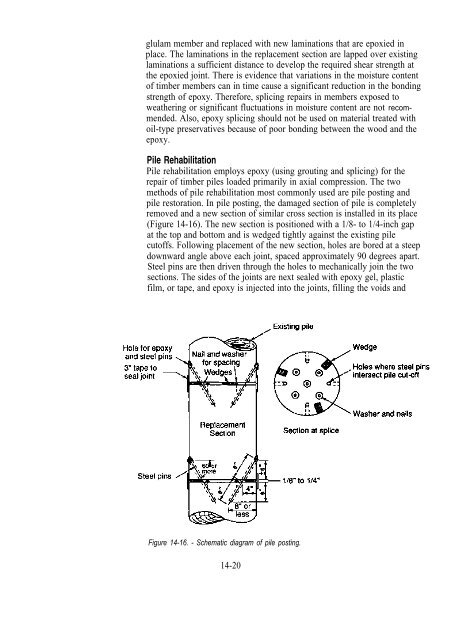
pile restoration. In pile posting, the damaged section of pile is completely<br />
removed and a new section of similar cross section is installed in its place<br />
(Figure 14-16). The new section is positioned with a 1/8- to 1/4-inch gap<br />
at the top and bottom and is wedged tightly against the existing pile<br />
cutoffs. Following placement of the new section, holes are bored at a steep<br />
downward angle above each joint, spaced approximately 90 degrees apart.<br />
Steel pins are then driven through the holes to mechanically join the two<br />
sections. The sides of the joints are next sealed with epoxy gel, plastic<br />
film, or tape, and epoxy is injected into the joints, filling the voids and<br />
Figure 14-16. - Schematic diagram of pile posting.<br />
14-20