Melco Compilation

Create successful ePaper yourself
Turn your PDF publications into a flip-book with our unique Google optimized e-Paper software.
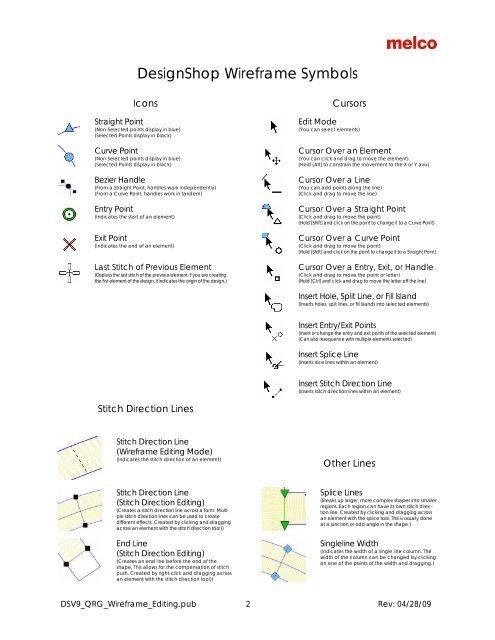
DesignShop Wireframe Symbols<br />
Icons<br />
Straight Point<br />
(Non-Selected points display in blue)<br />
(Selected Points display in black)<br />
Curve Point<br />
(Non-Selected points display in blue)<br />
(Selected Points display in black)<br />
Bezier Handle<br />
(From a Straight Point, handles work independently)<br />
(From a Curve Point, handles work in tandem)<br />
Entry Point<br />
(Indicates the start of an element)<br />
Exit Point<br />
(Indicates the end of an element)<br />
Last Stitch of Previous Element<br />
(Displays the last stitch of the previous element. If you are creating<br />
the first element of the design, it indicates the origin of the design.)<br />
Cursors<br />
Edit Mode<br />
(You can select elements)<br />
Cursor Over an Element<br />
(You can click and drag to move the element)<br />
(Hold [Alt] to constrain the movement to the X or Y axix)<br />
Cursor Over a Line<br />
(You can add points along the line)<br />
(Click and drag to move the line)<br />
Cursor Over a Straight Point<br />
(Click and drag to move the point)<br />
(Hold [Shift] and click on the point to change it to a Curve Point)<br />
Cursor Over a Curve Point<br />
(Click and drag to move the point)<br />
(Hold [Shift] and click on the point to change it to a Straight Point)<br />
Cursor Over a Entry, Exit, or Handle<br />
(Click and drag to move the point or letter)<br />
(Hold [Ctrl] and click and drag to move the letter off the line)<br />
Insert Hole, Split Line, or Fill Island<br />
(Inserts holes, split lines, or fill islands into selected elements)<br />
Insert Entry/Exit Points<br />
(Insert or change the entry and exit points of the selected element)<br />
(Can also resequence with multiple elements selected)<br />
Insert Splice Line<br />
(Inserts slice lines within an element)<br />
Insert Stitch Direction Line<br />
(Inserts stitch direction lines within an element)<br />
Stitch Direction Lines<br />
Stitch Direction Line<br />
(Wireframe Editing Mode)<br />
(Indicates the stitch direction of an element)<br />
Other Lines<br />
Stitch Direction Line<br />
(Stitch Direction Editing)<br />
(Creates a stitch direction line across a form. Multiple<br />
stitch direction lines can be used to create<br />
different effects. Created by clicking and dragging<br />
across an element with the stitch direction tool))<br />
End Line<br />
(Stitch Direction Editing)<br />
(Creates an end line before the end of the<br />
shape. This allows for the compensation of stitch<br />
push. Created by right-click and dragging across<br />
an element with the stitch direction tool))<br />
Splice Lines<br />
(Breaks up larger, more complex shapes into smaller<br />
regions. Each region can have its own stitch direction<br />
line. Created by clicking and dragging across<br />
an element with the splice tool. This is usually done<br />
at a junction or odd angle in the shape.)<br />
Singleline Width<br />
(Indicates the width of a single line column. The<br />
width of the column can be changed by clicking<br />
on one of the points of the width and dragging.)<br />
DSV9_QRG_Wireframe_Editing.pub 2 Rev: 04/28/09