Melco Compilation

You also want an ePaper? Increase the reach of your titles
YUMPU automatically turns print PDFs into web optimized ePapers that Google loves.
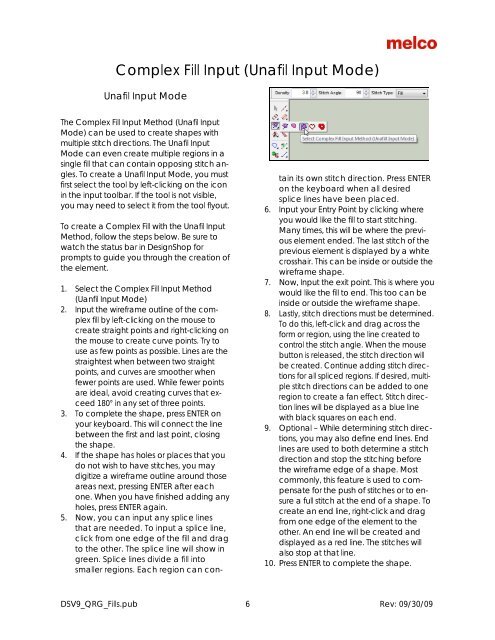
Complex Fill Input (Unafil Input Mode)<br />
Unafil Input Mode<br />
The Complex Fill Input Method (Unafil Input<br />
Mode) can be used to create shapes with<br />
multiple stitch directions. The Unafil Input<br />
Mode can even create multiple regions in a<br />
single fill that can contain opposing stitch angles.<br />
To create a Unafil Input Mode, you must<br />
first select the tool by left-clicking on the icon<br />
in the input toolbar. If the tool is not visible,<br />
you may need to select it from the tool flyout.<br />
To create a Complex Fill with the Unafil Input<br />
Method, follow the steps below. Be sure to<br />
watch the status bar in DesignShop for<br />
prompts to guide you through the creation of<br />
the element.<br />
1. Select the Complex Fill Input Method<br />
(Uanfil Input Mode)<br />
2. Input the wireframe outline of the complex<br />
fill by left-clicking on the mouse to<br />
create straight points and right-clicking on<br />
the mouse to create curve points. Try to<br />
use as few points as possible. Lines are the<br />
straightest when between two straight<br />
points, and curves are smoother when<br />
fewer points are used. While fewer points<br />
are ideal, avoid creating curves that exceed<br />
180° in any set of three points.<br />
3. To complete the shape, press ENTER on<br />
your keyboard. This will connect the line<br />
between the first and last point, closing<br />
the shape.<br />
4. If the shape has holes or places that you<br />
do not wish to have stitches, you may<br />
digitize a wireframe outline around those<br />
areas next, pressing ENTER after each<br />
one. When you have finished adding any<br />
holes, press ENTER again.<br />
5. Now, you can input any splice lines<br />
that are needed. To input a splice line,<br />
click from one edge of the fill and drag<br />
to the other. The splice line will show in<br />
green. Splice lines divide a fill into<br />
smaller regions. Each region can contain<br />
its own stitch direction. Press ENTER<br />
on the keyboard when all desired<br />
splice lines have been placed.<br />
6. Input your Entry Point by clicking where<br />
you would like the fill to start stitching.<br />
Many times, this will be where the previous<br />
element ended. The last stitch of the<br />
previous element is displayed by a white<br />
crosshair. This can be inside or outside the<br />
wireframe shape.<br />
7. Now, Input the exit point. This is where you<br />
would like the fill to end. This too can be<br />
inside or outside the wireframe shape.<br />
8. Lastly, stitch directions must be determined.<br />
To do this, left-click and drag across the<br />
form or region, using the line created to<br />
control the stitch angle. When the mouse<br />
button is released, the stitch direction will<br />
be created. Continue adding stitch directions<br />
for all spliced regions. If desired, multiple<br />
stitch directions can be added to one<br />
region to create a fan effect. Stitch direction<br />
lines will be displayed as a blue line<br />
with black squares on each end.<br />
9. Optional – While determining stitch directions,<br />
you may also define end lines. End<br />
lines are used to both determine a stitch<br />
direction and stop the stitching before<br />
the wireframe edge of a shape. Most<br />
commonly, this feature is used to compensate<br />
for the push of stitches or to ensure<br />
a full stitch at the end of a shape. To<br />
create an end line, right-click and drag<br />
from one edge of the element to the<br />
other. An end line will be created and<br />
displayed as a red line. The stitches will<br />
also stop at that line.<br />
10. Press ENTER to complete the shape.<br />
DSV9_QRG_Fills.pub 6 Rev: 09/30/09