- Page 1 and 2: Webinar #1 Getting Started DesignSh
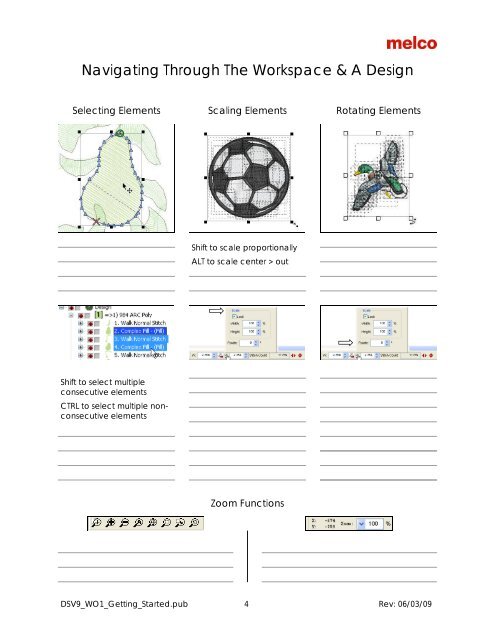
- Page 3: Project View: Managing Your Element
- Page 7 and 8: Accessing the Help System The help
- Page 9 and 10: Help System Videos Many topics have
- Page 11 and 12: Creating a Lettering Segment 1. Sel
- Page 13 and 14: On Screen Manipulation of Lettering
- Page 15 and 16: Spacing Auto Kern • Adjusts the s
- Page 17 and 18: Icon Identification 1. Edit Mode -
- Page 19 and 20: Scale and rotate lettering elements
- Page 21 and 22: Auto Borders All of the following c
- Page 23 and 24: Add Underlay 1. Click on text on th
- Page 25 and 26: Lettering - Object Properties Dialo
- Page 27 and 28: Adjust the space between two letter
- Page 29 and 30: • Arc - Adjust the arc radius ang
- Page 31 and 32: 1. Type letters for shadow effect.
- Page 33 and 34: letter to avoid a possible “threa
- Page 35 and 36: Understanding & Changing Stitch Typ
- Page 37 and 38: Common Stitch Types for Multi-Stitc
- Page 39 and 40: Accessing the Color System Object P
- Page 41 and 42: Color Properties If accessed from t
- Page 43 and 44: Webinar #3 Object Properties Design
- Page 45 and 46: Top Stitching: Stitch Types Satin
- Page 47 and 48: Underlay Center Walk 1. Good for sm
- Page 49 and 50: Tie In & Tie Off DSV9_WO3_Object_Pr
- Page 51 and 52: Clicking the button next to Auto De
- Page 53 and 54: Digitizing Tools and Basic Function
- Page 55 and 56:
Column 1 Input Method Column 1 Uses
- Page 57 and 58:
Single Line Input Methods • Excel
- Page 59 and 60:
Enabling Pull Compensation Using pu
- Page 61 and 62:
Max Pull Comp • Specified Maximum
- Page 63 and 64:
Enabling an Underlay When a column,
- Page 65 and 66:
Zig Zag *Available in the Object Pr
- Page 67 and 68:
Digitizing Tools and Basic Function
- Page 69 and 70:
Complex Fill Input (Traditional Inp
- Page 71 and 72:
Complex Fill Input (Unafil Input Mo
- Page 73 and 74:
Complex Fill Input (Manual Input Mo
- Page 75 and 76:
Walk Input Method DesignShop V9 Bas
- Page 77 and 78:
DesignShop Symbols Icons Straight P
- Page 79 and 80:
Creating a Walk Element Straights,
- Page 81 and 82:
EDITING Change Properties for the E
- Page 83 and 84:
Select By Color 1. On the color pal
- Page 85 and 86:
7. Double click on a point- brings
- Page 87 and 88:
3. You will now be able to drag the
- Page 89 and 90:
Appliqué / Tackle Twill - Sewing P
- Page 91 and 92:
Example 1: Tackle Twill Design Loca
- Page 93 and 94:
Appliqué: Tackdown Stitch Object T
- Page 95 and 96:
Appliqué Tackdown (Top Stitching)
- Page 97 and 98:
Object Properties - Miter Effect (D
- Page 99 and 100:
Webinar #4 Wireframe Editing Design
- Page 101 and 102:
Wireframe Editing DesignShop V9 Qui
- Page 103 and 104:
Editing Wireframe Points Drag a poi
- Page 105 and 106:
Editing Wireframe Segments Clicking
- Page 107 and 108:
Actual Size Tool This tool displays
- Page 109 and 110:
The Digitizing Process 1. Get the G
- Page 111 and 112:
AMAYA XT, AMAYA BRAVO & AMAYA OS V9
- Page 113 and 114:
Connecting the AMAYA Dongles & Leve
- Page 115 and 116:
Needles BACK SIDE FRONT Needle Orie
- Page 117 and 118:
Changing a Needle It is recommended
- Page 119 and 120:
More Backing and Topping Informatio
- Page 121 and 122:
Procedure to Run the AMAYA 1. Load
- Page 123 and 124:
Hooping Choosing the appropriate ho
- Page 125 and 126:
Color Groups (SE & Flex+ Only) Colo
- Page 127 and 128:
Embroidery File Formats Wire Frame
- Page 129 and 130:
Sewing Caps 1. Load Design or use L
- Page 131 and 132:
AMAYA Laser Alignment (SE & Flex+ O
- Page 133 and 134:
Contents of Class Page 3 4 4 5 8 10
- Page 135 and 136:
Bobbin We recommend continuous fila
- Page 137 and 138:
Choosing a Needle Choosing the appr
- Page 139 and 140:
Backings and Toppings Cut Away Stan
- Page 141 and 142:
AMAYA Keypad Single Key Operations
- Page 143 and 144:
Setting Presser Foot Height On the
- Page 145 and 146:
Color Sequence Settings Color - Nee
- Page 147 and 148:
Color Sequence Commands (SE & Flex+
- Page 149 and 150:
Settings by Color (SE & Flex+ Only)
- Page 151 and 152:
Maintenance • The oiler is plugge
- Page 153 and 154:
More AMAYA OS Settings Larger Icons
- Page 155 and 156:
BRAVO & BRAVO OS V11 BRAVO OS V11 C
- Page 157 and 158:
Connecting the BRAVO Dongles & Leve
- Page 159 and 160:
Needles FRONT SIDE BACK Needle Orie
- Page 161 and 162:
Changing a Needle When installing n
- Page 163 and 164:
More Backing and Topping Informatio
- Page 165 and 166:
Procedure to Run the BRAVO 1. Load
- Page 167 and 168:
Hooping Round hoops give the m
- Page 169 and 170:
Color Sequence Settings Cont. Color
- Page 171 and 172:
Embroidery File Formats Wire Frame
- Page 173 and 174:
Sewing Caps 1. Load Design or use L
- Page 175:
More BRAVO OS Settings Naming Your