


You also want an ePaper? Increase the reach of your titles
YUMPU automatically turns print PDFs into web optimized ePapers that Google loves.
Feature: Best photography techniques<br />
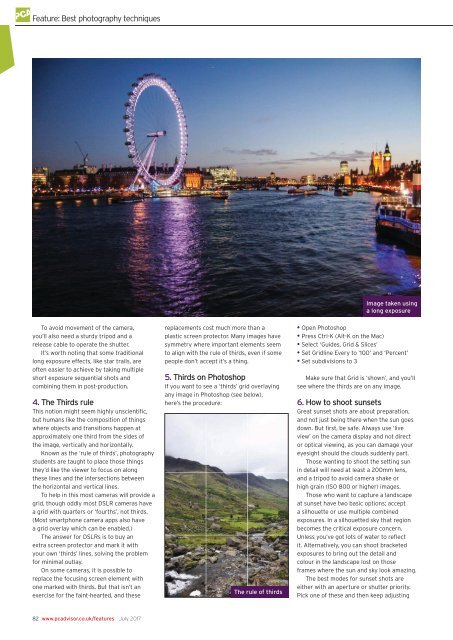
Image taken using<br />
a long exposure<br />
To avoid movement of the camera,<br />
you’ll also need a sturdy tripod and a<br />
release cable to operate the shutter.<br />
It’s worth noting that some traditional<br />
long exposure effects, like star trails, are<br />
often easier to achieve by taking multiple<br />
short exposure sequential shots and<br />
combining them in post-production.<br />
4. The Thirds rule<br />
This notion might seem highly unscientific,<br />
but humans like the composition of things<br />
where objects and transitions happen at<br />
approximately one third from the sides of<br />
the image, vertically and horizontally.<br />
Known as the ‘rule of thirds’, photography<br />
students are taught to place those things<br />
they’d like the viewer to focus on along<br />
these lines and the intersections between<br />
the horizontal and vertical lines.<br />
To help in this most cameras will provide a<br />
grid, though oddly most DSLR cameras have<br />
a grid with quarters or ‘fourths’, not thirds.<br />
(Most smartphone camera apps also have<br />
a grid overlay which can be enabled.)<br />
The answer for DSLRs is to buy an<br />
extra screen protector and mark it with<br />
your own ‘thirds’ lines, solving the problem<br />
for minimal outlay.<br />
On some cameras, it is possible to<br />
replace the focusing screen element with<br />
one marked with thirds. But that isn’t an<br />
exercise for the faint-hearted, and these<br />
replacements cost much more than a<br />
plastic screen protector. Many images have<br />
symmetry where important elements seem<br />
to align with the rule of thirds, even if some<br />
people don’t accept it’s a thing.<br />
5. Thirds on Photoshop<br />
If you want to see a ‘thirds’ grid overlaying<br />
any image in Photoshop (see below),<br />
here’s the procedure:<br />
The rule of thirds<br />
• Open Photoshop<br />
• Press Ctrl-K (Alt-K on the Mac)<br />
• Select ‘Guides, Grid & Slices’<br />
• Set Gridline Every to ‘100’ and ‘Percent’<br />
• Set subdivisions to 3<br />
Make sure that Grid is ‘shown’, and you’ll<br />
see where the thirds are on any image.<br />
6. How to shoot sunsets<br />
Great sunset shots are about preparation,<br />
and not just being there when the sun goes<br />
down. But first, be safe. Always use ‘live<br />
view’ on the camera display and not direct<br />
or optical viewing, as you can damage your<br />
eyesight should the clouds suddenly part.<br />
Those wanting to shoot the setting sun<br />
in detail will need at least a 200mm lens,<br />
and a tripod to avoid camera shake or<br />
high grain (ISO 800 or higher) images.<br />
Those who want to capture a landscape<br />
at sunset have two basic options; accept<br />
a silhouette or use multiple combined<br />
exposures. In a silhouetted sky that region<br />
becomes the critical exposure concern.<br />
Unless you’ve got lots of water to reflect<br />
it. Alternatively, you can shoot bracketed<br />
exposures to bring out the detail and<br />
colour in the landscape lost on those<br />
frames where the sun and sky look amazing.<br />
The best modes for sunset shots are<br />
either with an aperture or shutter priority.<br />
Pick one of these and then keep adjusting<br />
82 www.pcadvisor.co.uk/features <strong>July</strong> <strong>2017</strong>


