


You also want an ePaper? Increase the reach of your titles
YUMPU automatically turns print PDFs into web optimized ePapers that Google loves.
HOW TO<br />
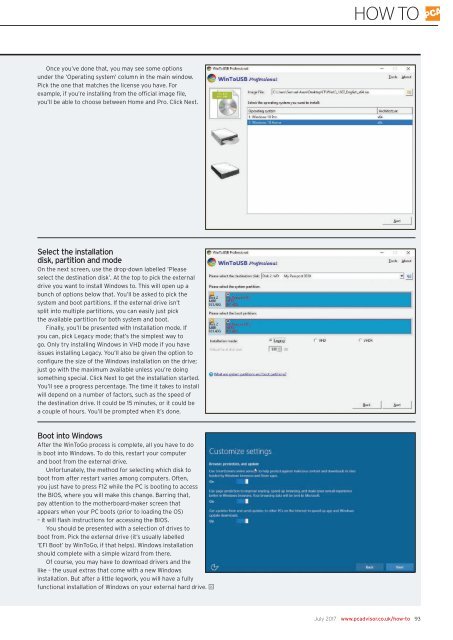
Once you’ve done that, you may see some options<br />
under the ‘Operating system’ column in the main window.<br />
Pick the one that matches the license you have. For<br />
example, if you’re installing from the official image file,<br />
you’ll be able to choose between Home and Pro. Click Next.<br />
Select the installation<br />
disk, partition and mode<br />
On the next screen, use the drop-down labelled ‘Please<br />
select the destination disk’. At the top to pick the external<br />
drive you want to install Windows to. This will open up a<br />
bunch of options below that. You’ll be asked to pick the<br />
system and boot partitions. If the external drive isn’t<br />
split into multiple partitions, you can easily just pick<br />
the available partition for both system and boot.<br />
Finally, you’ll be presented with Installation mode. If<br />
you can, pick Legacy mode; that’s the simplest way to<br />
go. Only try installing Windows in VHD mode if you have<br />
issues installing Legacy. You’ll also be given the option to<br />
configure the size of the Windows installation on the drive;<br />
just go with the maximum available unless you’re doing<br />
something special. Click Next to get the installation started.<br />
You’ll see a progress percentage. The time it takes to install<br />
will depend on a number of factors, such as the speed of<br />
the destination drive. It could be 15 minutes, or it could be<br />
a couple of hours. You’ll be prompted when it’s done.<br />
Boot into Windows<br />
After the WinToGo process is complete, all you have to do<br />
is boot into Windows. To do this, restart your computer<br />
and boot from the external drive.<br />
Unfortunately, the method for selecting which disk to<br />
boot from after restart varies among computers. Often,<br />
you just have to press F12 while the <strong>PC</strong> is booting to access<br />
the BIOS, where you will make this change. Barring that,<br />
pay attention to the motherboard-maker screen that<br />
appears when your <strong>PC</strong> boots (prior to loading the OS)<br />
– it will flash instructions for accessing the BIOS.<br />
You should be presented with a selection of drives to<br />
boot from. Pick the external drive (it’s usually labelled<br />
‘EFI Boot’ by WinToGo, if that helps). Windows installation<br />
should complete with a simple wizard from there.<br />
Of course, you may have to download drivers and the<br />
like – the usual extras that come with a new Windows<br />
installation. But after a little legwork, you will have a fully<br />
functional installation of Windows on your external hard drive. J<br />
<strong>July</strong> <strong>2017</strong> www.pcadvisor.co.uk/how-to 93


