GA-K8VM800M / GA-K8VM800M-RH - visit site - Gigabyte
GA-K8VM800M / GA-K8VM800M-RH - visit site - Gigabyte
GA-K8VM800M / GA-K8VM800M-RH - visit site - Gigabyte

Create successful ePaper yourself
Turn your PDF publications into a flip-book with our unique Google optimized e-Paper software.
English<br />
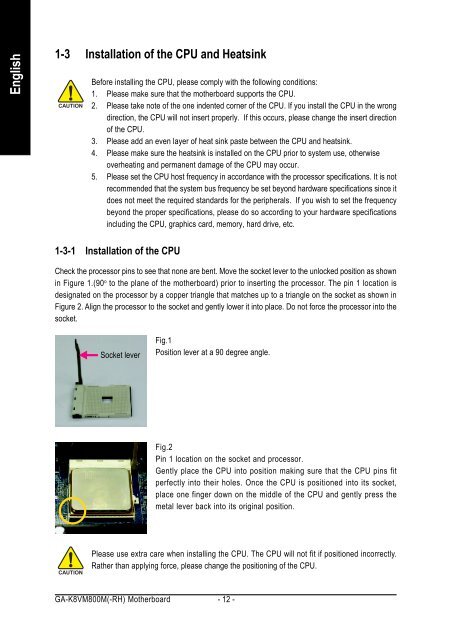
1-3 Installation of the CPU and Heatsink<br />
Before installing the CPU, please comply with the following conditions:<br />
1. Please make sure that the motherboard supports the CPU.<br />
2. Please take note of the one indented corner of the CPU. If you install the CPU in the wrong<br />
direction, the CPU will not insert properly. If this occurs, please change the insert direction<br />
of the CPU.<br />
3. Please add an even layer of heat sink paste between the CPU and heatsink.<br />
4. Please make sure the heatsink is installed on the CPU prior to system use, otherwise<br />
overheating and permanent damage of the CPU may occur.<br />
5. Please set the CPU host frequency in accordance with the processor specifications. It is not<br />
recommended that the system bus frequency be set beyond hardware specifications since it<br />
does not meet the required standards for the peripherals. If you wish to set the frequency<br />
beyond the proper specifications, please do so according to your hardware specifications<br />
including the CPU, graphics card, memory, hard drive, etc.<br />
1-3-1 Installation of the CPU<br />
Check the processor pins to see that none are bent. Move the socket lever to the unlocked position as shown<br />
in Figure 1.(90 o to the plane of the motherboard) prior to inserting the processor. The pin 1 location is<br />
designated on the processor by a copper triangle that matches up to a triangle on the socket as shown in<br />
Figure 2. Align the processor to the socket and gently lower it into place. Do not force the processor into the<br />
socket.<br />
Socket lever<br />
Fig.1<br />
Position lever at a 90 degree angle.<br />
<strong>GA</strong>-<strong>K8VM800M</strong>(-<strong>RH</strong>) Motherboard - 12 -<br />
Fig.2<br />
Pin 1 location on the socket and processor.<br />
Gently place the CPU into position making sure that the CPU pins fit<br />
perfectly into their holes. Once the CPU is positioned into its socket,<br />
place one finger down on the middle of the CPU and gently press the<br />
metal lever back into its original position.<br />
Please use extra care when installing the CPU. The CPU will not fit if positioned incorrectly.<br />
Rather than applying force, please change the positioning of the CPU.