GA-K8VM800M / GA-K8VM800M-RH - visit site - Gigabyte
GA-K8VM800M / GA-K8VM800M-RH - visit site - Gigabyte
GA-K8VM800M / GA-K8VM800M-RH - visit site - Gigabyte

Create successful ePaper yourself
Turn your PDF publications into a flip-book with our unique Google optimized e-Paper software.
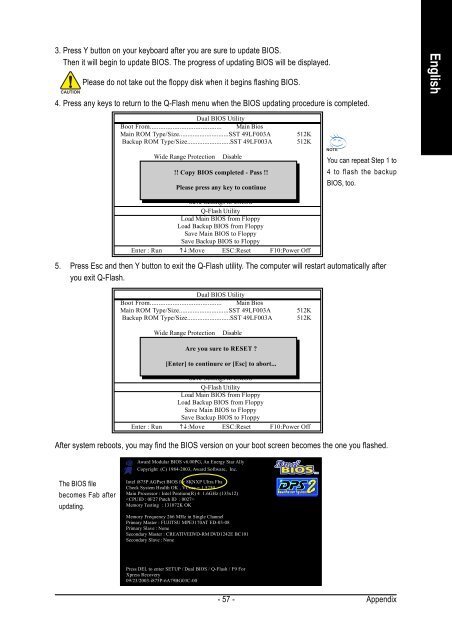
3. Press Y button on your keyboard after you are sure to update BIOS.<br />
Then it will begin to update BIOS. The progress of updating BIOS will be displayed.<br />
Please do not take out the floppy disk when it begins flashing BIOS.<br />
4. Press any keys to return to the Q-Flash menu when the BIOS updating procedure is completed.<br />
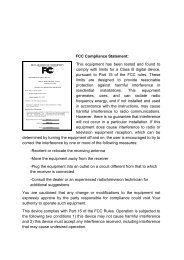
Dual BIOS Utility<br />
Boot From......................................... Main Bios<br />
Main ROM Type/Size.............................SST 49LF003A 512K<br />
Backup ROM Type/Size.........................SST 49LF003A 512K<br />
Wide Range Protection<br />
Boot From<br />
Disable<br />
Main Bios<br />
You can repeat Step 1 to<br />
!! Auto Copy Recovery BIOS completed Enable - Pass !!<br />
4 to flash the backup<br />
Halt On Error Disable<br />
Copy Please Main press ROM any Data key to continue Backup<br />
Load Default Settings<br />
Save Settings to CMOS<br />
Q-Flash Utility<br />
Load Main BIOS from Floppy<br />
Load Backup BIOS from Floppy<br />
Save Main BIOS to Floppy<br />
Save Backup BIOS to Floppy<br />
Enter : Run ��:Move ESC:Reset F10:Power Off<br />
BIOS, too.<br />
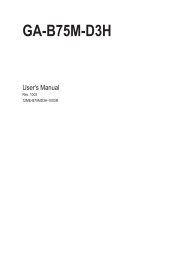
5. Press Esc and then Y button to exit the Q-Flash utility. The computer will restart automatically after<br />
you exit Q-Flash.<br />
Dual BIOS Utility<br />
Boot From......................................... Main Bios<br />
Main ROM Type/Size.............................SST 49LF003A 512K<br />
Backup ROM Type/Size.........................SST 49LF003A 512K<br />
Wide Range Protection Disable<br />
Boot From Main Bios<br />
Auto Are Recovery you sure Enable to RESET ?<br />
Halt On Error Disable<br />
[Enter] Copy to Main continure ROM Data or [Esc] to Backup to abort...<br />
Load Default Settings<br />
Save Settings to CMOS<br />
Q-Flash Utility<br />
Load Main BIOS from Floppy<br />
Load Backup BIOS from Floppy<br />
Save Main BIOS to Floppy<br />
Save Backup BIOS to Floppy<br />
Enter : Run ��:Move ESC:Reset F10:Power Off<br />
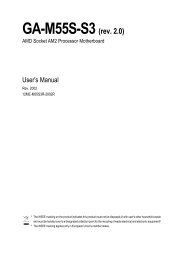
After system reboots, you may find the BIOS version on your boot screen becomes the one you flashed.<br />
The BIOS file<br />
becomes Fab after<br />
updating.<br />
Award Modular BIOS v6.00PG, An Energy Star Ally<br />
Copyright (C) 1984-2003, Award Software, Inc.<br />
Intel i875P AGPset BIOS for 8KNXP Ultra Fba<br />
Check System Health OK , VCore = 1.5250<br />
Main Processor : Intel Pentium(R) 4 1.6GHz (133x12)<br />
<br />
Memory Testing : 131072K OK<br />
Memory Frequency 266 MHz in Single Channel<br />
Primary Master : FUJITSU MPE3170AT ED-03-08<br />
Primary Slave : None<br />
Secondary Master : CREATIVEDVD-RM DVD1242E BC101<br />
Secondary Slave : None<br />
Press DEL to enter SETUP / Dual BIOS / Q-Flash / F9 For<br />
Xpress Recovery<br />
09/23/2003-i875P-6A79BG03C-00<br />
- 57 -<br />
Appendix<br />
English