GA-K8VM800M / GA-K8VM800M-RH - visit site - Gigabyte
GA-K8VM800M / GA-K8VM800M-RH - visit site - Gigabyte
GA-K8VM800M / GA-K8VM800M-RH - visit site - Gigabyte

You also want an ePaper? Increase the reach of your titles
YUMPU automatically turns print PDFs into web optimized ePapers that Google loves.
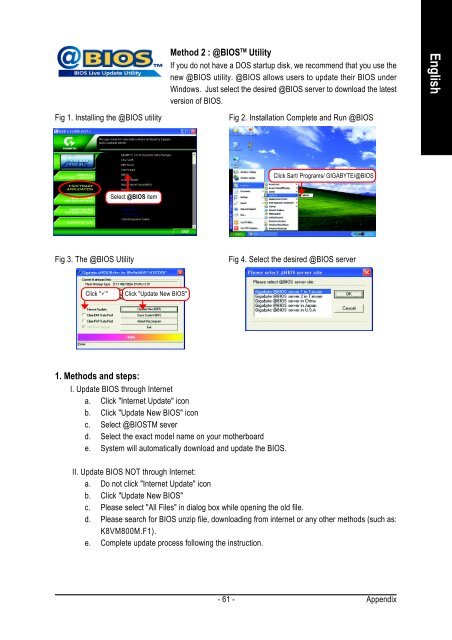
Method 2 : @BIOS TM Utility<br />
If you do not have a DOS startup disk, we recommend that you use the<br />
new @BIOS utility. @BIOS allows users to update their BIOS under<br />
Windows. Just select the desired @BIOS server to download the latest<br />
version of BIOS.<br />
Fig 1. Installing the @BIOS utility Fig 2. Installation Complete and Run @BIOS<br />
Select @BIOS item<br />
Fig 3. The @BIOS Utility Fig 4. Select the desired @BIOS server<br />
Click "�" Click "Update New BIOS"<br />
1. Methods and steps:<br />
I. Update BIOS through Internet<br />
a. Click "Internet Update" icon<br />
b. Click "Update New BIOS" icon<br />
c. Select @BIOSTM sever<br />
d. Select the exact model name on your motherboard<br />
e. System will automatically download and update the BIOS.<br />
II. Update BIOS NOT through Internet:<br />
a. Do not click "Internet Update" icon<br />
b. Click "Update New BIOS"<br />
c. Please select "All Files" in dialog box while opening the old file.<br />
d. Please search for BIOS unzip file, downloading from internet or any other methods (such as:<br />
<strong>K8VM800M</strong>.F1).<br />
e. Complete update process following the instruction.<br />
- 61 -<br />
Click Sart/ Programs/ GI<strong>GA</strong>BYTE/@BIOS<br />
Appendix<br />
English