GA-K8VM800M / GA-K8VM800M-RH - visit site - Gigabyte
GA-K8VM800M / GA-K8VM800M-RH - visit site - Gigabyte
GA-K8VM800M / GA-K8VM800M-RH - visit site - Gigabyte

Create successful ePaper yourself
Turn your PDF publications into a flip-book with our unique Google optimized e-Paper software.
English<br />
Please follow the steps below to construct a complete RAID array:<br />
1) Have ready your hard drives for RAID construction.<br />
Note: To achieve best performance, it is recommended that the hard drives used are of similar make<br />
and storage capacity.<br />
2) Please attach the hard drive connectors to their appropriate location on the motherboard ie. IDE, SCSI,<br />
or SATA.<br />
3) Enter the motherboard BIOS and locate RAID setup (Please refer to the section on Integrated Peripherals).<br />
4) Enter RAID setup in the BIOS and select the RAID type (For instance, enter Tab to select<br />
VT8237R / VT8237R+ RAID; Ctrl + S to select Silicon Image).<br />
5) Complete driver installation.<br />
6) Complete RAID utility installation.<br />
More information on steps 4 and 5 is provided. (For more detailed setup information, please <strong>visit</strong> our web<strong>site</strong><br />
at http:\\www.gigabyte.com.tw to read or download the information you need.)<br />
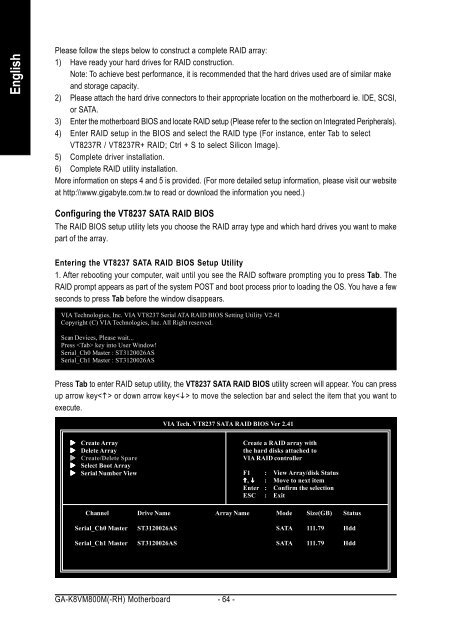
Configuring the VT8237 SATA RAID BIOS<br />
The RAID BIOS setup utility lets you choose the RAID array type and which hard drives you want to make<br />
part of the array.<br />
Entering the VT8237 SATA RAID BIOS Setup Utility<br />
1. After rebooting your computer, wait until you see the RAID software prompting you to press Tab. The<br />
RAID prompt appears as part of the system POST and boot process prior to loading the OS. You have a few<br />
seconds to press Tab before the window disappears.<br />
VIA Technologies, Inc. VIA VT8237 Serial ATA RAID BIOS Setting Utility V2.41<br />
Copyright (C) VIA Technologies, Inc. All Right reserved.<br />
Scan Devices, Please wait...<br />
Press key into User Window!<br />
Serial_Ch0 Master : ST3120026AS<br />
Serial_Ch1 Master : ST3120026AS<br />
Press Tab to enter RAID setup utility, the VT8237 SATA RAID BIOS utility screen will appear. You can press<br />
up arrow key or down arrow key to move the selection bar and select the item that you want to<br />
execute.<br />
����� Create Array<br />
����� Delete Array<br />
����� Create/Delete Spare<br />
����� Select Boot Array<br />
����� Serial Number View<br />
VIA Tech. VT8237 SATA RAID BIOS Ver 2.41<br />
Channel Drive Name Array Name Mode Size(GB) Status<br />
Serial_Ch0 Master ST3120026AS SATA 111.79 Hdd<br />
Serial_Ch1 Master ST3120026AS SATA 111.79 Hdd<br />
<strong>GA</strong>-<strong>K8VM800M</strong>(-<strong>RH</strong>) Motherboard - 64 -<br />
Create a RAID array with<br />
the hard disks attached to<br />
VIA RAID controller<br />
F1 : View Array/disk Status<br />
�����, ����� : Move to next item<br />
Enter : Confirm the selection<br />
ESC : Exit