GA-K8VM800M / GA-K8VM800M-RH - visit site - Gigabyte
GA-K8VM800M / GA-K8VM800M-RH - visit site - Gigabyte
GA-K8VM800M / GA-K8VM800M-RH - visit site - Gigabyte

You also want an ePaper? Increase the reach of your titles
YUMPU automatically turns print PDFs into web optimized ePapers that Google loves.
English<br />
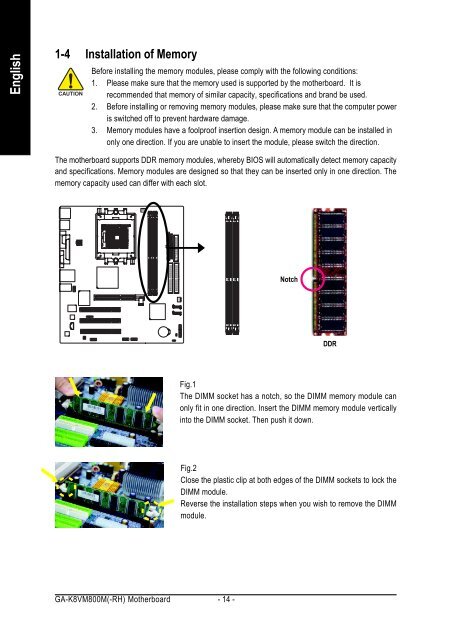
1-4 Installation of Memory<br />
Before installing the memory modules, please comply with the following conditions:<br />
1. Please make sure that the memory used is supported by the motherboard. It is<br />
recommended that memory of similar capacity, specifications and brand be used.<br />
2. Before installing or removing memory modules, please make sure that the computer power<br />
is switched off to prevent hardware damage.<br />
3. Memory modules have a foolproof insertion design. A memory module can be installed in<br />
only one direction. If you are unable to insert the module, please switch the direction.<br />
The motherboard supports DDR memory modules, whereby BIOS will automatically detect memory capacity<br />
and specifications. Memory modules are designed so that they can be inserted only in one direction. The<br />
memory capacity used can differ with each slot.<br />
<strong>GA</strong>-<strong>K8VM800M</strong>(-<strong>RH</strong>) Motherboard - 14 -<br />
Notch<br />
DDR<br />
Fig.1<br />
The DIMM socket has a notch, so the DIMM memory module can<br />
only fit in one direction. Insert the DIMM memory module vertically<br />
into the DIMM socket. Then push it down.<br />
Fig.2<br />
Close the plastic clip at both edges of the DIMM sockets to lock the<br />
DIMM module.<br />
Reverse the installation steps when you wish to remove the DIMM<br />
module.