GA-K8VM800M / GA-K8VM800M-RH - visit site - Gigabyte
GA-K8VM800M / GA-K8VM800M-RH - visit site - Gigabyte
GA-K8VM800M / GA-K8VM800M-RH - visit site - Gigabyte

You also want an ePaper? Increase the reach of your titles
YUMPU automatically turns print PDFs into web optimized ePapers that Google loves.
English<br />
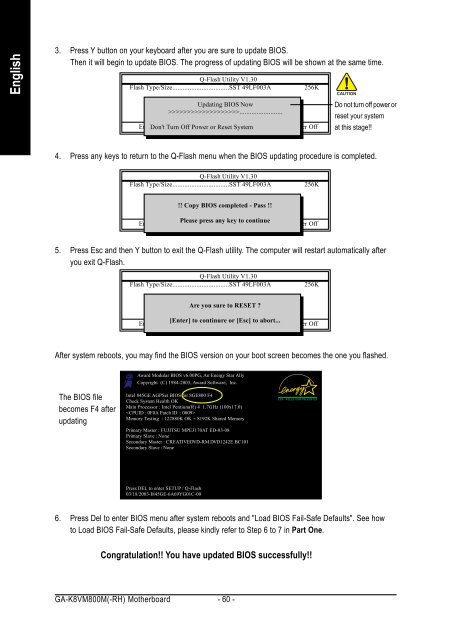
3. Press Y button on your keyboard after you are sure to update BIOS.<br />
Then it will begin to update BIOS. The progress of updating BIOS will be shown at the same time.<br />
Q-Flash Utility V1.30<br />
Flash Type/Size.................................SST 49LF003A 256K<br />
Keep DMI Updating Data BIOS Enable Now<br />
>>>>>>>>>>>>>>>>>>>.........................<br />
Update BIOS from Floppy<br />
Save BIOS to Floppy<br />
Enter Don't : Run Turn Off ��:Move Power or Reset ESC:Reset System F10:Power Off<br />
<strong>GA</strong>-<strong>K8VM800M</strong>(-<strong>RH</strong>) Motherboard - 60 -<br />
Do not turn off power or<br />
reset your system<br />
at this stage!!<br />
4. Press any keys to return to the Q-Flash menu when the BIOS updating procedure is completed.<br />
Q-Flash Utility V1.30<br />
Flash Type/Size.................................SST 49LF003A 256K<br />
Keep DMI Data Enable<br />
!! Copy Update BIOS BIOS completed from Floppy - Pass !!<br />
Save BIOS to Floppy<br />
Enter : Run<br />
Please<br />
��:Move<br />
press any key<br />
ESC:Reset<br />
to continue<br />
F10:Power Off<br />
5. Press Esc and then Y button to exit the Q-Flash utility. The computer will restart automatically after<br />
you exit Q-Flash.<br />
Q-Flash Utility V1.30<br />
Flash Type/Size.................................SST 49LF003A 256K<br />
Keep DMI Data Enable<br />
Are Update you sure BIOS to from RESET Floppy ?<br />
Save BIOS to Floppy<br />
[Enter] to continure or [Esc] to abort...<br />
Enter : Run ��:Move ESC:Reset F10:Power Off<br />
After system reboots, you may find the BIOS version on your boot screen becomes the one you flashed.<br />
The BIOS file<br />
becomes F4 after<br />
updating<br />
Award Modular BIOS v6.00PG, An Energy Star Ally<br />
Copyright (C) 1984-2003, Award Software, Inc.<br />
Intel 845GE AGPSet BIOS for 8GE800 F4<br />
Check System Health OK<br />
Main Processor : Intel Pentium(R) 4 1.7GHz (100x17.0)<br />
<br />
Memory Testing : 122880K OK + 8192K Shared Memory<br />
Primary Master : FUJITSU MPE3170AT ED-03-08<br />
Primary Slave : None<br />
Secondary Master : CREATIVEDVD-RM DVD1242E BC101<br />
Secondary Slave : None<br />
Press DEL to enter SETUP / Q-Flash<br />
03/18/2003-I845GE-6A69YG01C-00<br />
6. Press Del to enter BIOS menu after system reboots and "Load BIOS Fail-Safe Defaults". See how<br />
to Load BIOS Fail-Safe Defaults, please kindly refer to Step 6 to 7 in Part One.<br />
Congratulation!! You have updated BIOS successfully!!