GA-K8VM800M / GA-K8VM800M-RH - visit site - Gigabyte
GA-K8VM800M / GA-K8VM800M-RH - visit site - Gigabyte
GA-K8VM800M / GA-K8VM800M-RH - visit site - Gigabyte

You also want an ePaper? Increase the reach of your titles
YUMPU automatically turns print PDFs into web optimized ePapers that Google loves.
English<br />
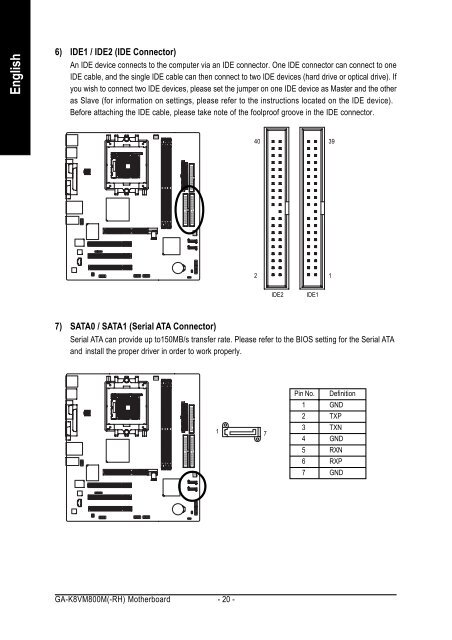
6) IDE1 / IDE2 (IDE Connector)<br />
An IDE device connects to the computer via an IDE connector. One IDE connector can connect to one<br />
IDE cable, and the single IDE cable can then connect to two IDE devices (hard drive or optical drive). If<br />
you wish to connect two IDE devices, please set the jumper on one IDE device as Master and the other<br />
as Slave (for information on settings, please refer to the instructions located on the IDE device).<br />
Before attaching the IDE cable, please take note of the foolproof groove in the IDE connector.<br />
7) SATA0 / SATA1 (Serial ATA Connector)<br />
Serial ATA can provide up to150MB/s transfer rate. Please refer to the BIOS setting for the Serial ATA<br />
and install the proper driver in order to work properly.<br />
<strong>GA</strong>-<strong>K8VM800M</strong>(-<strong>RH</strong>) Motherboard - 20 -<br />
40<br />
2<br />
1 7<br />
IDE2 IDE1<br />
39<br />
Pin No. Definition<br />
1 GND<br />
2 TXP<br />
3 TXN<br />
4 GND<br />
5 RXN<br />
6 RXP<br />
7 GND<br />
1