PCI TriManual-Intro - Sonnet Technologies
PCI TriManual-Intro - Sonnet Technologies
PCI TriManual-Intro - Sonnet Technologies

Create successful ePaper yourself
Turn your PDF publications into a flip-book with our unique Google optimized e-Paper software.
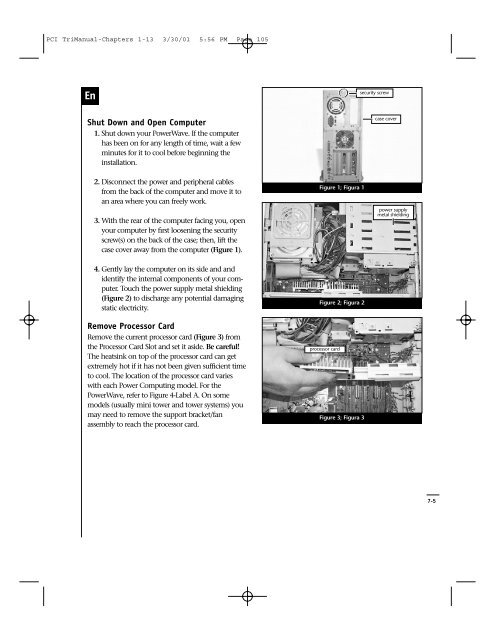
<strong>PCI</strong> <strong>TriManual</strong>-Chapters 1-13 3/30/01 5:56 PM Page 105<br />
En<br />
security screw<br />
Shut Down and Open Computer<br />
1. Shut down your PowerWave. If the computer<br />
has been on for any length of time, wait a few<br />
minutes for it to cool before beginning the<br />
installation.<br />
case cover<br />
2. Disconnect the power and peripheral cables<br />
from the back of the computer and move it to<br />
an area where you can freely work.<br />
3. With the rear of the computer facing you, open<br />
your computer by first loosening the security<br />
screw(s) on the back of the case; then, lift the<br />
case cover away from the computer (Figure 1).<br />
4. Gently lay the computer on its side and and<br />
identify the internal components of your computer.<br />
Touch the power supply metal shielding<br />
(Figure 2) to discharge any potential damaging<br />
static electricity.<br />
Remove Processor Card<br />
Remove the current processor card (Figure 3) from<br />
the Processor Card Slot and set it aside. Be careful!<br />
The heatsink on top of the processor card can get<br />
extremely hot if it has not been given sufficient time<br />
to cool. The location of the processor card varies<br />
with each Power Computing model. For the<br />
PowerWave, refer to Figure 4-Label A. On some<br />
models (usually mini tower and tower systems) you<br />
may need to remove the support bracket/fan<br />
assembly to reach the processor card.<br />
Figure 1; Figura 1<br />
Figure 2; Figura 2<br />
processor card<br />
Figure 3; Figura 3<br />
power supply<br />
metal shielding<br />
7-5