PCI TriManual-Intro - Sonnet Technologies
PCI TriManual-Intro - Sonnet Technologies
PCI TriManual-Intro - Sonnet Technologies

You also want an ePaper? Increase the reach of your titles
YUMPU automatically turns print PDFs into web optimized ePapers that Google loves.
<strong>PCI</strong> <strong>TriManual</strong>-Chapters 1-13 3/30/01 5:56 PM Page 77<br />
En<br />
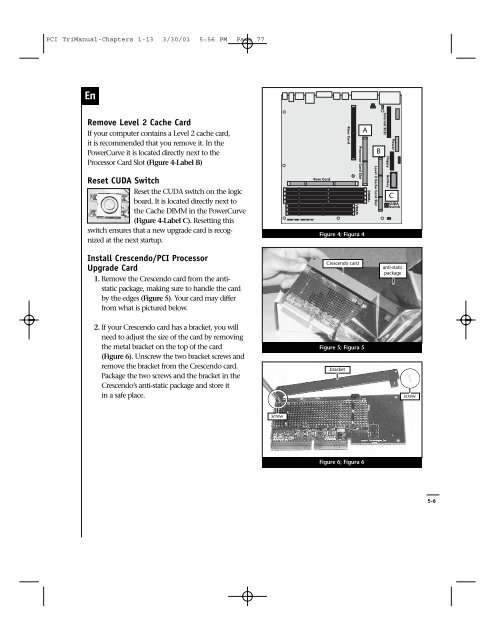
Remove Level 2 Cache Card<br />
If your computer contains a Level 2 cache card,<br />
it is recommended that you remove it. In the<br />
PowerCurve it is located directly next to the<br />
Processor Card Slot (Figure 4-Label B)<br />
A<br />
B<br />
Reset CUDA Switch<br />
Reset the CUDA switch on the logic<br />
board. It is located directly next to<br />
the Cache DIMM in the PowerCurve<br />
(Figure 4-Label C). Resetting this<br />
switch ensures that a new upgrade card is recognized<br />
at the next startup.<br />
Install Crescendo/<strong>PCI</strong> Processor<br />
Upgrade Card<br />
1. Remove the Crescendo card from the antistatic<br />
package, making sure to handle the card<br />
by the edges (Figure 5). Your card may differ<br />
from what is pictured below.<br />
Figure 4; Figura 4<br />
Crescendo card<br />
C<br />
anti-static<br />
package<br />
2. If your Crescendo card has a bracket, you will<br />
need to adjust the size of the card by removing<br />
the metal bracket on the top of the card<br />
(Figure 6). Unscrew the two bracket screws and<br />
remove the bracket from the Crescendo card.<br />
Package the two screws and the bracket in the<br />
Crescendo’s anti-static package and store it<br />
in a safe place.<br />
Figure 5; Figura 5<br />
bracket<br />
screw<br />
screw<br />
Figure 6; Figura 6<br />
5-6