PCI TriManual-Intro - Sonnet Technologies
PCI TriManual-Intro - Sonnet Technologies
PCI TriManual-Intro - Sonnet Technologies

Create successful ePaper yourself
Turn your PDF publications into a flip-book with our unique Google optimized e-Paper software.
<strong>PCI</strong> <strong>TriManual</strong>-Chapters 1-13 3/30/01 5:55 PM Page 45<br />
En<br />
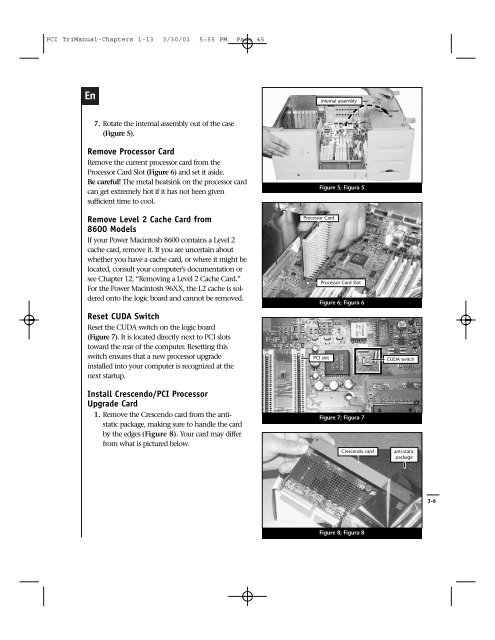
internal assembly<br />
7. Rotate the internal assembly out of the case<br />
(Figure 5).<br />
Remove Processor Card<br />
Remove the current processor card from the<br />
Processor Card Slot (Figure 6) and set it aside.<br />
Be careful! The metal heatsink on the processor card<br />
can get extremely hot if it has not been given<br />
sufficient time to cool.<br />
Remove Level 2 Cache Card from<br />
8600 Models<br />
If your Power Macintosh 8600 contains a Level 2<br />
cache card, remove it. If you are uncertain about<br />
whether you have a cache card, or where it might be<br />
located, consult your computer’s documentation or<br />
see Chapter 12, “Removing a Level 2 Cache Card.”<br />
For the Power Macintosh 96XX, the L2 cache is soldered<br />
onto the logic board and cannot be removed.<br />
Reset CUDA Switch<br />
Reset the CUDA switch on the logic board<br />
(Figure 7). It is located directly next to <strong>PCI</strong> slots<br />
toward the rear of the computer. Resetting this<br />
switch ensures that a new processor upgrade<br />
installed into your computer is recognized at the<br />
next startup.<br />
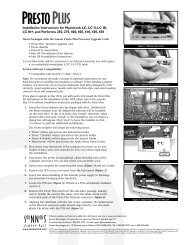
Install Crescendo/<strong>PCI</strong> Processor<br />
Upgrade Card<br />
1. Remove the Crescendo card from the antistatic<br />
package, making sure to handle the card<br />
by the edges (Figure 8). Your card may differ<br />
from what is pictured below.<br />
Figure 5; Figura 5<br />
Processor Card<br />
Processor Card Slot<br />
Figure 6; Figura 6<br />
<strong>PCI</strong> slot<br />
Figure 7; Figura 7<br />
Crescendo card<br />
CUDA switch<br />
anti-static<br />
package<br />
3-6<br />
Figure 8; Figura 8