PCI TriManual-Intro - Sonnet Technologies
PCI TriManual-Intro - Sonnet Technologies
PCI TriManual-Intro - Sonnet Technologies

Create successful ePaper yourself
Turn your PDF publications into a flip-book with our unique Google optimized e-Paper software.
<strong>PCI</strong> <strong>TriManual</strong>-Chapters 1-13 3/30/01 5:55 PM Page 29<br />
En<br />
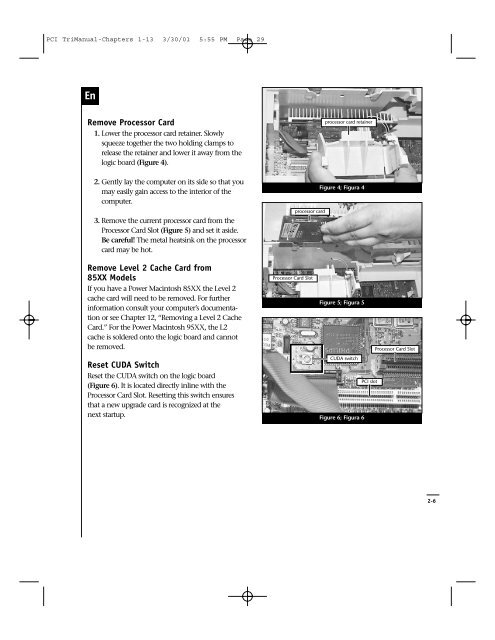
Remove Processor Card<br />
1. Lower the processor card retainer. Slowly<br />
squeeze together the two holding clamps to<br />
release the retainer and lower it away from the<br />
logic board (Figure 4).<br />
2. Gently lay the computer on its side so that you<br />
may easily gain access to the interior of the<br />
computer.<br />
3. Remove the current processor card from the<br />
Processor Card Slot (Figure 5) and set it aside.<br />
Be careful! The metal heatsink on the processor<br />
card may be hot.<br />
processor card<br />
processor card retainer<br />
Figure 4; Figura 4<br />
Remove Level 2 Cache Card from<br />
85XX Models<br />
If you have a Power Macintosh 85XX the Level 2<br />
cache card will need to be removed. For further<br />
information consult your computer’s documentation<br />
or see Chapter 12, “Removing a Level 2 Cache<br />
Card.” For the Power Macintosh 95XX, the L2<br />
cache is soldered onto the logic board and cannot<br />
be removed.<br />
Reset CUDA Switch<br />
Reset the CUDA switch on the logic board<br />
(Figure 6). It is located directly inline with the<br />
Processor Card Slot. Resetting this switch ensures<br />
that a new upgrade card is recognized at the<br />
next startup.<br />
Processor Card Slot<br />
Figure 5; Figura 5<br />
Processor Card Slot<br />
CUDA switch<br />
<strong>PCI</strong> slot<br />
Figure 6; Figura 6<br />
2-6