

Pioneer KRL-32V - User manual - allemand, anglais, espagnol, français, italien, néerlandais, russe
Pioneer KRL-32V - User manual - allemand, anglais, espagnol, français, italien, néerlandais, russe
Pioneer KRL-32V - User manual - allemand, anglais, espagnol, français, italien, néerlandais, russe

You also want an ePaper? Increase the reach of your titles
YUMPU automatically turns print PDFs into web optimized ePapers that Google loves.
Preparation<br />
Installation precautions<br />
Observe the following precautions when installing with<br />
any items such as the optional stand.<br />
When using other stands, brackets or equivalent<br />
items<br />
• Consult your dealer.<br />
• The following mounting holes can be used for the<br />
installation.<br />
Rear view<br />
(<strong>KRL</strong>-37V)<br />
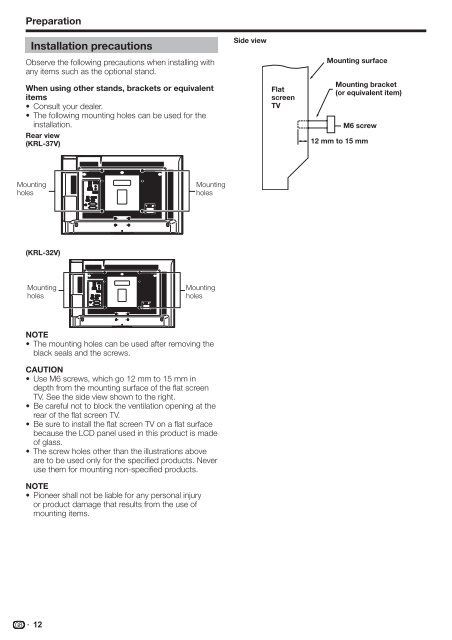
Side view<br />
Flat<br />
screen<br />
TV<br />
Mounting surface<br />
Mounting bracket<br />
(or equivalent item)<br />
M6 screw<br />
12 mm to 15 mm<br />
Mounting<br />
holes<br />
Mounting<br />
holes<br />
(<strong>KRL</strong>-<strong>32V</strong>)<br />
Mounting<br />
holes<br />
Mounting<br />
holes<br />
NOTE<br />
• The mounting holes can be used after removing the<br />
black seals and the screws.<br />
CAUTION<br />
• Use M6 screws, which go 12 mm to 15 mm in<br />
depth from the mounting surface of the flat screen<br />
TV. See the side view shown to the right.<br />
• Be careful not to block the ventilation opening at the<br />
rear of the flat screen TV.<br />
• Be sure to install the flat screen TV on a flat surface<br />
because the LCD panel used in this product is made<br />
of glass.<br />
• The screw holes other than the illustrations above<br />
are to be used only for the specified products. Never<br />
use them for mounting non-specified products.<br />
NOTE<br />
• <strong>Pioneer</strong> shall not be liable for any personal injury<br />
or product damage that results from the use of<br />
mounting items.<br />
12


