

Pioneer KRL-32V - User manual - allemand, anglais, espagnol, français, italien, néerlandais, russe
Pioneer KRL-32V - User manual - allemand, anglais, espagnol, français, italien, néerlandais, russe
Pioneer KRL-32V - User manual - allemand, anglais, espagnol, français, italien, néerlandais, russe

You also want an ePaper? Increase the reach of your titles
YUMPU automatically turns print PDFs into web optimized ePapers that Google loves.
HDMI CONTROL<br />
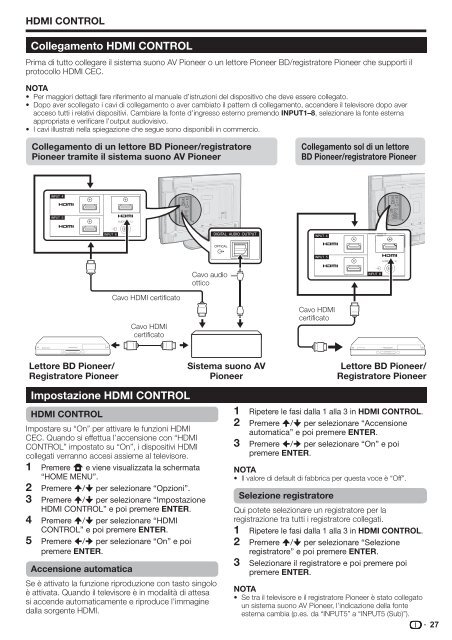
Collegamento HDMI CONTROL<br />
Prima di tutto collegare il sistema suono AV <strong>Pioneer</strong> o un lettore <strong>Pioneer</strong> BD/registratore <strong>Pioneer</strong> che supporti il<br />
protocollo HDMI CEC.<br />
NOTA<br />
• Per maggiori dettagli fare riferimento al <strong>manual</strong>e d’istruzioni del dispositivo che deve essere collegato.<br />
• Dopo aver scollegato i cavi di collegamento o aver cambiato il pattern di collegamento, accendere il televisore dopo aver<br />
acceso tutti i relativi dispositivi. Cambiare la fonte d’ingresso esterno premendo INPUT1–8, selezionare la fonte esterna<br />
appropriata e verificare l’output audiovisivo.<br />
• I cavi illustrati nella spiegazione che segue sono disponibili in commercio.<br />
Collegamento di un lettore BD <strong>Pioneer</strong>/registratore<br />
<strong>Pioneer</strong> tramite il sistema suono AV <strong>Pioneer</strong><br />
Collegamento sol di un lettore<br />
BD <strong>Pioneer</strong>/registratore <strong>Pioneer</strong><br />
Cavo audio<br />
ottico<br />
Cavo HDMI certificato<br />
Cavo HDMI<br />
certificato<br />
Cavo HDMI<br />
certificato<br />
Lettore BD <strong>Pioneer</strong>/<br />
Registratore <strong>Pioneer</strong><br />
Sistema suono AV<br />
<strong>Pioneer</strong><br />
Lettore BD <strong>Pioneer</strong>/<br />
Registratore <strong>Pioneer</strong><br />
HDMI CONTROL<br />
Impostare su “On” per attivare le funzioni HDMI<br />
CEC. Quando si effettua l’accensione con “HDMI<br />
CONTROL” impostato su “On”, i dispositivi HDMI<br />
collegati verranno accesi assieme al televisore.<br />
1<br />
2<br />
3<br />
4<br />
5<br />
Impostazione HDMI CONTROL<br />
Premere h e viene visualizzata la schermata<br />
“HOME MENU”.<br />
Premere a/b per selezionare “Opzioni”.<br />
Premere a/b per selezionare “Impostazione<br />
HDMI CONTROL” e poi premere ENTER.<br />
Premere a/b per selezionare “HDMI<br />
CONTROL” e poi premere ENTER.<br />
Premere c/d per selezionare “On” e poi<br />
premere ENTER.<br />
Accensione automatica<br />
Se è attivato la funzione riproduzione con tasto singolo<br />
è attivata. Quando il televisore è in modalità di attesa<br />
si accende automaticamente e riproduce l’immagine<br />
dalla sorgente HDMI.<br />
1<br />
2<br />
3<br />
Ripetere le fasi dalla 1 alla 3 in HDMI CONTROL.<br />
Premere a/b per selezionare “Accensione<br />
automatica” e poi premere ENTER.<br />
Premere c/d per selezionare “On” e poi<br />
premere ENTER.<br />
NOTA<br />
• Il valore di default di fabbrica per questa voce è “Off”.<br />
Selezione registratore<br />
Qui potete selezionare un registratore per la<br />
registrazione tra tutti i registratore collegati.<br />
1<br />
2<br />
3<br />
Ripetere le fasi dalla 1 alla 3 in HDMI CONTROL.<br />
Premere a/b per selezionare “Selezione<br />
registratore” e poi premere ENTER.<br />
Selezionare il registratore e poi premere poi<br />
premere ENTER.<br />
NOTA<br />
• Se tra il televisore e il registratore <strong>Pioneer</strong> è stato collegato<br />
un sistema suono AV <strong>Pioneer</strong>, l’indicazione della fonte<br />
esterna cambia (p.es. da “INPUT5” a “INPUT5 (Sub)”).<br />
27


