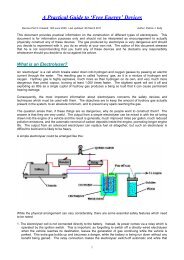
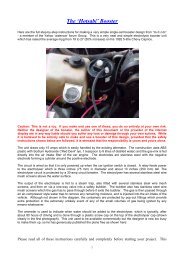
- Page 1 and 2:
JUAN AGUERO Patent Application EP04
- Page 3 and 4:
the exhaust manifold. This heats so
- Page 5 and 6:
combustion chambers. The hydrogen i
- Page 7 and 8:
21. The system of claim 20, charact
- Page 9 and 10:
electrolysis of water at such a rat
- Page 11 and 12:
Fig.4 is an elevation view of the h
- Page 13 and 14:
Fig.10 is a cross-section on the li
- Page 15 and 16:
Fig.16 is a cross-section on the li
- Page 17 and 18:
Fig.23 is an enlargement of part of
- Page 19 and 20:
Fig.33 is a perspective view of a v
- Page 21 and 22:
A - 843
- Page 23 and 24:
through a resistor R4 to provide tr
- Page 25 and 26:
The installation of the above circu
- Page 27 and 28:
cathode in the upper region of the
- Page 29 and 30:
transformer and, assuming an input
- Page 31 and 32:
valve apparatus to control engine s
- Page 33 and 34:
. a first hollow cylindrical electr
- Page 35 and 36:
CHRISTOPHER ECCLES UK Patent App. 2
- Page 37 and 38:
Fig.1 is a circuit diagram of fract
- Page 39 and 40:
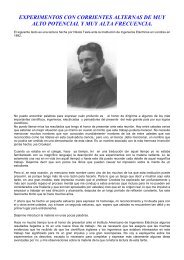
If a large electric field is applie
- Page 41 and 42:
The pulses R1 and S1 are of the sam
- Page 43 and 44:
DISCLOSURE OF THE INVENTION The inv
- Page 45 and 46:
A - 867
- Page 47 and 48:
Fig.5B shows a stylised representat
- Page 49 and 50:
Fig.6 shows a gas collection system
- Page 51 and 52:
Fig.8A and Fig.8B are views of a se
- Page 53 and 54:
A - 875
- Page 55 and 56:
Figs.16-30 are graphs supporting th
- Page 57 and 58:
A - 879
- Page 59 and 60:
A - 881
- Page 61 and 62:
A - 883
- Page 63 and 64:
A - 885
- Page 65 and 66:
A - 887
- Page 67 and 68:
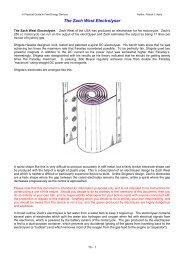
If it is the case that the hydrogen
- Page 69 and 70:
plate shown in Fig.1A and Fig.1B an
- Page 71 and 72:
is in equilibrium where the 10 watt
- Page 73 and 74:
The previously mentioned prior art
- Page 75 and 76:
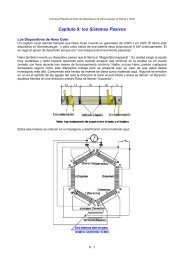
The stores of high pressure gases c
- Page 77 and 78:
unit to retain operational gas pres
- Page 79 and 80:
HENRY PAINE This is a very interest
- Page 81 and 82:
Henry Paine’s apparatus would the
- Page 83 and 84:
some form of distortion of space. I
- Page 85 and 86:
superconductive disk is made part o
- Page 87 and 88:
Fig.2A and Fig.2B are diagrams, pre
- Page 89 and 90:
Fig.4A and Fig.4B are diagrams, pre
- Page 91 and 92:
#1 hollow superconductive shield #2
- Page 93 and 94:
Fig.2B shows the counter-clockwise
- Page 95 and 96:
In this example, the difference bet
- Page 97 and 98:
CHARLES POGUE US Patent 642,434 12t
- Page 99 and 100:
Fig.3 is a horizontal sectional vie
- Page 101 and 102:
Fig.9 and Fig.10 are detail section
- Page 103 and 104:
having a valve 52 in it. Chamber 50
- Page 105 and 106:
CHARLES POGUE US Patent 1,997,497 9
- Page 107 and 108:
Fig.4 is a detail sectional view of
- Page 109 and 110:
A low-speed or idling jet 25 has it
- Page 111 and 112:
DESCRIPTION OF THE DRAWINGS Fig.1 i
- Page 113 and 114:
Fig.5 is a detail sectional view on
- Page 115 and 116:
Vapour formed by air bubbling throu
- Page 117 and 118:
From the foregoing description it w
- Page 119 and 120:
Fig.2 is an enlarged view of the de
- Page 121 and 122:
Fig.6 is a section taken along line
- Page 123 and 124:
ROBERT SHELTON US Patent 2,982,528
- Page 125 and 126:
Fig.4 is a transverse sectional vie
- Page 127 and 128:
HAROLD SCHWARTZ US Patent 3,294,381
- Page 129 and 130:
182,420 now abandoned. The present
- Page 131 and 132:
DESCRIPTION OF THE INVENTION The ca
- Page 133 and 134:
THOMAS OGLE US Patent 4,177,779 11t
- Page 135 and 136:
In accordance with other aspects of
- Page 137 and 138:
Fig.3 is a sectional view of the va
- Page 139 and 140:
Fig.7 is a partial side, partial se
- Page 141 and 142:
The cooling system of the vehicle c
- Page 143 and 144:
Upon initial starting of the engine
- Page 145 and 146:
(f) A filter positioned in the vapo
- Page 147 and 148:
with the magnitude of the current a
- Page 149 and 150:
Fig.1B is a perspective view of the
- Page 151 and 152:
Fig.3 is a top view of the motor of
- Page 153 and 154:
Fig.7 is an isometric view showing
- Page 155 and 156:
Fig.10 is a top view showing the ro
- Page 157 and 158:
Fig.13 is a top view of a pair of r
- Page 159 and 160:
Extending in opposite diametric dir
- Page 161 and 162:
Fig.5 shows the state of the switch
- Page 163 and 164:
otor magnets 42 - 49 when in the ho
- Page 165 and 166:
Fig.9 and Fig.10 show a second arra
- Page 167 and 168:
constructed otherwise than as speci
- Page 169 and 170: 12. The motor of claim 11 wherein t
- Page 171 and 172: timer or a control mechanism mounte
- Page 173 and 174: Fig.4 is a view similar to Fig.3 bu
- Page 175 and 176: Fig.10 is a view similar to Fig.3 f
- Page 177 and 178: Fig.13 is a schematic circuit diagr
- Page 179 and 180: Fig.16 is a simplified embodiment o
- Page 181 and 182: Fig.22 to Fig.25 are similar to Fig
- Page 183 and 184: Referring to Fig.2, the permanent m
- Page 185 and 186: Fig.7 shows a modified embodiment w
- Page 187 and 188: them, will depend upon the order in
- Page 189 and 190: Fig.14, shows another embodiment 14
- Page 191 and 192: Fig.18 shows the air coil 210 posit
- Page 193 and 194: Figs. 22-25 show four different pos
- Page 195 and 196: movement with the first permanent m
- Page 197 and 198: a shaft and means journaling the sh
- Page 199 and 200: CLAUDE MEAD and WILLIAM HOLMES US P
- Page 201 and 202: Fig.2 is a front elevation of the w
- Page 203 and 204: impactors and drills. The turbine d
- Page 205 and 206: (a) fourth rotating means responsiv
- Page 207 and 208: path to the other side of the perma
- Page 209 and 210: Fig.3 is an oscilloscope waveform t
- Page 211 and 212: DETAILED DESCRIPTION OF THE PREFERR
- Page 213 and 214: although it is by no means obvious
- Page 215 and 216: second diode connected at its posit
- Page 217 and 218: In the present invention, a permane
- Page 219: Fig.4 is a circuit diagram, illustr
- Page 223 and 224: y a simultaneous magnetic accelerat
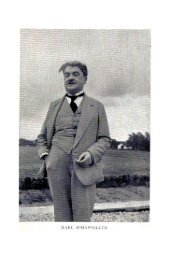
- Page 225 and 226: Mr. P.G. Mallory started out in 191
- Page 227 and 228: All models have a 30 Watt power rat
- Page 229 and 230: In the auto racing circles it has a
- Page 231 and 232: BATTERY + _ SIMPLIFIED MULTIVIBRATO
- Page 233 and 234: Schematic Wiring Diagrams for two P
- Page 235 and 236: motor. What is not generally known,
- Page 237 and 238: Mark McKay's investigation of Edwin
- Page 239 and 240: Investor Photo #012D Popping a coil
- Page 241 and 242: capacitors connected in series, wit
- Page 243 and 244: Mark McKay's investigation of Edwin
- Page 245 and 246: PULSE WIDTH TIME IN mS went to the
- Page 247 and 248: TOP DEAD CENTER 0° REFERENCE Accor
- Page 249 and 250: Mark McKay's investigation of Edwin
- Page 251 and 252: The recovery and simple analysis of
- Page 253 and 254: FILTER CAPACITOR + 2 OHM 200 WATT R
- Page 255 and 256: Subject: CSET design Date: Sun Feb
- Page 257 and 258: Date: Fri Feb 28, 2003 8:25 pm (Tim
- Page 259 and 260: (Tad Johnson) I'm being as careful
- Page 261 and 262: SANGAMO ENERGY DISCHARGE CAPACITOR
- Page 263 and 264: (Alan Francoeur) But I also measure
- Page 265 and 266: Subject: Progress Date: Sun Mar 30,
- Page 267 and 268: ● all electrical connections were
- Page 269 and 270: Mark Gray claims that the heart and
- Page 271 and 272:
Mark Gray claims that some potentia
- Page 273 and 274:
Radio Frequency (RF) Generator Gene
- Page 275 and 276:
Mark McKay's investigation of Edwin
- Page 277 and 278:
Some time during 1987 - 1988, Gray
- Page 279 and 280:
The two-channel trace from the osci
- Page 281 and 282:
What “maximum squareness” means
- Page 283 and 284:
Zo = 112 Ohms Td of 293 nS. 50 KV 8
- Page 285 and 286:
MIKE BRADY’S “PERENDEV” MAGNE
- Page 287 and 288:
Fig.3 is a perspective view showing
- Page 289 and 290:
Fig.7 is a perspective view showing
- Page 291 and 292:
In the rotor assembly 30 of Fig.2,
- Page 293 and 294:
Fig.7 shows a typical magnetic sour
- Page 295 and 296:
DONALD A. KELLY ABSTRACT Patent US
- Page 297 and 298:
This series of magnetic oscillating
- Page 299 and 300:
Because there is no natural, lock-i
- Page 301 and 302:
Fig.3 is an enlarged top view of on
- Page 303 and 304:
An arm 9, is fastened to a flat fac
- Page 305 and 306:
Fig.2 is a vertical transverse cros
- Page 307 and 308:
Fig.6 is a vertical, longitudinal,
- Page 309 and 310:
Working inside the cylinders 12 are
- Page 311 and 312:
Leroy K. Rogers Patent US 4,292,804
- Page 313 and 314:
Preferred embodiments of a method a
- Page 315 and 316:
Fig.6 is a cross-sectional view of
- Page 317 and 318:
Fig.8 is a cross-sectional view of
- Page 319 and 320:
tapped hole in the cylinder 20 typi
- Page 321 and 322:
A second embodiment of a valve actu
- Page 323 and 324:
otates faster, the other end 98 of
- Page 325 and 326:
In normal operation (as seen in Fig
- Page 327 and 328:
Eber Van Valkinburg Patent US 3,744
- Page 329 and 330:
Referring to the drawings in detail
- Page 331 and 332:
Since the pump depends for its supp
- Page 333 and 334:
Briefly, in one aspect the engine o
- Page 335 and 336:
Fig.5 is a cross-sectional view of
- Page 337 and 338:
Fig.12 is a cross-sectional view si
- Page 339 and 340:
Fig.14 is a schematic diagram of an
- Page 341 and 342:
A - 1163
- Page 343 and 344:
A - 1165
- Page 345 and 346:
Figs.20A-20F are schematic diagrams
- Page 347 and 348:
Note: Corresponding reference chara
- Page 349 and 350:
Integral with the piston bodies are
- Page 351 and 352:
The piston has a generally semi-tor
- Page 353 and 354:
Referring back to Fig.13A, for engi
- Page 355 and 356:
As piston 39A reaches BDC, distribu
- Page 357 and 358:
mixture and do not combine because
- Page 359 and 360:
These wires are about twelve gauge,
- Page 361 and 362:
cold-cathode tube 391, and an x-ray
- Page 363 and 364:
Fig.17D), polariser 289, branch B17
- Page 365 and 366:
Robert Britt US Patent 3,977,191 31
- Page 367 and 368:
Fig.3 is an elevational view of the
- Page 369 and 370:
Fig.7 is an electrical schematic of
- Page 371 and 372:
Referring now to Fig.3 of the drawi
- Page 373 and 374:
and drives Q1 into conduction. The
- Page 375 and 376:
Floyd Sweet Recently, some addition
- Page 377 and 378:
The day when we witnessed the VTA d
- Page 379 and 380:
up to see Floyd. Floyd was with the
- Page 381 and 382:
Energy cannot enter a space of zero
- Page 383 and 384:
electromagnetic and gravitational f
- Page 385 and 386:
or in another form: So, the e.m.f.
- Page 387 and 388:
Example 2: Suppose the conductor wi
- Page 389 and 390:
Meguer Kalfaian There is a patent a
- Page 391 and 392:
Fig.2 illustrates a controlled top
- Page 393 and 394:
Fig.9 is a modification of Fig.6; a
- Page 395 and 396:
the outer periphery of the magnet,
- Page 397 and 398:
wobbling top is sufficient, as proo
- Page 399 and 400:
Theodore Annis & Patrick Eberly US
- Page 401 and 402:
BRIEF DESCRIPTION OF THE DRAWINGS F
- Page 403 and 404:
Fig.6 is a schematic diagram of a s
- Page 405 and 406:
DETAILED DESCRIPTION OF THE PREFERR
- Page 407 and 408:
Fig.5 is a detail drawing of an alt
- Page 409 and 410:
In the preferred implementation of
- Page 411 and 412:
William McDavid junior US Patent 6,
- Page 413 and 414:
This sloping floor causes the drive
- Page 415 and 416:
FIG.3 is a side elevational view of
- Page 417 and 418:
FIG.9 is a horizontal cross-section
- Page 419 and 420:
otational downstream annular chambe
- Page 421 and 422:
In Fig.5 is shown a perspective vie
- Page 423 and 424:
small hydro-electric version of the
- Page 425 and 426:
Fig.10 is a perspective view of a s
- Page 427 and 428:
longitudinally mounted in the upstr
- Page 429 and 430:
shaft in the central aperture, said
- Page 431 and 432:
Scientific Papers The following lin
- Page 433 and 434:
http://www.free-energy-info.co.uk/M