A Practical Guide to 'Free-Energy' Devices
A Practical Guide to 'Free-Energy' Devices
A Practical Guide to 'Free-Energy' Devices

You also want an ePaper? Increase the reach of your titles
YUMPU automatically turns print PDFs into web optimized ePapers that Google loves.
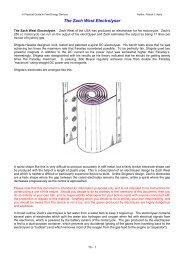
The installation of the above circuit components is illustrated in Fig.3 <strong>to</strong> Fig.13. They are mounted within and on<br />
a housing which is denoted generally as 101 and which is fastened <strong>to</strong> a side wall of the car engine bay 32 via a<br />
mounting bracket 102. Housing 101, which may be formed as an aluminium casting, has a front wall 103, <strong>to</strong>p and<br />
bot<strong>to</strong>m walls 104, 105 and side walls 106, 107. All of these walls have external cooling fins. The back of housing<br />
101 is closed by a printed circuit board 108 which is held clamped in position by a peripheral frame 109 formed of<br />
an insulated plastics material clamped between the circuit board and mounting bracket 102. An insulating sheet<br />
111 of cork is held between the frame 109 and mounting bracket 102.<br />
Printed circuit board 108 carries all of the above-listed circuit components except for capaci<strong>to</strong>r C5 and transis<strong>to</strong>rs<br />
Q3 and Q4. Fig.5 illustrates the position in which transis<strong>to</strong>r Q2 and the coil assembly 112 of transformer TR1 are<br />
mounted on the printed circuit board. Transis<strong>to</strong>r Q2 must withstand considerable heat generation and it is<br />
therefore mounted on a specially designed heat sink 113 clamped <strong>to</strong> circuit board 108 by clamping screws 114<br />
and nuts 115. As most clearly illustrated in Fig.7 and Fig.8, heat sink 113 has a flat base plate portion 116 which<br />
is generally diamond shaped and a series of rod like cooling fins 117 project <strong>to</strong> one side of the base plate around<br />
its periphery. It has a pair of countersunk holes 118 of the clamping screws and a similar pair of holes 119 <strong>to</strong><br />
receive the connec<strong>to</strong>r pins 121 which connect transis<strong>to</strong>r Q2 <strong>to</strong> the printed circuit board. Holes 118, 119 are lined<br />
with nylon bushes 122 and a Formica sheet 123 is fitted between the transis<strong>to</strong>r and the heat sink so that the sink<br />
is electrically insulated from the transis<strong>to</strong>r.<br />
The coil assembly 112 of transformer TR1 (See Fig.9) is comprised of a casing 124 which contains transformer<br />
coils and the associated core and former and is closed by a plastic closing plate 125. Plate 125 is held in position<br />
by a clamping stud 126 and is fitted with electrical connec<strong>to</strong>r pins 127 which are simply pushed through holes in<br />
circuit board 108 and are soldered <strong>to</strong> appropriate copper conduc<strong>to</strong>r strips 128 on the outer face of the board.<br />
For clarity the other circuit components mounted on printed circuit board 108 are not illustrated in the drawings.<br />
These are standard small size components and the manner in which they may be fitted <strong>to</strong> the circuit board is<br />
entirely conventional.<br />
Capaci<strong>to</strong>r C5 is mounted within casing 101. More specifically it is clamped in position between a flange 131<br />
which stands up from the floor 105 of the casing and a clamping pad 132 engaged by a clamping screw 133,<br />
which is mounted in a threaded hole in casing side wall 106 and is set in position by a lock screw 134. Flange<br />
131 has two holes 135 (See Fig.6) in which the terminal bosses 136 of capaci<strong>to</strong>r C5 are located. The terminal<br />
pins 137 projecting from bosses 136 are connected <strong>to</strong> the terminal board 108 by wires (not shown) and<br />
appropriate connec<strong>to</strong>r pins which are extended through holes in the circuit board and soldered <strong>to</strong> the appropriate<br />
conduc<strong>to</strong>r strips on the other face of that board.<br />
Transis<strong>to</strong>rs Q3 and Q4 are mounted on the front wall 103 of casing 101 so that the finned casing serves as an<br />
extended heat sink for these two transis<strong>to</strong>rs. They are mounted on the casing wall and electrically connected <strong>to</strong><br />
the printed circuit board in identical fashion and this is illustrated by Fig.10 which shows the mounting of transis<strong>to</strong>r<br />
Q3. As shown in that figure the transis<strong>to</strong>r is clamped in position by clamping screws 138 and nuts 139 which also<br />
serve <strong>to</strong> provide electrical connections <strong>to</strong> the appropriate conduc<strong>to</strong>rs of the printed circuit board via conduc<strong>to</strong>r<br />
wires 141. The third connection from the emitter of the transis<strong>to</strong>r <strong>to</strong> the common negative conduc<strong>to</strong>r of the printed<br />
circuit is made by conduc<strong>to</strong>r 142. Screws 130 and conduc<strong>to</strong>r 142 extend through three holes in the casing front<br />
wall 103 and these holes are lined with electrically insulating nylon bushes 143, 144. A Formica sheet 145 is<br />
sandwiched between casing plate 103 and the transis<strong>to</strong>r which is therefore electrically insulated from the casing.<br />
Two washers 146 are placed beneath the ends of conduc<strong>to</strong>r wires 141.<br />
Pressure operated microswitch 52 is mounted on a bracket 147 projecting inwardly from front wall 103 of casing<br />
101 adjacent the <strong>to</strong>p wall 104 of the casing and the pressure sensing unit 148 for this switch is installed in an<br />
opening 149 through <strong>to</strong>p wall 104. As most clearly seen in Fig.11, pressure sensing unit 148 is comprised of two<br />
generally cylindrical body members 150, 151 between which a flexible diaphragm 152 is clamped <strong>to</strong> provide a<br />
diaphragm chamber 153. The gas pressure of sensing tube 63 is applied <strong>to</strong> chamber 153 via a small diameter<br />
passage 154 in body member 150 and a larger passage 155 in a cap member 156. The cap member and body<br />
members are fastened <strong>to</strong>gether and clamped <strong>to</strong> the casing <strong>to</strong>p plate 104 by means of clamping screws 157.<br />
Sensing tube 63 is connected <strong>to</strong> the passage 155 in cap member 156 by a tapered thread connec<strong>to</strong>r 158 and the<br />
interface between cap member 156 and body member 150 is sealed by an O-ring 159.<br />
The lower end of body member 151 of pressure sensing unit 148 has an internally screw threaded opening which<br />
receives a screw 161 which at its lower end is formed as an externally <strong>to</strong>othed adjusting wheel 162. A switch<br />
actuating plunger 163 extends through a central bore in adjusting wheel 162 so that it engages at one end flexible<br />
diaphragm 152 and at the other end the actua<strong>to</strong>r member 164 of microswitch 62. The end of plunger 163 which<br />
engages the diaphragm has a flange 165 <strong>to</strong> serve as a pressure pad and a helical compression spring 167<br />
encircles plunger 163 <strong>to</strong> act between flange 165 and the adjusting wheel 162 <strong>to</strong> bias the plunger upwardly against<br />
the action of the gas pressure acting on diaphragm 152 in chamber 153. The pressure at which diaphragm 152<br />
A - 847