manuale per l'installatore - 1/3 tipologie d'installazione - 2/3 software ...
manuale per l'installatore - 1/3 tipologie d'installazione - 2/3 software ...
manuale per l'installatore - 1/3 tipologie d'installazione - 2/3 software ...

You also want an ePaper? Increase the reach of your titles
YUMPU automatically turns print PDFs into web optimized ePapers that Google loves.
4.2.1.6 Oxygen Sensor<br />
Calibration<br />
It is the fifth step for LPG installation<br />
and the sixth one for CNG<br />
(see picture 4.1).<br />
The Oxygen sensor calibration<br />
is very important for this system as<br />
this signal is used to speed up and<br />
optimize the self-learning strategy.<br />
It is important to know some<br />
oxygen sensor characteristics such<br />
as if it is a “CURRENT” or a “VOLT-<br />
AGE” one (ordinary oxygen sensor),<br />
if it is “straight” or “reverse”.<br />
Let’s explain the meaning:<br />
• Straight Oxygen sensor: the<br />
high tension level corresponds<br />
to a “rich” situation of the mixture<br />
and, on the contrary, the<br />
low tension level to a “lean” situation<br />
of the mixture.<br />
• Reverse Oxygen sensor: the<br />
opposite of Straight one.<br />
Note: usually if the oxygen sensor<br />
is a current type, it is a reverse<br />
one, too.<br />
Identification method: with a<br />
sharp acceleration and standing<br />
still, execute a cut- off (released<br />
condition where there is no injection);<br />
if the oxygen sensor is low it<br />
is a Straight one otherwise it is a<br />
Reverse one.<br />
The Current oxygen sensor is<br />
recognisable for its extremely different<br />
behaviour compared to the<br />
Voltage oxygen sensor one.<br />
During stationary conditions (at<br />
idle) when the vehicle is in control,<br />
a voltage oxygen sensor continuously<br />
varies between minimum and<br />
maximum tension value while a<br />
current one will keep practically the<br />
same value.<br />
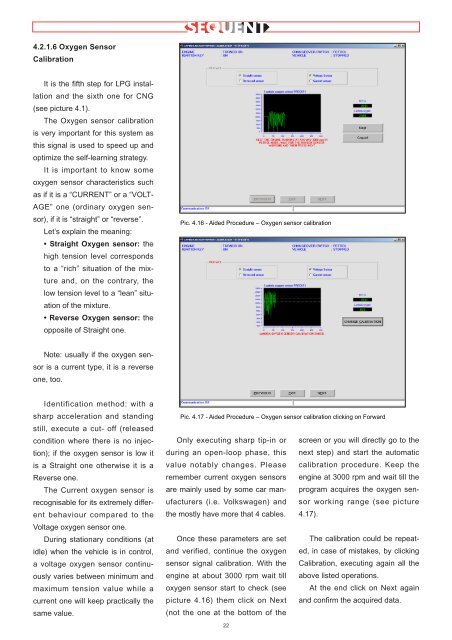
Pic. 4.16 - Aided Procedure – Oxygen sensor calibration<br />
Pic. 4.17 - Aided Procedure – Oxygen sensor calibration clicking on Forward<br />
Only executing sharp tip-in or<br />
during an open-loop phase, this<br />
value notably changes. Please<br />
remember current oxygen sensors<br />
are mainly used by some car manufacturers<br />
(i.e. Volkswagen) and<br />
the mostly have more that 4 cables.<br />
Once these parameters are set<br />
and verified, continue the oxygen<br />
sensor signal calibration. With the<br />
engine at about 3000 rpm wait till<br />
oxygen sensor start to check (see<br />
picture 4.16) them click on Next<br />
(not the one at the bottom of the<br />
22<br />
screen or you will directly go to the<br />
next step) and start the automatic<br />
calibration procedure. Keep the<br />
engine at 3000 rpm and wait till the<br />
program acquires the oxygen sensor<br />
working range (see picture<br />
4.17).<br />
The calibration could be repeated,<br />
in case of mistakes, by clicking<br />
Calibration, executing again all the<br />
above listed o<strong>per</strong>ations.<br />
At the end click on Next again<br />
and confirm the acquired data.