manuale per l'installatore - 1/3 tipologie d'installazione - 2/3 software ...
manuale per l'installatore - 1/3 tipologie d'installazione - 2/3 software ...
manuale per l'installatore - 1/3 tipologie d'installazione - 2/3 software ...

You also want an ePaper? Increase the reach of your titles
YUMPU automatically turns print PDFs into web optimized ePapers that Google loves.
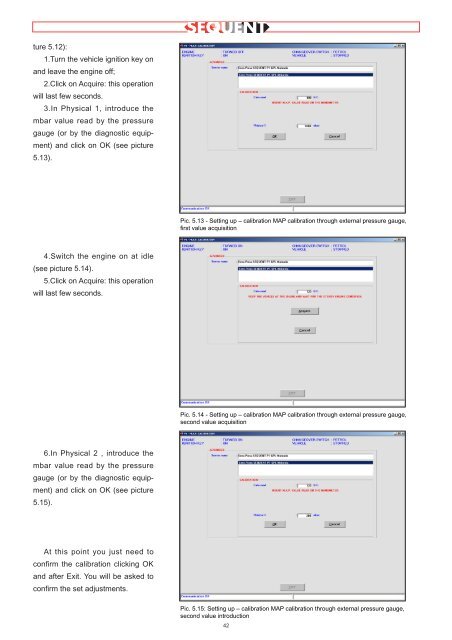
ture 5.12):<br />
1.Turn the vehicle ignition key on<br />
and leave the engine off;<br />
2.Click on Acquire: this o<strong>per</strong>ation<br />
will last few seconds.<br />
3.In Physical 1, introduce the<br />
mbar value read by the pressure<br />
gauge (or by the diagnostic equipment)<br />
and click on OK (see picture<br />
5.13).<br />
4.Switch the engine on at idle<br />
(see picture 5.14).<br />
5.Click on Acquire: this o<strong>per</strong>ation<br />
will last few seconds.<br />
6.In Physical 2 , introduce the<br />
mbar value read by the pressure<br />
gauge (or by the diagnostic equipment)<br />
and click on OK (see picture<br />
5.15).<br />
At this point you just need to<br />
confirm the calibration clicking OK<br />
and after Exit. You will be asked to<br />
confirm the set adjustments.<br />
Pic. 5.13 - Setting up – calibration MAP calibration through external pressure gauge,<br />
first value acquisition<br />
Pic. 5.14 - Setting up – calibration MAP calibration through external pressure gauge,<br />
second value acquisition<br />
Pic. 5.15: Setting up – calibration MAP calibration through external pressure gauge,<br />
second value introduction<br />
42