THE PHOTOGRAPHIC EYE
THE PHOTOGRAPHIC EYE
THE PHOTOGRAPHIC EYE

You also want an ePaper? Increase the reach of your titles
YUMPU automatically turns print PDFs into web optimized ePapers that Google loves.
contaminating your chemicals. Always<br />
use your tongs . . -. do not use<br />
your fingers.<br />
• Chemicals<br />
The chemicals used for processing<br />
prints are essentially the same as<br />
those used for processing film. Some<br />
of them, in fact, can be used for<br />
either purpose. In both cases, you<br />
develop the image, "stop" it, fix it<br />
and, finally, wash and dry it.<br />
Contact Prints<br />
• Additional Tools<br />
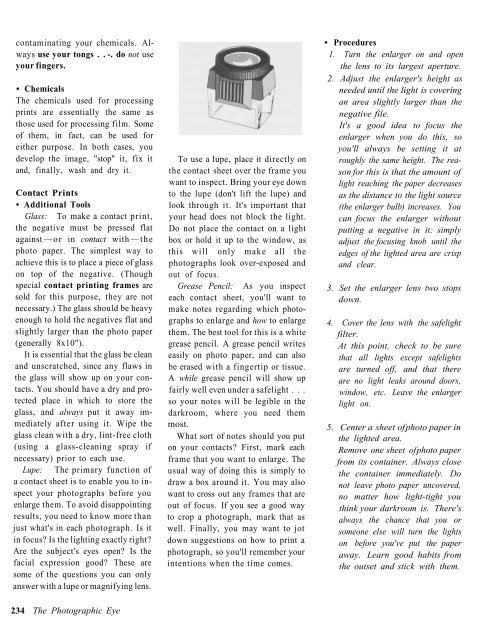
Glass: To make a contact print,<br />
the negative must be pressed flat<br />
against —or in contact with —the<br />
photo paper. The simplest way to<br />
achieve this is to place a piece of glass<br />
on top of the negative. (Though<br />
special contact printing frames are<br />
sold for this purpose, they are not<br />
necessary.) The glass should be heavy<br />
enough to hold the negatives flat and<br />
slightly larger than the photo paper<br />
(generally 8x10").<br />
It is essential that the glass be clean<br />
and unscratched, since any flaws in<br />
the glass will show up on your contacts.<br />
You should have a dry and protected<br />
place in which to store the<br />
glass, and always put it away immediately<br />
after using it. Wipe the<br />
glass clean with a dry, lint-free cloth<br />
(using a glass-cleaning spray if<br />
necessary) prior to each use.<br />
Lupe: The primary function of<br />
a contact sheet is to enable you to inspect<br />
your photographs before you<br />
enlarge them. To avoid disappointing<br />
results, you need to know more than<br />
just what's in each photograph. Is it<br />
in focus? Is the lighting exactly right?<br />
Are the subject's eyes open? Is the<br />
facial expression good? These are<br />
some of the questions you can only<br />
answer with a lupe or magnifying lens.<br />
234 The Photographic Eye<br />
To use a lupe, place it directly on<br />
the contact sheet over the frame you<br />
want to inspect. Bring your eye down<br />
to the lupe (don't lift the lupe) and<br />
look through it. It's important that<br />
your head does not block the light.<br />
Do not place the contact on a light<br />
box or hold it up to the window, as<br />
this will only make all the<br />
photographs look over-exposed and<br />
out of focus.<br />
Grease Pencil: As you inspect<br />
each contact sheet, you'll want to<br />
make notes regarding which photographs<br />
to enlarge and how to enlarge<br />
them. The best tool for this is a white<br />
grease pencil. A grease pencil writes<br />
easily on photo paper, and can also<br />
be erased with a fingertip or tissue.<br />
A while grease pencil will show up<br />
fairly well even under a safelight . . .<br />
so your notes will be legible in the<br />
darkroom, where you need them<br />
most.<br />
What sort of notes should you put<br />
on your contacts? First, mark each<br />
frame that you want to enlarge. The<br />
usual way of doing this is simply to<br />
draw a box around it. You may also<br />
want to cross out any frames that are<br />
out of focus. If you see a good way<br />
to crop a photograph, mark that as<br />
well. Finally, you may want to jot<br />
down suggestions on how to print a<br />
photograph, so you'll remember your<br />
intentions when the time comes.<br />
• Procedures<br />
1. Turn the enlarger on and open<br />
the lens to its largest aperture.<br />
2. Adjust the enlarger's height as<br />
needed until the light is covering<br />
an area slightly larger than the<br />
negative file.<br />
It's a good idea to focus the<br />
enlarger when you do this, so<br />
you'll always be setting it at<br />
roughly the same height. The reason<br />
for this is that the amount of<br />
light reaching the paper decreases<br />
as the distance to the light source<br />
(the enlarger bulb) increases. You<br />
can focus the enlarger without<br />
putting a negative in it: simply<br />
adjust the focusing knob until the<br />
edges of the lighted area are crisp<br />
and clear.<br />
3. Set the enlarger lens two stops<br />
down.<br />
4. Cover the lens with the safelight<br />
filter.<br />
At this point, check to be sure<br />
that all lights except safelights<br />
are turned off, and that there<br />
are no light leaks around doors,<br />
window, etc. Leave the enlarger<br />
light on.<br />
5. Center a sheet of photo paper in<br />
the lighted area.<br />
Remove one sheet of photo paper<br />
from its container. Always close<br />
the container immediately. Do<br />
not leave photo paper uncovered,<br />
no matter how light-tight you<br />
think your darkroom is. There's<br />
always the chance that you or<br />
someone else will turn the lights<br />
on before you've put the paper<br />
away. Learn good habits from<br />
the outset and stick with them.