- Page 1:
REVISED EDITION THE PHOTOGRAPHIC EY
- Page 4 and 5:
Student photograph by Gregory Conra
- Page 6 and 7:
Part 3 People, Places & Things: Exe
- Page 8 and 9:
part 1 Getting Started Student phot
- Page 10 and 11:
chapter 1 S urprisingly few new art
- Page 12 and 13:
light, producing a positive image o
- Page 14 and 15:
Mathew Brady, Magazine in Battery R
- Page 16 and 17:
Peter Henry Emerson, Gunner Working
- Page 18 and 19:
Alfred Stieglitz, The 'Flat Iron',
- Page 20 and 21:
chestra. His first photographic job
- Page 22 and 23:
1959 Development of first zoom lens
- Page 24 and 25:
Minor White, Moon and Wall Encrusta
- Page 26 and 27:
Fortunately, however, commercial ph
- Page 28 and 29:
1904-71 Margaret Bourke-White, Airs
- Page 30 and 31:
Variations Mixed in with these gene
- Page 32 and 33:
Student photograph. 34 The Photogra
- Page 34 and 35:
violin money can buy, but a blues s
- Page 36 and 37:
Each kind of lens has its own chara
- Page 38 and 39:
Additional Tools Once you've select
- Page 40 and 41:
whether the camera is in manual or
- Page 42 and 43:
motor-drives, see Appendix 4.) In t
- Page 44 and 45:
• Film-Advance Sprocket Just to t
- Page 46 and 47:
EXERCISE Testing the Shutter & Aper
- Page 48 and 49:
Is a plastic hose interesting? It i
- Page 50 and 51:
Attention to detail is the primary
- Page 52 and 53:
54 The Photographic Eye Weighting t
- Page 54 and 55:
still seem to be interestingly dist
- Page 56 and 57:
FOCAL POINT: Composition Tips As yo
- Page 58 and 59:
An unusual kind of balance is produ
- Page 60 and 61:
Two kinds of dynamics are at work i
- Page 62 and 63:
EXERCISE Mat Frame Turn to the back
- Page 64 and 65:
Student photograph by Jay Le Claire
- Page 66 and 67:
produced. Skill is the key ingredie
- Page 68 and 69:
Another "rule breaker"—this time
- Page 70 and 71:
Placing everything in sharp focus h
- Page 72 and 73:
focused. Use a focusing aid (see Ap
- Page 74 and 75:
EXERCISE Sample Crit Describe the d
- Page 76 and 77:
The value of this photograph is res
- Page 78 and 79:
How would you evaluate this photogr
- Page 80 and 81:
Used correctly, the "point of depar
- Page 82 and 83:
Student photograph by Linda Raymond
- Page 84 and 85:
There are three basic line effects
- Page 86 and 87:
How many basic line effects are in
- Page 88 and 89:
Notice the soft-focus lines behind
- Page 90 and 91:
EXERCISE Pattern Your assignment is
- Page 92 and 93:
Can you distinguish line from textu
- Page 94 and 95:
Student photograph by Man- McCoy. 9
- Page 96 and 97:
photograph, your attention may also
- Page 98 and 99:
EXERCISE Leaves Your next assignmen
- Page 100 and 101:
A series of similar curves, an inte
- Page 102 and 103:
In this high-contrast print, shape
- Page 104 and 105:
106 The Photographic Eye
- Page 106 and 107:
As with line and texture, a photogr
- Page 108 and 109:
EXERCISE Circles & Ovals Use at lea
- Page 110 and 111:
Student photograph by Bruce Cakebre
- Page 112 and 113:
Bright sunlight is best suited to c
- Page 114 and 115:
An unlighted subject against a ligh
- Page 116 and 117:
Low-light tends to be very somber,
- Page 118 and 119:
FOCAL POINT: Light Meters If your c
- Page 120 and 121:
couch. The average light in the sce
- Page 122 and 123:
promote rhythm. Alternating bands o
- Page 124 and 125:
long, or "wide," depth of field, th
- Page 126 and 127:
A skillfully handled blurred motion
- Page 128 and 129:
A fast shutter speed (or flash) wil
- Page 130 and 131:
Panning will at least slow down a m
- Page 132 and 133:
EXERCISE - Blurred Movement Assignm
- Page 134 and 135:
Converging lines and an appropriate
- Page 136 and 137:
For now, let's stick with the liter
- Page 138 and 139:
feet, making distant objects appear
- Page 140 and 141:
you'll have many focal lengths to c
- Page 142 and 143:
Student photograph by Russell Wells
- Page 144 and 145:
EXERCISE Point of View Assignment:
- Page 146 and 147:
part 3 People, Places & Things: Exe
- Page 148 and 149:
chapter 12 Things y now, you should
- Page 150 and 151:
1886-1958 Edward Weston, Pepper, 19
- Page 152 and 153:
Student photograph by Charles Stuar
- Page 154 and 155:
Student photograph by Han June Bae.
- Page 156 and 157:
Student photograph by William Roche
- Page 158 and 159:
Student photograph by Lynne Mattiel
- Page 160 and 161:
,- Student photograph by Lynne Matt
- Page 162 and 163:
EXERCISE Old Things Assignment: Pho
- Page 164 and 165:
chapter 13 Places s you progress fr
- Page 166 and 167:
1902-1984 Places 169
- Page 168 and 169:
Student photograph by Al Webb. Stud
- Page 170 and 171:
Student photograph by Mark Crew. St
- Page 172 and 173:
Student photograph by Gerald Allen
- Page 174 and 175:
The placement of the cat, combined
- Page 176 and 177:
EXERCISE Construction Sites Assignm
- Page 178 and 179:
chapter 14 People oving from photog
- Page 180 and 181:
is especially useful on location, i
- Page 182 and 183:
People 185
- Page 184 and 185:
EXERCISE Elders Assignment: Do a se
- Page 186 and 187:
Student photograph. Student photogr
- Page 188 and 189:
EXERCISE Side-Lit Portrait Assignme
- Page 190 and 191:
Student photograph by Michael Cothr
- Page 192 and 193:
EXERCISE Mood Portrait Assignment:
- Page 194 and 195:
chapter 15 Putting It All Together
- Page 196 and 197:
1908- During World War II he served
- Page 198 and 199:
Student photograph by Amy Walsh. Pu
- Page 200 and 201:
EXERCISE Rain Assignment: Do a seri
- Page 202 and 203:
Student photograph by Vinnie Rodzie
- Page 204 and 205:
Student photograph by Karen Demuth.
- Page 206 and 207:
chapter 16 Breaking the Rules hroug
- Page 208 and 209:
Diane Arbus, Identical Twins, 1966.
- Page 210 and 211:
Student photograph by John Dean. St
- Page 212 and 213:
Student photograph by Dave Hornback
- Page 214 and 215:
Student photograph by Lynne Mattiel
- Page 216 and 217:
As this photograph demonstrates, gr
- Page 218 and 219:
EXERCISE Photo-Copy Photos Assignme
- Page 220 and 221:
Variations: Shoot a sequence at dif
- Page 222 and 223:
In this example, an excerpt from a
- Page 224 and 225:
appendix 1 Processing PROCESSING FI
- Page 226 and 227:
perience. Start by loading your pra
- Page 228 and 229:
influences, such as incorrect expos
- Page 230 and 231:
The enlarge: can be raised or lower
- Page 232 and 233:
6. Place the negative file over the
- Page 234 and 235:
The easiest way to identify the emu
- Page 236 and 237:
that amount of time. Then cover the
- Page 238 and 239:
camera or are being careless during
- Page 240 and 241:
appendix 2 Color t's a good idea to
- Page 242 and 243:
Complicated Imagery The first thing
- Page 244 and 245:
of white mat board) or flash fill (
- Page 246 and 247:
TECHNICAL CONSIDERATIONS In additio
- Page 248 and 249:
more important consideration: cropp
- Page 250 and 251:
appendix 3 Manipulation & Presentat
- Page 252 and 253: 5. Use an 8" strip of masking tape
- Page 254 and 255: 7. Expose 2 more 2x3" sheets. 8. De
- Page 256 and 257: just called opaque), a sticky red g
- Page 258 and 259: Student photograph by Ray Shaw. 4.
- Page 260 and 261: Retouching Even if you are extraord
- Page 262 and 263: appendix 4 Advanced Techniques TOOL
- Page 264 and 265: image area. Special effects filters
- Page 266 and 267: amount of control over everyday lig
- Page 268 and 269: and some black dots in the white ar
- Page 270 and 271: Mat frame. Trace this frame, cut it
- Page 272 and 273: The Museum of Modern Art (of New Yo
- Page 274 and 275: Glossary Aperture Ring The ring on
- Page 276 and 277: Index Adams, Ansel, 23, 152, 168, 1
- Page 278 and 279: fixed lens, 36 fixer, 228-229, 231,
- Page 280 and 281: ain (exercise), 203 range of light,
- Page 282: Acknowledgments The authors wish to
- Page 285 and 286: ESSENTIAL ELEMENTS The following is
- Page 287 and 288: Copyright 1445 Da\ is Publications.
- Page 289 and 290: Introduction TECHNIQUE vs. CREATIVE
- Page 291 and 292: port 1 Teaching with The Photograph
- Page 293 and 294: Similarly, a teacher who has darkro
- Page 295 and 296: work of your students in a rotating
- Page 297 and 298: a wealth of old photographs of inte
- Page 299 and 300: PREPARING THE CLASSROOM slide show
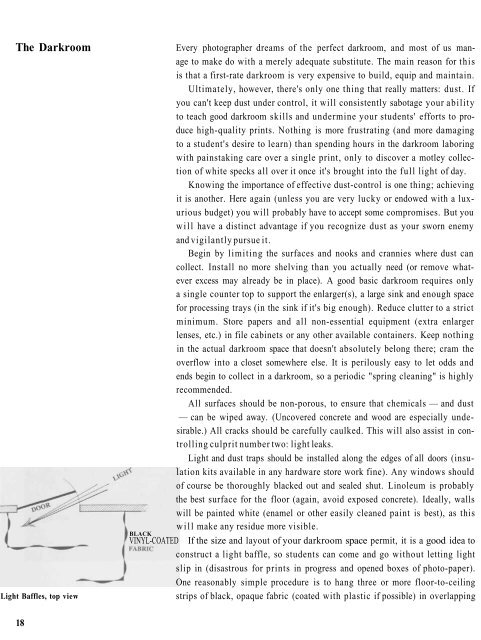
- Page 301: A well-equipped (and carefully desi
- Page 305 and 306: 2. One full array of developing tra
- Page 307 and 308: part 2 Planning the Course Naturall
- Page 309 and 310: Crit sessions offer an opportunity
- Page 311 and 312: STUDENT PORTFOLIO Our recommended g
- Page 313 and 314: RESEARCH PROJECTS You may want to m
- Page 315 and 316: • the moral and ethical implicati
- Page 317 and 318: TEXT PAGE p. 100, 101 p.l 10, 111 p
- Page 319 and 320: RETEACHING OPTIONS AND PRODUCTIVE P
- Page 321 and 322: far enough away from each other to
- Page 323 and 324: Chemicals A student examines a newl
- Page 325 and 326: Photo Processes to be Avoided in th
- Page 327 and 328: WEEK? WEEKS WEEK 9 44 Topic: Light
- Page 329 and 330: WEEK 3 46 Goal: Begin taking and pr
- Page 331 and 332: WEEK 21 WEEK 22 WEEK 23 48 Topic: P
- Page 333 and 334: ADDITIONAL SOURCES Films 50 Write t
- Page 335 and 336: Books Davis, Phil. Photography. Dub
- Page 337 and 338: 54 lines. A reasonable amount of le
- Page 339 and 340: Photograph Evaluation Name Assignme
- Page 341 and 342: Early Photography — Reading Works
- Page 343 and 344: Early Photography — Reading Works
- Page 345 and 346: Early Photography — Photography R
- Page 347 and 348: Quiz for Chapter 2 — Tools 9. Wha
- Page 349 and 350: Quiz for Chapter 2 — Tools — An
- Page 351 and 352: Film Developing — Photography 8.
- Page 353 and 354:
70 Contents Chapter 1: From Blurs t
- Page 355 and 356:
72 Contents Chapter 12: Things Chap


