THE PHOTOGRAPHIC EYE
THE PHOTOGRAPHIC EYE
THE PHOTOGRAPHIC EYE

You also want an ePaper? Increase the reach of your titles
YUMPU automatically turns print PDFs into web optimized ePapers that Google loves.
EXERCISE<br />
Testing the Shutter & Aperture<br />
By now you should be familiar with<br />
all the components that have an effect<br />
on the shutter. Let's take a look<br />
at them all in action.<br />
Set your shutter speed to "B" and<br />
your lens to its largest aperture<br />
(remember, that's the lowest<br />
number). Make sure the film advance<br />
lever has been wound, to cock the<br />
shutter. Open your camera back.<br />
Aim the lens at any convenient light<br />
source. While looking at the shutter<br />
screen, press the shutter release button<br />
and hold it down.<br />
You should find yourself looking<br />
through a hole about the size of a<br />
quarter, through which you'll be able<br />
to see whatever's in front of your<br />
lens . . . except everything will be upside<br />
down and probably out of focus.<br />
48 The Photographic Eye<br />
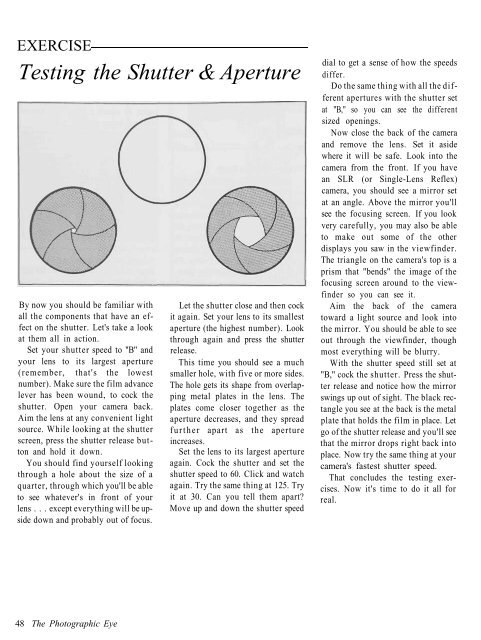
Let the shutter close and then cock<br />
it again. Set your lens to its smallest<br />
aperture (the highest number). Look<br />
through again and press the shutter<br />
release.<br />
This time you should see a much<br />
smaller hole, with five or more sides.<br />
The hole gets its shape from overlapping<br />
metal plates in the lens. The<br />
plates come closer together as the<br />
aperture decreases, and they spread<br />
further apart as the aperture<br />
increases.<br />
Set the lens to its largest aperture<br />
again. Cock the shutter and set the<br />
shutter speed to 60. Click and watch<br />
again. Try the same thing at 125. Try<br />
it at 30. Can you tell them apart?<br />
Move up and down the shutter speed<br />
dial to get a sense of how the speeds<br />
differ.<br />
Do the same thing with all the different<br />
apertures with the shutter set<br />
at "B," so you can see the different<br />
sized openings.<br />
Now close the back of the camera<br />
and remove the lens. Set it aside<br />
where it will be safe. Look into the<br />
camera from the front. If you have<br />
an SLR (or Single-Lens Reflex)<br />
camera, you should see a mirror set<br />
at an angle. Above the mirror you'll<br />
see the focusing screen. If you look<br />
very carefully, you may also be able<br />
to make out some of the other<br />
displays you saw in the viewfinder.<br />
The triangle on the camera's top is a<br />
prism that "bends" the image of the<br />
focusing screen around to the viewfinder<br />
so you can see it.<br />
Aim the back of the camera<br />
toward a light source and look into<br />
the mirror. You should be able to see<br />
out through the viewfinder, though<br />
most everything will be blurry.<br />
With the shutter speed still set at<br />
"B," cock the shutter. Press the shutter<br />
release and notice how the mirror<br />
swings up out of sight. The black rectangle<br />
you see at the back is the metal<br />
plate that holds the film in place. Let<br />
go of the shutter release and you'll see<br />
that the mirror drops right back into<br />
place. Now try the same thing at your<br />
camera's fastest shutter speed.<br />
That concludes the testing exercises.<br />
Now it's time to do it all for<br />
real.