THE PHOTOGRAPHIC EYE
THE PHOTOGRAPHIC EYE
THE PHOTOGRAPHIC EYE

Create successful ePaper yourself
Turn your PDF publications into a flip-book with our unique Google optimized e-Paper software.
whether the camera is in manual or<br />
automatic mode, whether your flash<br />
has recharged, etc.<br />
Take some time to explore your<br />
viewfinder. If you aren't certain what<br />
everything in it means, consult the<br />
user's manual for your camera or ask<br />
an experienced photographer.<br />
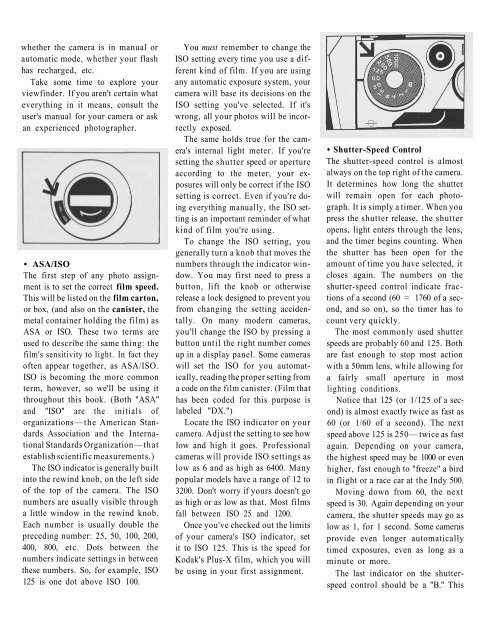
• ASA/ISO<br />
The first step of any photo assignment<br />
is to set the correct film speed.<br />
This will be listed on the film carton,<br />
or box, (and also on the canister, the<br />
metal container holding the film) as<br />
ASA or ISO. These two terms are<br />
used to describe the same thing: the<br />
film's sensitivity to light. In fact they<br />
often appear together, as ASA/ISO.<br />
ISO is becoming the more common<br />
term, however, so we'll be using it<br />
throughout this book. (Both "ASA"<br />
and "ISO" are the initials of<br />
organizations —the American Standards<br />
Association and the International<br />
Standards Organization —that<br />
establish scientific measurements.)<br />
The ISO indicator is generally built<br />
into the rewind knob, on the left side<br />
of the top of the camera. The ISO<br />
numbers are usually visible through<br />
a little window in the rewind knob.<br />
Each number is usually double the<br />
preceding number: 25, 50, 100, 200,<br />
400, 800, etc. Dots between the<br />
numbers indicate settings in between<br />
these numbers. So, for example, ISO<br />
125 is one dot above ISO 100.<br />
You must remember to change the<br />
ISO setting every time you use a different<br />
kind of film. If you are using<br />
any automatic exposure system, your<br />
camera will base its decisions on the<br />
ISO setting you've selected. If it's<br />
wrong, all your photos will be incorrectly<br />
exposed.<br />
The same holds true for the camera's<br />
internal light meter. If you're<br />
setting the shutter speed or aperture<br />
according to the meter, your exposures<br />
will only be correct if the ISO<br />
setting is correct. Even if you're doing<br />
everything manually, the ISO setting<br />
is an important reminder of what<br />
kind of film you're using.<br />
To change the ISO setting, you<br />
generally turn a knob that moves the<br />
numbers through the indicator window.<br />
You may first need to press a<br />
button, lift the knob or otherwise<br />
release a lock designed to prevent you<br />
from changing the setting accidentally.<br />
On many modern cameras,<br />
you'll change the ISO by pressing a<br />
button until the right number comes<br />
up in a display panel. Some cameras<br />
will set the ISO for you automatically,<br />
reading the proper setting from<br />
a code on the film canister. (Film that<br />
has been coded for this purpose is<br />
labeled "DX.")<br />
Locate the ISO indicator on your<br />
camera. Adjust the setting to see how<br />
low and high it goes. Professional<br />
cameras will provide ISO settings as<br />
low as 6 and as high as 6400. Many<br />
popular models have a range of 12 to<br />
3200. Don't worry if yours doesn't go<br />
as high or as low as that. Most films<br />
fall between ISO 25 and 1200.<br />
Once you've checked out the limits<br />
of your camera's ISO indicator, set<br />
it to ISO 125. This is the speed for<br />
Kodak's Plus-X film, which you will<br />
be using in your first assignment.<br />
• Shutter-Speed Control<br />
The shutter-speed control is almost<br />
always on the top right of the camera.<br />
It determines how long the shutter<br />
will remain open for each photograph.<br />
It is simply a timer. When you<br />
press the shutter release, the shutter<br />
opens, light enters through the lens,<br />
and the timer begins counting. When<br />
the shutter has been open for the<br />
amount of time you have selected, it<br />
closes again. The numbers on the<br />
shutter-speed control indicate fractions<br />
of a second (60 = 1760 of a second,<br />
and so on), so the timer has to<br />
count very quickly.<br />
The most commonly used shutter<br />
speeds are probably 60 and 125. Both<br />
are fast enough to stop most action<br />
with a 50mm lens, while allowing for<br />
a fairly small aperture in most<br />
lighting conditions.<br />
Notice that 125 (or 1/125 of a second)<br />
is almost exactly twice as fast as<br />
60 (or 1/60 of a second). The next<br />
speed above 125 is 250— twice as fast<br />
again. Depending on your camera,<br />
the highest speed may be 1000 or even<br />
higher, fast enough to "freeze" a bird<br />
in flight or a race car at the Indy 500.<br />
Moving down from 60, the next<br />
speed is 30. Again depending on your<br />
camera, the shutter speeds may go as<br />
low as 1, for 1 second. Some cameras<br />
provide even longer automatically<br />
timed exposures, even as long as a<br />
minute or more.<br />
The last indicator on the shutterspeed<br />
control should be a "B." This