THE PHOTOGRAPHIC EYE
THE PHOTOGRAPHIC EYE
THE PHOTOGRAPHIC EYE

Create successful ePaper yourself
Turn your PDF publications into a flip-book with our unique Google optimized e-Paper software.
which improves the effect.<br />
Leave the rest of the trim edge<br />
intact for now. Do not cut it off.<br />
You'll need some space to number<br />
the strips, and it's handy to<br />
have some blank area to work<br />
with when you assemble the<br />
composite.<br />
4. Cut each print into narrow<br />
strips.<br />
All the strips (for both prints)<br />
should be the same width, about<br />
3/8". Narrower strips work well<br />
too (down to about 1/4"). Wider<br />
strips are generally less effective.<br />
It is very important to keep<br />
track of the sequence of the strips<br />
as you cut them. You can either<br />
number them in the borders as<br />
you go, or measure where your<br />
cuts will be and number the strips<br />
before you cut them.<br />
It is also important to keep the<br />
strips from each print separate.<br />
You may want to use different<br />
colored pens; or use "A "for one<br />
print and "B" for the other (i.e.<br />
Al, A2, A3, etc. and Bl, B2, B3,<br />
etc.); or use numbers for one and<br />
letters for the other; or number<br />
one along the top and the other<br />
along the bottom . . . whatever<br />
works for you.<br />
5. Re-assemble the strips on a mat<br />
board, alternating one strip from<br />
one print with one from the<br />
other.<br />
The easiest way to do this is to use<br />
the tacking iron on the borders of<br />
the strips to stick them to the<br />
mounting board. Get a bunch of<br />
strips (about 1/4 of the total)<br />
tacked in place, press them, tack<br />
another bunch, press them, and<br />
so on until the whole composite<br />
print is assembled and pressed.<br />
258 The Photographic Eye<br />
(Note: Do not place uncovered<br />
dry mounting tissue in the press.)<br />
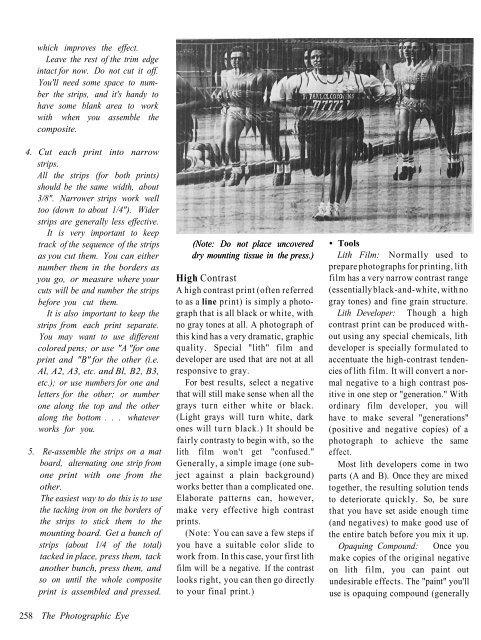
High Contrast<br />
A high contrast print (often referred<br />
to as a line print) is simply a photograph<br />
that is all black or white, with<br />
no gray tones at all. A photograph of<br />
this kind has a very dramatic, graphic<br />
quality. Special "lith" film and<br />
developer are used that are not at all<br />
responsive to gray.<br />
For best results, select a negative<br />
that will still make sense when all the<br />
grays turn either white or black.<br />
(Light grays will turn white, dark<br />
ones will turn black.) It should be<br />
fairly contrasty to begin with, so the<br />
lith film won't get "confused."<br />
Generally, a simple image (one subject<br />
against a plain background)<br />
works better than a complicated one.<br />
Elaborate patterns can, however,<br />
make very effective high contrast<br />
prints.<br />
(Note: You can save a few steps if<br />
you have a suitable color slide to<br />
work from. In this case, your first lith<br />
film will be a negative. If the contrast<br />
looks right, you can then go directly<br />
to your final print.)<br />
• Tools<br />
Lith Film: Normally used to<br />
prepare photographs for printing, lith<br />
film has a very narrow contrast range<br />
(essentially black-and-white, with no<br />
gray tones) and fine grain structure.<br />
Lith Developer: Though a high<br />
contrast print can be produced without<br />
using any special chemicals, lith<br />
developer is specially formulated to<br />
accentuate the high-contrast tendencies<br />
of lith film. It will convert a normal<br />
negative to a high contrast positive<br />
in one step or "generation." With<br />
ordinary film developer, you will<br />
have to make several "generations"<br />
(positive and negative copies) of a<br />
photograph to achieve the same<br />
effect.<br />
Most lith developers come in two<br />
parts (A and B). Once they are mixed<br />
together, the resulting solution tends<br />
to deteriorate quickly. So, be sure<br />
that you have set aside enough time<br />
(and negatives) to make good use of<br />
the entire batch before you mix it up.<br />
Opaquing Compound: Once you<br />
make copies of the original negative<br />
on lith film, you can paint out<br />
undesirable effects. The "paint" you'll<br />
use is opaquing compound (generally