QuarkXPress to Adobe InDesign CS4 Conversion Guide
QuarkXPress to Adobe InDesign CS4 Conversion Guide
QuarkXPress to Adobe InDesign CS4 Conversion Guide

Create successful ePaper yourself
Turn your PDF publications into a flip-book with our unique Google optimized e-Paper software.
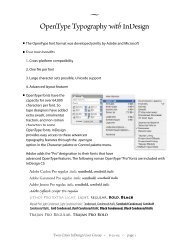
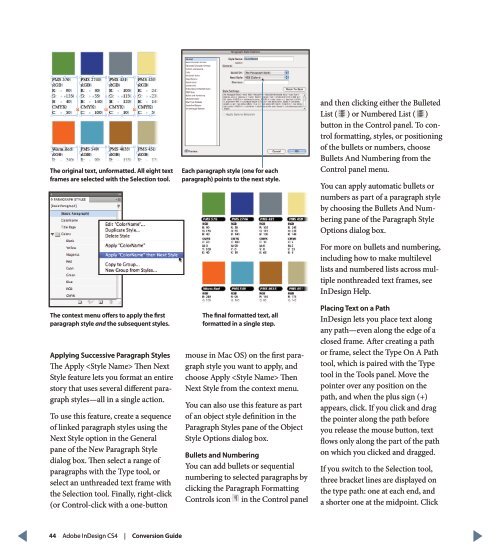
The original text, unformatted. All eight text<br />
frames are selected with the Selection <strong>to</strong>ol.<br />
The context menu offers <strong>to</strong> apply the first<br />
paragraph style and the subsequent styles.<br />
Applying Successive Paragraph Styles<br />
The Apply Then Next<br />
Style feature lets you format an entire<br />
s<strong>to</strong>ry that uses several different paragraph<br />
styles—all in a single action.<br />
To use this feature, create a sequence<br />
of linked paragraph styles using the<br />
Next Style option in the General<br />
pane of the New Paragraph Style<br />
dialog box. Then select a range of<br />
paragraphs with the Type <strong>to</strong>ol, or<br />
select an unthreaded text frame with<br />
the Selection <strong>to</strong>ol. Finally, right-click<br />
(or Control-click with a one-but<strong>to</strong>n<br />
Each paragraph style (one for each<br />
paragraph) points <strong>to</strong> the next style.<br />
The final formatted text, all<br />
formatted in a single step.<br />
mouse in Mac OS) on the first paragraph<br />
style you want <strong>to</strong> apply, and<br />
choose Apply Then<br />
Next Style from the context menu.<br />
You can also use this feature as part<br />
of an object style definition in the<br />
Paragraph Styles pane of the Object<br />
Style Options dialog box.<br />
Bullets and Numbering<br />
You can add bullets or sequential<br />
numbering <strong>to</strong> selected paragraphs by<br />
clicking the Paragraph Formatting<br />
Controls icon in the Control panel<br />
and then clicking either the Bulleted<br />
List ( ) or Numbered List ( )<br />
but<strong>to</strong>n in the Control panel. To control<br />
formatting, styles, or positioning<br />
of the bullets or numbers, choose<br />
Bullets And Numbering from the<br />
Control panel menu.<br />
You can apply au<strong>to</strong>matic bullets or<br />
numbers as part of a paragraph style<br />
by choosing the Bullets And Numbering<br />
pane of the Paragraph Style<br />
Options dialog box.<br />
For more on bullets and numbering,<br />
including how <strong>to</strong> make multilevel<br />
lists and numbered lists across multiple<br />
nonthreaded text frames, see<br />
<strong>InDesign</strong> Help.<br />
Placing Text on a Path<br />
<strong>InDesign</strong> lets you place text along<br />
any path—even along the edge of a<br />
closed frame. After creating a path<br />
or frame, select the Type On A Path<br />
<strong>to</strong>ol, which is paired with the Type<br />
<strong>to</strong>ol in the Tools panel. Move the<br />
pointer over any position on the<br />
path, and when the plus sign (+)<br />
appears, click. If you click and drag<br />
the pointer along the path before<br />
you release the mouse but<strong>to</strong>n, text<br />
flows only along the part of the path<br />
on which you clicked and dragged.<br />
If you switch <strong>to</strong> the Selection <strong>to</strong>ol,<br />
three bracket lines are displayed on<br />
the type path: one at each end, and<br />
a shorter one at the midpoint. Click<br />
44 <strong>Adobe</strong> <strong>InDesign</strong> <strong>CS4</strong> | <strong>Conversion</strong> <strong>Guide</strong>