QuarkXPress to Adobe InDesign CS4 Conversion Guide
QuarkXPress to Adobe InDesign CS4 Conversion Guide
QuarkXPress to Adobe InDesign CS4 Conversion Guide

You also want an ePaper? Increase the reach of your titles
YUMPU automatically turns print PDFs into web optimized ePapers that Google loves.
For Spots option. This ensures you<br />
get the best quality color for proofing<br />
and for conversion <strong>to</strong> CMYK. The Ink<br />
Manager also lets you convert a spot<br />
color <strong>to</strong> a process color by clicking<br />
the spot color icon <strong>to</strong> the left of<br />
the spot color name or by selecting<br />
the All Spots To Process option.<br />
To convert RGB colors or images <strong>to</strong><br />
CMYK when you print, choose Composite<br />
CMYK, Separations, or In-RIP<br />
Separations from the Color pop-up<br />
menu in the Output pane of the Print<br />
dialog box.<br />
You can convert <strong>to</strong> CMYK while<br />
exporting a PDF file by choosing<br />
Convert To Destination (Preserve<br />
Numbers) from the Color <strong>Conversion</strong><br />
pop-up menu in the Output<br />
pane of the Export <strong>Adobe</strong> PDF dialog<br />
box. Preserve Numbers indicates that<br />
images and swatches already defined<br />
with CMYK values will pass through<br />
and not be changed.<br />
Bézier Drawing<br />
While <strong>Adobe</strong> Illustra<strong>to</strong>r is the industry’s<br />
premier drawing application,<br />
<strong>InDesign</strong> offers many excellent drawing<br />
features that work identically <strong>to</strong><br />
those in Illustra<strong>to</strong>r, including a Pen<br />
<strong>to</strong>ol and a Convert Direction Point<br />
<strong>to</strong>ol. Note that when the Pen <strong>to</strong>ol is<br />
over a path, it au<strong>to</strong>matically changes<br />
<strong>to</strong> the Add Anchor Point <strong>to</strong>ol; when<br />
over an anchor point, it changes <strong>to</strong><br />
the Delete Anchor Point <strong>to</strong>ol.<br />
The Pathfinder panel (in the Window<br />
> Object & Layout menu) lets<br />
you merge and intersect paths. The<br />
Object > Paths menu lets you combine<br />
paths in<strong>to</strong> compound paths.<br />
You can also copy and paste editable<br />
vec<strong>to</strong>r artwork between <strong>InDesign</strong><br />
and Illustra<strong>to</strong>r (see “Copying Graphics”<br />
on page 24).<br />
Redrawing Frames with the Pencil Tool<br />
The Pencil <strong>to</strong>ol lets you draw paths<br />
or frames free-form, by clicking and<br />
dragging. To create a closed path,<br />
hold down the Option (Mac OS) or<br />
Alt (Windows) key after you start<br />
drawing, and hold it down until after<br />
you let go of the mouse but<strong>to</strong>n.<br />
The Pencil <strong>to</strong>ol not only draws, it<br />
redraws: If you draw over part of a<br />
path or frame edge, <strong>InDesign</strong> deletes<br />
a section of the path and redraws<br />
using the new path you drew. This<br />
is helpful for converting rectangular<br />
frames <strong>to</strong> irregular shapes.<br />
To change the Pencil <strong>to</strong>ol’s <strong>to</strong>lerance<br />
settings, double-click the <strong>to</strong>ol in the<br />
Tools panel.<br />
Corner Effects<br />
<strong>InDesign</strong> lets you alter the look of<br />
corner points in any frame or path.<br />
For example, you may want <strong>to</strong> apply<br />
rounded corners <strong>to</strong> a selected frame<br />
or path. You can do this by choosing<br />
Object > Corner Options, and then<br />
choosing Rounded from the Effects<br />
pop-up menu in the Corner Options<br />
dialog box.<br />
Anchoring Objects in<strong>to</strong> Text<br />
When you copy a path, frame, or<br />
group with the Selection <strong>to</strong>ol and<br />
then paste it in<strong>to</strong> text with the Type<br />
<strong>to</strong>ol, it’s called an anchored item. It<br />
behaves like a single text character<br />
that moves with the adjoining text as<br />
you make edits <strong>to</strong> the text. You can<br />
also create an anchored object by<br />
inserting the text cursor in some text<br />
and choosing File > Place or Object ><br />
Anchored Object > Insert.<br />
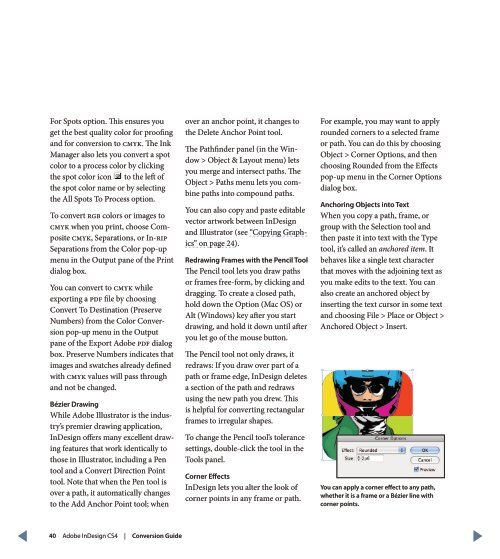
You can apply a corner effect <strong>to</strong> any path,<br />
whether it is a frame or a Bézier line with<br />
corner points.<br />
40 <strong>Adobe</strong> <strong>InDesign</strong> <strong>CS4</strong> | <strong>Conversion</strong> <strong>Guide</strong>