User's Manual AXF Magnetic Flowmeter Integral ... - Yokogawa
User's Manual AXF Magnetic Flowmeter Integral ... - Yokogawa
User's Manual AXF Magnetic Flowmeter Integral ... - Yokogawa

You also want an ePaper? Increase the reach of your titles
YUMPU automatically turns print PDFs into web optimized ePapers that Google loves.
3. INSTALLATION<br />
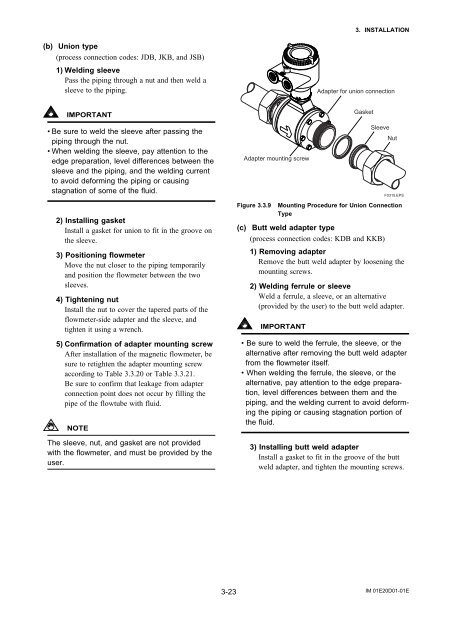
(b) Union type<br />
(process connection codes: JDB, JKB, and JSB)<br />
1) Welding sleeve<br />
Pass the piping through a nut and then weld a<br />
sleeve to the piping.<br />
Adapter for union connection<br />
IMPORTANT<br />
• Be sure to weld the sleeve after passing the<br />
piping through the nut.<br />
•When welding the sleeve, pay attention to the<br />
edge preparation, level differences between the<br />
sleeve and the piping, and the welding current<br />
to avoid deforming the piping or causing<br />
stagnation of some of the fluid.<br />
2) Installing gasket<br />
Install a gasket for union to fit in the groove on<br />
the sleeve.<br />
3) Positioning flowmeter<br />
Move the nut closer to the piping temporarily<br />
and position the flowmeter between the two<br />
sleeves.<br />
4) Tightening nut<br />
Install the nut to cover the tapered parts of the<br />
flowmeter-side adapter and the sleeve, and<br />
tighten it using a wrench.<br />
5) Confirmation of adapter mounting screw<br />
After installation of the magnetic flowmeter, be<br />
sure to retighten the adapter mounting screw<br />
according to Table 3.3.20 or Table 3.3.21.<br />
Be sure to confirm that leakage from adapter<br />
connection point does not occur by filling the<br />
pipe of the flowtube with fluid.<br />
NOTE<br />
The sleeve, nut, and gasket are not provided<br />
with the flowmeter, and must be provided by the<br />
user.<br />
Adapter mounting screw<br />
Figure 3.3.9<br />
(c)<br />
Gasket<br />
Sleeve<br />
Nut<br />
F0315.EPS<br />
Mounting Procedure for Union Connection<br />
Type<br />
Butt weld adapter type<br />
(process connection codes: KDB and KKB)<br />
1) Removing adapter<br />
Remove the butt weld adapter by loosening the<br />
mounting screws.<br />
2) Welding ferrule or sleeve<br />
Weld a ferrule, a sleeve, or an alternative<br />
(provided by the user) to the butt weld adapter.<br />
IMPORTANT<br />
• Be sure to weld the ferrule, the sleeve, or the<br />
alternative after removing the butt weld adapter<br />
from the flowmeter itself.<br />
• When welding the ferrule, the sleeve, or the<br />
alternative, pay attention to the edge preparation,<br />
level differences between them and the<br />
piping, and the welding current to avoid deforming<br />
the piping or causing stagnation portion of<br />
the fluid.<br />
3) Installing butt weld adapter<br />
Install a gasket to fit in the groove of the butt<br />
weld adapter, and tighten the mounting screws.<br />
3-23<br />
IM 01E20D01-01E