User's Manual AXF Magnetic Flowmeter Integral ... - Yokogawa
User's Manual AXF Magnetic Flowmeter Integral ... - Yokogawa
User's Manual AXF Magnetic Flowmeter Integral ... - Yokogawa

Create successful ePaper yourself
Turn your PDF publications into a flip-book with our unique Google optimized e-Paper software.
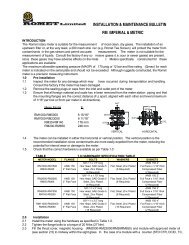
3. INSTALLATION<br />
CAUTION<br />
• In case of standard gasket (EPDM rubber),<br />
tighten the adapter mounting screw according<br />
to the torque values in Table 3.3.20.<br />
• In case that optional code GH (Silicon rubber)<br />
is selected, tighten the adapter mounting screw<br />
according to the torque values in Table 3.3.21.<br />
• Tighten the adapter mounting screw in diagonal<br />
order step by step.<br />
• After tightening of screw, confirm that gaskets<br />
protrude inside adapter. Protruding of gasket is<br />
necessary to keep the sanitary requirements.<br />
Mini-flange<br />
Gasket<br />
Butt weld adapter<br />
Adapter<br />
mounting screw<br />
F0316.EPS<br />
Table 3.3.20<br />
Tightening Torque Values of adapter for<br />
EPDM rubber gasket<br />
Figure 3.3.10 Mounting Procedure for Weld Joint Adapter<br />
Type<br />
Tightening torque values (N-m / {kgf-cm} / [in-lbf])<br />
Gasket type<br />
EPDM rubber<br />
Size mm (inch)<br />
(standard)<br />
15 (0.5), 25 (1.0), 32 (1.25), 40 (1.5)<br />
50 (2.0), 65 (2.5)<br />
80 (3.0)<br />
100 (4.0), 125 (5.0)<br />
3.0 to 3.5 / {30.59 to 35.69} / [26.55 to 30.98]<br />
4.5 to 5.0 / {45.89 to 50.99} / [39.83 to 44.25]<br />
8.0 to 9.0 / {81.58 to 91.78} / [70.81 to 79.65]<br />
10 to 11 / {102.0 to 112.2} / [88.50 to 97.35]<br />
T0502.EPS<br />
(3) Maintenance of Sanitary Type<br />
Refer to Section 5.3<br />
Table 3.3.21<br />
Tightening Torque Values of adapter for<br />
silicon rubber gasket<br />
Tightening torque values (N-m / {kgf-cm} / [in-lbf])<br />
Gasket type Silicon rubber<br />
Size mm (inch)<br />
(optional code GH)<br />
15 (0.5), 25 (1.0), 32 (1.25), 40 (1.5)<br />
50 (2.0), 65 (2.5), 80 (3.0)<br />
100 (4.0), 125 (5.0)<br />
2.0 to 2.5 / {20.39 to 25.49} / [17.70 to 22.13]<br />
4.0 to 4.5 / {40.79 to 45.89} / [35.40 to 39.83]<br />
6.0 to 6.5 / {61.18 to 66.28} / [53.10 to 57.53]<br />
T0503.EPS<br />
4) Mounting flowmeter to piping<br />
Connect the flowmeter to the piping in a manner<br />
appropriate to the ferrule, the sleeve, or the<br />
alternative that has been welded to the adapter.<br />
5) Confirmation of adapter mounting screw<br />
After installation of the magnetic flowmeter, be<br />
sure to retighten the adapter mounting screw<br />
according to Table 3.3.20 or Table 3.3.21.<br />
Be sure to confirm that leakage from adapter<br />
connection point does not occur by filling the<br />
pipe of the flowtube with fluid.<br />
3-24<br />
IM 01E20D01-01E