2110XP Ammonia Analyzer User Guide (1574 Kb) - Thermo Scientific
2110XP Ammonia Analyzer User Guide (1574 Kb) - Thermo Scientific
2110XP Ammonia Analyzer User Guide (1574 Kb) - Thermo Scientific

You also want an ePaper? Increase the reach of your titles
YUMPU automatically turns print PDFs into web optimized ePapers that Google loves.
Instrument Preparation<br />
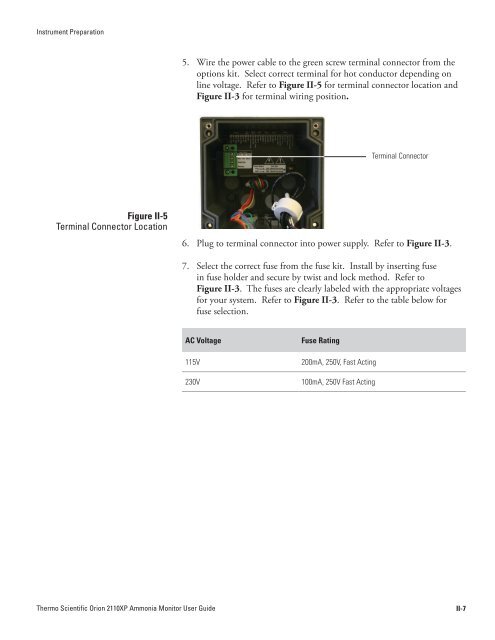
5. Wire the power cable to the green screw terminal connector from the<br />
options kit. Select correct terminal for hot conductor depending on<br />
line voltage. Refer to Figure II-5 for terminal connector location and<br />
Figure II-3 for terminal wiring position.<br />
Terminal Connector<br />
Figure II-5<br />
Terminal Connector Location<br />
6. Plug to terminal connector into power supply. Refer to Figure II-3.<br />
7. Select the correct fuse from the fuse kit. Install by inserting fuse<br />
in fuse holder and secure by twist and lock method. Refer to<br />
Figure II-3. The fuses are clearly labeled with the appropriate voltages<br />
for your system. Refer to Figure II-3. Refer to the table below for<br />
fuse selection.<br />
AC Voltage<br />
115V<br />
230V<br />
Fuse Rating<br />
200mA, 250V, Fast Acting<br />
100mA, 250V Fast Acting<br />
<strong>Thermo</strong> <strong>Scientific</strong> Orion <strong>2110XP</strong> <strong>Ammonia</strong> Monitor <strong>User</strong> <strong>Guide</strong><br />
II-7