2110XP Ammonia Analyzer User Guide (1574 Kb) - Thermo Scientific
2110XP Ammonia Analyzer User Guide (1574 Kb) - Thermo Scientific
2110XP Ammonia Analyzer User Guide (1574 Kb) - Thermo Scientific

Create successful ePaper yourself
Turn your PDF publications into a flip-book with our unique Google optimized e-Paper software.
Instrument Preparation<br />
Installation of New<br />
<strong>Ammonia</strong> Electrode<br />
The Orion ammonia electrode (Cat. No. 100047) must be used in<br />
conjunction with the Orion reference electrode (Cat. No. 210056).<br />
1. Unpack the ammonia electrode (Cat. No. 100047) and carefully<br />
remove it from the storage cap.<br />
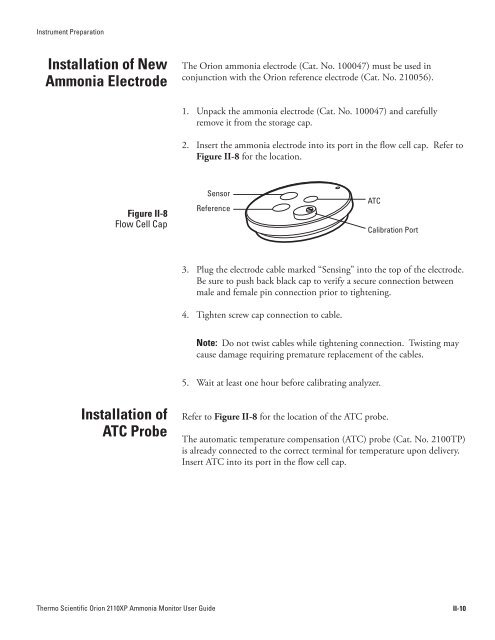
2. Insert the ammonia electrode into its port in the flow cell cap. Refer to<br />
Figure II-8 for the location.<br />
Figure II-8<br />
Flow Cell Cap<br />
Sensor<br />
Reference<br />
ATC<br />
Calibration Port<br />
3. Plug the electrode cable marked “Sensing” into the top of the electrode.<br />
Be sure to push back black cap to verify a secure connection between<br />
male and female pin connection prior to tightening.<br />
4. Tighten screw cap connection to cable.<br />
Note: Do not twist cables while tightening connection. Twisting may<br />
cause damage requiring premature replacement of the cables.<br />
5. Wait at least one hour before calibrating analyzer.<br />
Installation of<br />
ATC Probe<br />
Refer to Figure II-8 for the location of the ATC probe.<br />
The automatic temperature compensation (ATC) probe (Cat. No. 2100TP)<br />
is already connected to the correct terminal for temperature upon delivery.<br />
Insert ATC into its port in the flow cell cap.<br />
<strong>Thermo</strong> <strong>Scientific</strong> Orion <strong>2110XP</strong> <strong>Ammonia</strong> Monitor <strong>User</strong> <strong>Guide</strong><br />
II-10