2110XP Ammonia Analyzer User Guide (1574 Kb) - Thermo Scientific
2110XP Ammonia Analyzer User Guide (1574 Kb) - Thermo Scientific
2110XP Ammonia Analyzer User Guide (1574 Kb) - Thermo Scientific

You also want an ePaper? Increase the reach of your titles
YUMPU automatically turns print PDFs into web optimized ePapers that Google loves.
Instrument Maintenance<br />
Yearly Preventive<br />
Maintenance<br />
Note: Dispose of all old solutions according to MSDS instruction. MSDS<br />
can be downloaded at www.thermo.com/water.<br />
Electrodes<br />
1. Replace the Orion reference electrode (Cat. No. 100057). Refer to<br />
Chapter II, Instrument Preparation for step-by-step instructions.<br />
2. Replace the Orion sensing electrode (Cat. No. 100025). Refer to<br />
Chapter II, Instrument Preparation for step-by-step instructions.<br />
3. Replace calibration solutions kit (Cat. No. 211740).<br />
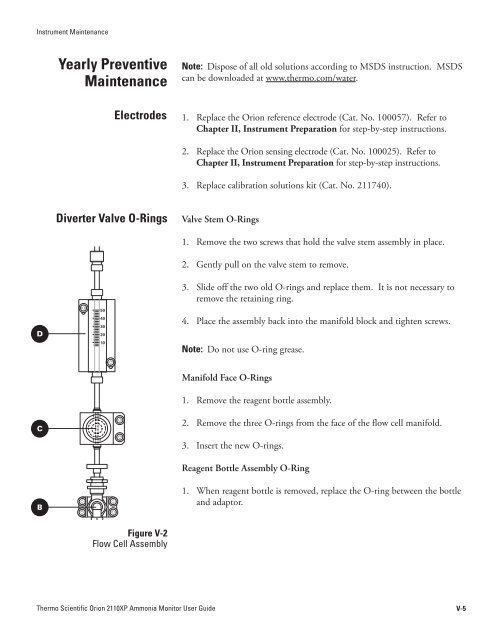
Diverter Valve O-Rings<br />
Valve Stem O-Rings<br />
1. Remove the two screws that hold the valve stem assembly in place.<br />
2. Gently pull on the valve stem to remove.<br />
D<br />
50<br />
40<br />
30<br />
20<br />
10<br />
3. Slide off the two old O-rings and replace them. It is not necessary to<br />
remove the retaining ring.<br />
4. Place the assembly back into the manifold block and tighten screws.<br />
Note: Do not use O-ring grease.<br />
Manifold Face O-Rings<br />
1. Remove the reagent bottle assembly.<br />
C<br />
2. Remove the three O-rings from the face of the flow cell manifold.<br />
3. Insert the new O-rings.<br />
Reagent Bottle Assembly O-Ring<br />
B<br />
1. When reagent bottle is removed, replace the O-ring between the bottle<br />
and adaptor.<br />
Figure V-2<br />
Flow Cell Assembly<br />
A<br />
<strong>Thermo</strong> <strong>Scientific</strong> Orion <strong>2110XP</strong> <strong>Ammonia</strong> Monitor <strong>User</strong> <strong>Guide</strong><br />
V-5