

MAINTENANCE MANUAL - Meritor
MAINTENANCE MANUAL - Meritor
MAINTENANCE MANUAL - Meritor

You also want an ePaper? Increase the reach of your titles
YUMPU automatically turns print PDFs into web optimized ePapers that Google loves.
14. Lock or engaged the main differential Cage<br />
using the manual engaging methoid.<br />
A. Install the manual engaging capscrew into<br />
the threaded hole in the center of the cylinder.<br />
FIGURE 11.6.<br />
CAUTION<br />
WHEN YOU TURN THE CAPSCREW IN<br />
STEP D AND YOU FEEL A HIGH RESIS-<br />
TANCE, STOP TURNING THE CAPSCREW.<br />
A HIGH RESISTANCE AGAINST THE CAP-<br />
SCREW INDICATES THAT THE SPLINES<br />
OF THE SHIFT COLLAR AND DIFFEREN-<br />
TIAL CASE ARE NOT ALIGNED. DAMAGE<br />
TO THE THREADS OF THE CYLINDER AND<br />
CAPSCREW WILL RESULT.<br />
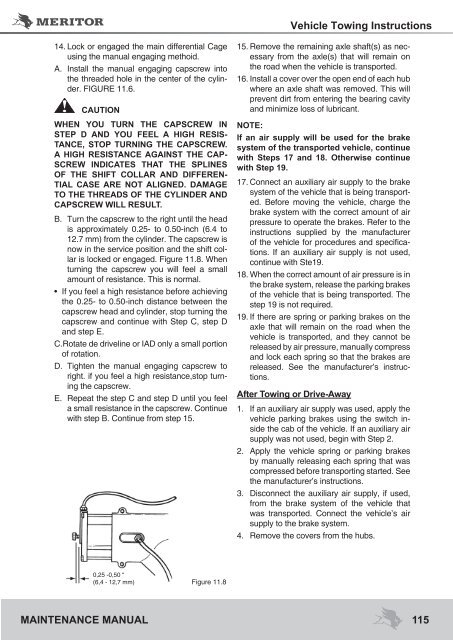
B. Turn the capscrew to the right until the head<br />
is approximately 0.25- to 0.50-inch (6.4 to<br />
12.7 mm) from the cylinder. The capscrew is<br />
now in the service position and the shift collar<br />
is locked or engaged. Figure 11.8. When<br />
turning the capscrew you will feel a small<br />
amount of resistance. This is normal.<br />
• If you feel a high resistance before achieving<br />
the 0.25- to 0.50-inch distance between the<br />
capscrew head and cylinder, stop turning the<br />
capscrew and continue with Step C, step D<br />
and step E.<br />
C. Rotate de driveline or IAD only a small portion<br />
of rotation.<br />
D. Tighten the manual engaging capscrew to<br />
right. if you feel a high resistance,stop turning<br />
the capscrew.<br />
E. Repeat the step C and step D until you feel<br />
a small resistance in the capscrew. Continue<br />
with step B. Continue from step 15.<br />
<strong>MAINTENANCE</strong> <strong>MANUAL</strong><br />
0,25 -0,50 “<br />
(6,4 - 12,7 mm) Figure 11.8<br />
Vehicle Towing Instructions<br />
15. Remove the remaining axle shaft(s) as necessary<br />
from the axle(s) that will remain on<br />
the road when the vehicle is transported.<br />
16. Install a cover over the open end of each hub<br />
where an axle shaft was removed. This will<br />
prevent dirt from entering the bearing cavity<br />
and minimize loss of lubricant.<br />
NOTE:<br />
If an air supply will be used for the brake<br />
system of the transported vehicle, continue<br />
with Steps 17 and 18. Otherwise continue<br />
with Step 19.<br />
17. Connect an auxiliary air supply to the brake<br />
system of the vehicle that is being transported.<br />
Before moving the vehicle, charge the<br />
brake system with the correct amount of air<br />
pressure to operate the brakes. Refer to the<br />
instructions supplied by the manufacturer<br />
of the vehicle for procedures and specifications.<br />
If an auxiliary air supply is not used,<br />
continue with Ste19.<br />
18. When the correct amount of air pressure is in<br />
the brake system, release the parking brakes<br />
of the vehicle that is being transported. The<br />
step 19 is not required.<br />
19. If there are spring or parking brakes on the<br />
axle that will remain on the road when the<br />
vehicle is transported, and they cannot be<br />
released by air pressure, manually compress<br />
and lock each spring so that the brakes are<br />
released. See the manufacturer’s instructions.<br />
After Towing or Drive-Away<br />
1. If an auxiliary air supply was used, apply the<br />
vehicle parking brakes using the switch inside<br />
the cab of the vehicle. If an auxiliary air<br />
supply was not used, begin with Step 2.<br />
2. Apply the vehicle spring or parking brakes<br />
by manually releasing each spring that was<br />
compressed before transporting started. See<br />
the manufacturer’s instructions.<br />
3. Disconnect the auxiliary air supply, if used,<br />
from the brake system of the vehicle that<br />
was transported. Connect the vehicle’s air<br />
supply to the brake system.<br />
4. Remove the covers from the hubs.<br />
115


