

MAINTENANCE MANUAL - Meritor
MAINTENANCE MANUAL - Meritor
MAINTENANCE MANUAL - Meritor

Create successful ePaper yourself
Turn your PDF publications into a flip-book with our unique Google optimized e-Paper software.
Hazard Alert Messages<br />
Read and observe all Warning and Caution<br />
hazard alert messages in this publication. They<br />
provide information that can help prevent serious<br />
personal injury, damage to components, or<br />
both.<br />
WARNING<br />
To prevent serious eye injury, always wear<br />
safe eye protection when you perform vehicle<br />
maintenance or service.<br />
Use a brass or synthetic mallet for assembly<br />
and disassembly procedures. Do not hit steel<br />
parts with a steel hammer. Pieces of a part can<br />
break off. Serious personal injury and damage<br />
to components can result.<br />
Observe all warnings and cautions provided<br />
by the press manufacturer to avoid damage to<br />
components and serious personal injury.<br />
Axle Shafts from the Axle Housing<br />
WARNING<br />
Park the vehicle on a level surface. Block the<br />
wheels to prevent the vehicle from moving.<br />
Support the vehicle with safety stands. Do not<br />
work under a vehicle supported only by jacks.<br />
Jacks can slip or fall over. Serious personal<br />
injury and damage to components can result.<br />
1. Park the vehicle on a level surface. Block the<br />
wheels to prevent the vehicle from moving.<br />
Set the parking brake.<br />
2.Use a jack to raise the vehicle so that the wheels<br />
to be serviced are off the ground. Support the<br />
vehicle with safety stands.<br />
3. Remove the oil drain plug from the bottom<br />
of the axle housing. Drain the axle lubricant<br />
from the housing assembly.<br />
<strong>MAINTENANCE</strong> <strong>MANUAL</strong><br />
Removal and Disassembly<br />
OIL FILTER ADAPTER<br />
OIL FILTER<br />
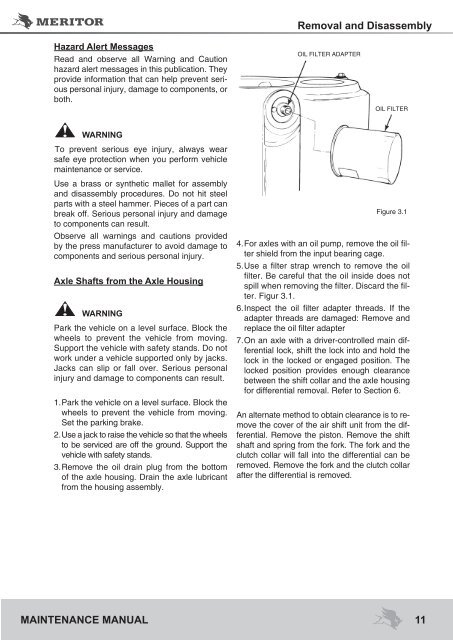
Figure 3.1<br />
4.For axles with an oil pump, remove the oil filter<br />
shield from the input bearing cage.<br />
5.Use a filter strap wrench to remove the oil<br />
filter. Be careful that the oil inside does not<br />
spill when removing the filter. Discard the filter.<br />
Figur 3.1.<br />
6.Inspect the oil filter adapter threads. If the<br />
adapter threads are damaged: Remove and<br />
replace the oil filter adapter<br />
7. On an axle with a driver-controlled main differential<br />
lock, shift the lock into and hold the<br />
lock in the locked or engaged position. The<br />
locked position provides enough clearance<br />
between the shift collar and the axle housing<br />
for differential removal. Refer to Section 6.<br />
An alternate method to obtain clearance is to remove<br />
the cover of the air shift unit from the differential.<br />
Remove the piston. Remove the shift<br />
shaft and spring from the fork. The fork and the<br />
clutch collar will fall into the differential can be<br />
removed. Remove the fork and the clutch collar<br />
after the differential is removed.<br />
11


