

MAINTENANCE MANUAL - Meritor
MAINTENANCE MANUAL - Meritor
MAINTENANCE MANUAL - Meritor

Create successful ePaper yourself
Turn your PDF publications into a flip-book with our unique Google optimized e-Paper software.
Assembly and Installation<br />
10. If disassembled, assemble the inter-axle<br />
differential.<br />
A. Apply axle lubricant to all of the inter-axle<br />
differential parts.<br />
B. Install the pinion gears and the thrust washers<br />
in the spider.<br />
C. Place the spider and pinion assembly in<br />
one of the case halves of the inter-axle<br />
differential.<br />
D. Install the remaining case half over the first<br />
case half. Verify that the marks on each case<br />
half are aligned.<br />
E. Install four of the capscrews that fasten the<br />
case halves together. Install the capscrews<br />
so that the capscrews are the same distance<br />
away from each other. Equally tighten the<br />
capscrews to bring the case halves together.<br />
F. Install the rest of the capscrews. Tighten<br />
the capscrews to 45-55 lb-ft (60-75 Nm).<br />
11. Install the inter-axle differential to the input<br />
shaft so that the teeth in the differential<br />
case are away from the helical drive gear.<br />
Install the snap ring that fastens the case to<br />
the shaft. Figure 5.75.<br />
SNAP RING<br />
HEAD OF BOLTS FACING<br />
DRIVE GEAR,EXCLUDES<br />
WELDED CASES.<br />
INPUT SHAFT<br />
INTER-AXLE<br />
DIFFERENTIAL<br />
HELICAL<br />
DRIVE<br />
GEAR<br />
Figure 5.75<br />
NOTE: If you replace either the bearing cap<br />
or the cone, replace both parts in a fullymatched<br />
set from the same manufacturer.<br />
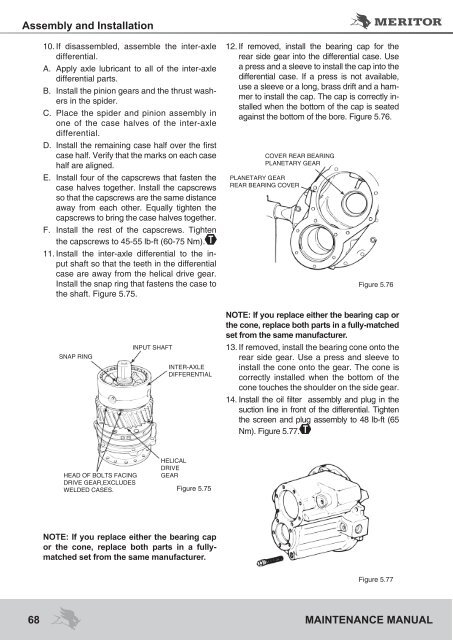
12. If removed, install the bearing cap for the<br />
rear side gear into the differential case. Use<br />
a press and a sleeve to install the cap into the<br />
differential case. If a press is not available,<br />
use a sleeve or a long, brass drift and a hammer<br />
to install the cap. The cap is correctly installed<br />
when the bottom of the cap is seated<br />
against the bottom of the bore. Figure 5.76.<br />
COVER REAR BEARING<br />
PLANETARY GEAR<br />
PLANETARY GEAR<br />
REAR BEARING COVER<br />
Figure 5.76<br />
NOTE: If you replace either the bearing cap or<br />
the cone, replace both parts in a fully-matched<br />
set from the same manufacturer.<br />
13. If removed, install the bearing cone onto the<br />
rear side gear. Use a press and sleeve to<br />
install the cone onto the gear. The cone is<br />
correctly installed when the bottom of the<br />
cone touches the shoulder on the side gear.<br />
14. Install the oil filter assembly and plug in the<br />
suction line in front of the differential. Tighten<br />
the screen and plug assembly to 48 lb-ft (65<br />
Nm). Figure 5.77.<br />
Figure 5.77<br />
68 <strong>MAINTENANCE</strong> <strong>MANUAL</strong>


