MAINTENANCE MANUAL - Meritor
MAINTENANCE MANUAL - Meritor
MAINTENANCE MANUAL - Meritor
You also want an ePaper? Increase the reach of your titles
YUMPU automatically turns print PDFs into web optimized ePapers that Google loves.
Assembly and Installation<br />
CAUTION<br />
THE BEARING CAPS MUST BE CORRECT-<br />
LY INSTALLED OR THE ADjUSTING RINGS<br />
WILL BE DAMAGED BY CROSS-THREAD-<br />
ING. FORCING THE CAPS INTO POSITION<br />
CAN DAMAGE THE CAPS AND THE DIF-<br />
FERENTIAL CASE.<br />
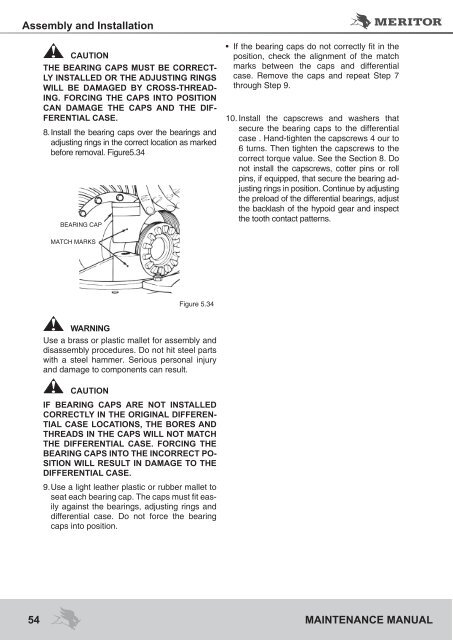
8. Install the bearing caps over the bearings and<br />
adjusting rings in the correct location as marked<br />
before removal. Figure5.34<br />
BEARING CAP<br />
MATCH MARKS<br />
Figure 5.34<br />
WARNING<br />
Use a brass or plastic mallet for assembly and<br />
disassembly procedures. Do not hit steel parts<br />
with a steel hammer. Serious personal injury<br />
and damage to components can result.<br />
CAUTION<br />
IF BEARING CAPS ARE NOT INSTALLED<br />
CORRECTLY IN THE ORIGINAL DIFFEREN-<br />
TIAL CASE LOCATIONS, THE BORES AND<br />
THREADS IN THE CAPS WILL NOT MATCH<br />
THE DIFFERENTIAL CASE. FORCING THE<br />
BEARING CAPS INTO THE INCORRECT PO-<br />
SITION WILL RESULT IN DAMAGE TO THE<br />
DIFFERENTIAL CASE.<br />
9. Use a light leather plastic or rubber mallet to<br />
seat each bearing cap. The caps must fit easily<br />
against the bearings, adjusting rings and<br />
differential case. Do not force the bearing<br />
caps into position.<br />
• If the bearing caps do not correctly fit in the<br />
position, check the alignment of the match<br />
marks between the caps and differential<br />
case. Remove the caps and repeat Step 7<br />
through Step 9.<br />
10. Install the capscrews and washers that<br />
secure the bearing caps to the differential<br />
case . Hand-tighten the capscrews 4 our to<br />
6 turns. Then tighten the capscrews to the<br />
correct torque value. See the Section 8. Do<br />
not install the capscrews, cotter pins or roll<br />
pins, if equipped, that secure the bearing adjusting<br />
rings in position. Continue by adjusting<br />
the preload of the differential bearings, adjust<br />
the backlash of the hypoid gear and inspect<br />
the tooth contact patterns.<br />
54 <strong>MAINTENANCE</strong> <strong>MANUAL</strong>


