h16tp(x - AJ Maskin AS
h16tp(x - AJ Maskin AS
h16tp(x - AJ Maskin AS
- No tags were found...

You also want an ePaper? Increase the reach of your titles
YUMPU automatically turns print PDFs into web optimized ePapers that Google loves.
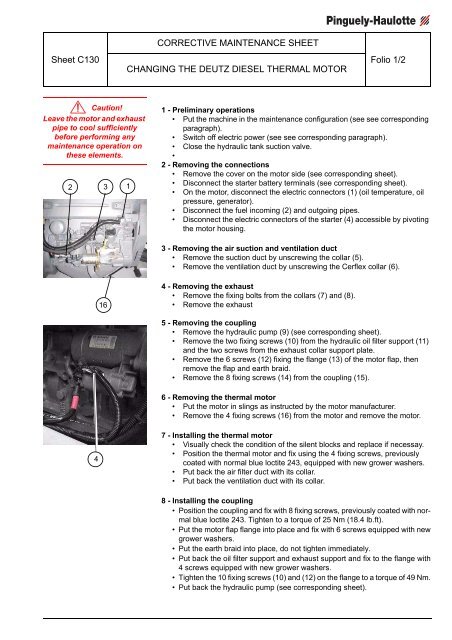
Sheet C130CORRECTIVE MAINTENANCE SHEETCHANGING THE DEUTZ DIESEL THERMAL MOTORFolio 1/2Caution!Leave the motor and exhaustpipe to cool sufficientlybefore performing anymaintenance operation onthese elements.23 11 - Preliminary operations• Put the machine in the maintenance configuration (see see correspondingparagraph).• Switch off electric power (see see corresponding paragraph).• Close the hydraulic tank suction valve.•2 - Removing the connections• Remove the cover on the motor side (see corresponding sheet).• Disconnect the starter battery terminals (see corresponding sheet).• On the motor, disconnect the electric connectors (1) (oil temperature, oilpressure, generator).• Disconnect the fuel incoming (2) and outgoing pipes.• Disconnect the electric connectors of the starter (4) accessible by pivotingthe motor housing.3 - Removing the air suction and ventilation duct• Remove the suction duct by unscrewing the collar (5).• Remove the ventilation duct by unscrewing the Cerflex collar (6).164 - Removing the exhaust• Remove the fixing bolts from the collars (7) and (8).• Remove the exhaust5 - Removing the coupling• Remove the hydraulic pump (9) (see corresponding sheet).• Remove the two fixing screws (10) from the hydraulic oil filter support (11)and the two screws from the exhaust collar support plate.• Remove the 6 screws (12) fixing the flange (13) of the motor flap, thenremove the flap and earth braid.• Remove the 8 fixing screws (14) from the coupling (15).6 - Removing the thermal motor• Put the motor in slings as instructed by the motor manufacturer.• Remove the 4 fixing screws (16) from the motor and remove the motor.47 - Installing the thermal motor• Visually check the condition of the silent blocks and replace if necessay.• Position the thermal motor and fix using the 4 fixing screws, previouslycoated with normal blue loctite 243, equipped with new grower washers.• Put back the air filter duct with its collar.• Put back the ventilation duct with its collar.8 - Installing the coupling• Position the coupling and fix with 8 fixing screws, previously coated with normalblue loctite 243. Tighten to a torque of 25 Nm (18.4 lb.ft).• Put the motor flap flange into place and fix with 6 screws equipped with newgrower washers.• Put the earth braid into place, do not tighten immediately.• Put back the oil filter support and exhaust support and fix to the flange with4 screws equipped with new grower washers.• Tighten the 10 fixing screws (10) and (12) on the flange to a torque of 49 Nm.• Put back the hydraulic pump (see corresponding sheet).