- Page 1 and 2:
LibreOffice 3.6 Writer Guide Word P
- Page 3 and 4:
Contents Copyright.................
- Page 5 and 6:
Chapter 6 Introduction to Styles...
- Page 7 and 8:
Chapter 14 Working with Fields.....
- Page 9 and 10:
Preface
- Page 11 and 12:
You can get comprehensive online su
- Page 13 and 14:
A dialog is a special type of windo
- Page 15 and 16:
Chapter 1 Introducing Writer
- Page 17 and 18:
Menus The Menu bar is located just
- Page 19 and 20:
Figure 6: Control+click to dock or
- Page 21 and 22:
Status bar The Writer status bar is
- Page 23 and 24:
Figure 13. View layouts: single, si
- Page 25 and 26:
From the operating system menu Figu
- Page 27 and 28:
Saving a document To save a new doc
- Page 29 and 30:
Figure 19: Two levels of password p
- Page 31 and 32:
To hide the list of categories and
- Page 33 and 34:
Figure 23: Previous, Navigation, an
- Page 35:
Click the small triangle to the rig
- Page 38 and 39:
Choosing options for Writer that af
- Page 40 and 41:
Memory options The Options on the L
- Page 42 and 43:
Graphics output - Use Anti-Aliasing
- Page 44 and 45:
Tip Color options You can use the e
- Page 46 and 47:
Security options Use the LibreOffic
- Page 48 and 49:
Choosing options for loading and sa
- Page 50 and 51:
Two notable examples are cross-refe
- Page 52 and 53:
Choosing options for Writer Setting
- Page 54 and 55:
Note Figure 45: Choosing Formatting
- Page 56 and 57:
Figure 48: Choosing Print options f
- Page 58 and 59:
Compatibility options Do you need t
- Page 60 and 61:
Mail Merge E-mail options You can p
- Page 62 and 63:
Figure 55: Choosing language option
- Page 65 and 66:
Chapter 3 Working with Text
- Page 67 and 68:
Figure 58: Selecting items that are
- Page 69 and 70:
Using the Find & Replace dialog box
- Page 71 and 72:
To use wildcards and regular expres
- Page 73 and 74:
Tip You can also record macros to i
- Page 75 and 76:
Figure 67: Options for the last lin
- Page 77 and 78:
1 Open Styles and Formatting Window
- Page 79 and 80:
Tip To move a list entry up, togeth
- Page 81 and 82:
Figure 76: Checking the outline num
- Page 83 and 84:
Figure 80: Defining footnote format
- Page 85 and 86:
under Tools > AutoCorrect Options >
- Page 87 and 88:
The first entry in the menu informs
- Page 89 and 90:
Figure 86: Options available in the
- Page 91 and 92:
Figure 89: The thesaurus offers alt
- Page 93 and 94:
To insert a conditional hyphen insi
- Page 95 and 96:
Using AutoText Use AutoText to stor
- Page 97 and 98:
Line numbering Line numbering puts
- Page 99 and 100:
Figure 98: Inserting a comment duri
- Page 101 and 102:
3) After the documents merge, the A
- Page 103 and 104:
Using hyperlinks When you type text
- Page 105 and 106:
The Further settings section in the
- Page 107 and 108:
Chapter 4 Formatting Pages Using Pa
- Page 109 and 110:
Use page styles (with two columns)
- Page 111 and 112:
Tip You can also insert a page brea
- Page 113 and 114:
Changing page orientation within a
- Page 115 and 116:
Adding title pages Writer provides
- Page 117 and 118:
Figure 114: Defining the number of
- Page 119 and 120:
To distribute text evenly, select t
- Page 121 and 122:
Moving, resizing, and changing fram
- Page 123 and 124:
Note You cannot link from a frame t
- Page 125 and 126:
Figure 124: Defining a two-column b
- Page 127 and 128:
Creating sections To create a secti
- Page 129 and 130:
Note Hiding sections Figure 131: Pa
- Page 131 and 132:
Customizing footnotes If you want t
- Page 133 and 134:
Editing the format of a section To
- Page 135 and 136:
Figure 139: Header marker at top of
- Page 137 and 138:
Portrait page (right page) Landscap
- Page 139 and 140:
Figure 144: Specifying the border p
- Page 141 and 142:
In the Styles and Formatting window
- Page 143 and 144:
For more information, see “Choosi
- Page 145 and 146:
Figure 152: Set the new page number
- Page 147 and 148:
Figure 156: Inserting a cross-refer
- Page 149:
Adding a graphic to the background
- Page 152 and 153:
Quick printing Click the Print File
- Page 154 and 155:
Figure 163: Printing multiple page
- Page 156 and 157:
Figure 164: Printing a selection of
- Page 158 and 159:
To use Page Preview: 1) Choose File
- Page 160 and 161:
Figure 169. Choosing printer option
- Page 162 and 163:
Sending a fax To send a fax directl
- Page 164 and 165:
• Export bookmarks: Creates PDF b
- Page 166 and 167:
Cross-document links Set up the beh
- Page 168 and 169:
To send the current document in ODT
- Page 170 and 171:
Figure 183: Deselecting a salutatio
- Page 173 and 174:
Chapter 6 Introduction to Styles Pa
- Page 175 and 176:
The Styles and Formatting window St
- Page 177 and 178:
Update Style (from a selection) Let
- Page 179 and 180:
Drag-and-drop a selection to create
- Page 181 and 182:
Figure 191: Showing the results of
- Page 183 and 184:
Tip Select all the formatting of on
- Page 185 and 186:
Another very useful mechanism to ch
- Page 187 and 188:
on the Bullets and Numbering toolba
- Page 189 and 190:
Examples: Modifying paragraph style
- Page 191 and 192:
The result should resemble the illu
- Page 193 and 194:
Creating the PoemHeading style Crea
- Page 195 and 196:
You can copy or move styles from on
- Page 197 and 198:
Defining a hierarchy of headings To
- Page 199 and 200:
Use the Numbering page of the Outli
- Page 201 and 202:
Positioning in new LibreOffice docu
- Page 203 and 204:
Chapter 7 Working with Styles
- Page 205 and 206:
Figure 227: The Organizer page disp
- Page 207 and 208:
Figure 230: Select the heading font
- Page 209 and 210:
• At least: this choice activates
- Page 211 and 212:
The Options section of the Text Flo
- Page 213 and 214:
Use the Position section to control
- Page 215 and 216:
Creating a new tab stop, therefore,
- Page 217 and 218:
Probably the most common use for co
- Page 219 and 220:
Creating a new character style This
- Page 221 and 222:
Style Comments and Use Graphics The
- Page 223 and 224:
Figure 246: Flow of page styles Gen
- Page 225 and 226:
If you deselect the Same content le
- Page 227 and 228:
Figure 250: Specifying the next sty
- Page 229 and 230:
Step 4. Start a new chapter. Apply
- Page 231 and 232:
Position page Use the Position page
- Page 233 and 234:
numbering and text is very useful w
- Page 235:
Creating the CDTracks numbered list
- Page 238 and 239:
Graphics (images) in Writer When yo
- Page 240 and 241:
Insert Picture dialog box 1) Click
- Page 242 and 243:
Caution If the application from whi
- Page 244 and 245:
Graphics mode You can change color
- Page 246 and 247:
Figure 264: The options available w
- Page 248 and 249:
Rotating a picture Writer does not
- Page 250 and 251: 4) To cancel the selected drawing f
- Page 252 and 253: 1 Apply Style 6 Center Horizontal 1
- Page 254 and 255: Page Wrap or Optimal Page Wrap The
- Page 256 and 257: Some familiarity with drawing tools
- Page 258 and 259: Example 3: Wrap Through and In Back
- Page 260 and 261: Figure 275: Defining the caption fo
- Page 262 and 263: Figure 277: The dialog box to creat
- Page 264 and 265: Note Note This procedure assumes th
- Page 267 and 268: Chapter 9 Working with Tables
- Page 269 and 270: Figure 279: Inserting a new table u
- Page 271 and 272: In the Separate text at part of the
- Page 273 and 274: Selecting Table > Autofit from the
- Page 275 and 276: The above keyboard technique can al
- Page 277 and 278: To set the background for a cell, r
- Page 279 and 280: also change the page style that wil
- Page 281 and 282: Note Figure 288: A table with rotat
- Page 283 and 284: 5) Press the Enter key, or click th
- Page 285 and 286: Options available to chapter number
- Page 287 and 288: Table AutoFormats record the follow
- Page 289 and 290: Using tables as a page layout tool
- Page 291 and 292: Chapter 10 Working with Templates
- Page 293 and 294: • To view the template’s proper
- Page 295 and 296: To edit a template: 1) From the men
- Page 297 and 298: See Chapter 16, Customizing Writer,
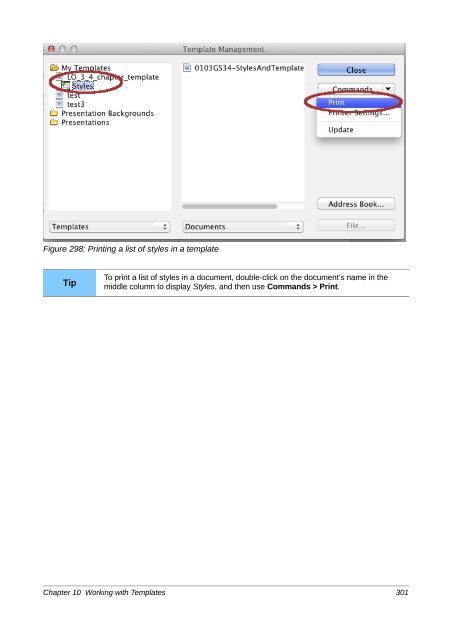
- Page 299: Note Organizing templates If you do
- Page 304 and 305: What is mail merge? LibreOffice Wri
- Page 306 and 307: 5) In the next dialog box, click Br
- Page 308 and 309: 3) Find the data source that you wi
- Page 310 and 311: c) Now click in the Condition box a
- Page 312 and 313: Figure 313: Select Database, Table,
- Page 314 and 315: 9) Click New Document. You now have
- Page 316 and 317: You can edit individual records in
- Page 318 and 319: Figure 320: Choosing addressee and
- Page 320 and 321: Creating an envelope template When
- Page 322 and 323: Figure 323: Insert address block Se
- Page 324 and 325: Figure 326: New address block Match
- Page 326 and 327: Figure 328: Create a salutation Ste
- Page 328 and 329: Note Figure 332: Insert mail merge
- Page 330 and 331: When you have saved the merged docu
- Page 332 and 333: Introduction This chapter describes
- Page 334 and 335: • Use the Entries and Styles page
- Page 336 and 337: • The E button represents the cha
- Page 338 and 339: Tab parameters Clicking on the Tab
- Page 340 and 341: 5) In the Type area of the Backgrou
- Page 342 and 343: 2) From the pop-up menu, choose Del
- Page 344 and 345: Index The type of index this entry
- Page 346 and 347: 5) Various other options determine
- Page 348 and 349: To apply a character style to an el
- Page 350 and 351:
2) Place the cursor in the field sh
- Page 352 and 353:
Bibliographies A bibliography is a
- Page 354 and 355:
Figure 357: Choosing a different da
- Page 356 and 357:
5) To complete the entry, move to t
- Page 358 and 359:
Caution When you open the Define Bi
- Page 360 and 361:
To add an element, click in the Str
- Page 362 and 363:
Figure 368: Applying a numbering st
- Page 364 and 365:
Why use a master document? Master d
- Page 366 and 367:
Figure 370: Splitting a document in
- Page 368 and 369:
Step 3. Create the master document
- Page 370 and 371:
Figure 372: Inserting a subdocument
- Page 372 and 373:
Example Each chapter may start with
- Page 374 and 375:
If, while editing a subdocument, yo
- Page 376 and 377:
Inserting the cross-references 1) O
- Page 378 and 379:
Figure 387. The Navigator for a tex
- Page 380 and 381:
Because the master document reorgan
- Page 382 and 383:
Introduction to fields Fields are e
- Page 384 and 385:
Figure 393: Custom Properties page,
- Page 386 and 387:
Using AutoText to insert often-used
- Page 388 and 389:
Figure 398: Defining a field to res
- Page 390 and 391:
For figures, you will usually choos
- Page 392 and 393:
Using fields in headers and footers
- Page 394 and 395:
Figure 403: Defining a number range
- Page 396 and 397:
You cannot use internal variables (
- Page 398 and 399:
Tip If you want to insert this fiel
- Page 400 and 401:
4) If you have set fields to update
- Page 402 and 403:
Figure 410: Inserting an input fiel
- Page 404 and 405:
Figure 414: Editing the items on an
- Page 406 and 407:
Introduction to forms This chapter
- Page 408 and 409:
Insert form controls 1) To insert a
- Page 410 and 411:
Form Control toolbar Option Button
- Page 412 and 413:
Form Design toolbar Form Navigator
- Page 414 and 415:
Figure 418: Specifying names for op
- Page 416 and 417:
Configure form controls No further
- Page 418 and 419:
Accessing data sources The most com
- Page 420 and 421:
Figure 428: Setting a primary key 4
- Page 422 and 423:
5) Click the Text Box button . Clic
- Page 424 and 425:
Advanced form customization Linking
- Page 426 and 427:
Figure 436: Data Properties of a fo
- Page 429 and 430:
Chapter 16 Customizing Writer
- Page 431 and 432:
and so on, there is File | Send and
- Page 433 and 434:
Modifying menu entries In addition
- Page 435 and 436:
To use a custom icon, create it in
- Page 437 and 438:
3) Next select the required functio
- Page 439 and 440:
Figure 445: Find and choose the en-
- Page 441 and 442:
Loading a saved keyboard configurat
- Page 443 and 444:
Appendix A Keyboard Shortcuts Using
- Page 445 and 446:
Shortcut Keys Result F6 Repeatedly
- Page 447 and 448:
Shortcut keys for controlling docum
- Page 449 and 450:
Shortcut keys Effect Ctrl+Shift+F12
- Page 451 and 452:
Shortcut Keys Effect Shift+PageDown
- Page 453 and 454:
Shortcut keys for moving and resizi
- Page 455 and 456:
Shortcut keys for drawing objects S
- Page 457 and 458:
Index A accessibility features 444
- Page 459 and 460:
toolbars 407 when to use 406 XForms
- Page 461 and 462:
automatic 139 numbering by chapter
- Page 463 and 464:
updating fields 393 URL Recognition