GL900 USER'S MANUAL
GL900 USER'S MANUAL
GL900 USER'S MANUAL

You also want an ePaper? Increase the reach of your titles
YUMPU automatically turns print PDFs into web optimized ePapers that Google loves.
Settings and Measurement<br />
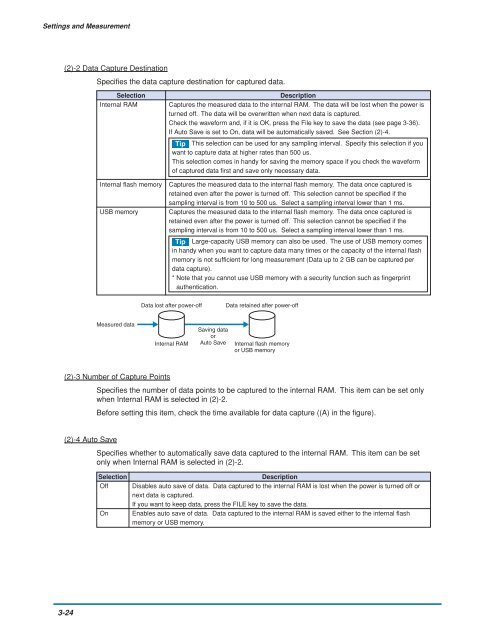
(2)-2 Data Capture Destination<br />
Specifies the data capture destination for captured data.<br />
Selection<br />
Internal RAM<br />
Internal flash memory<br />
USB memory<br />
Description<br />
Captures the measured data to the internal RAM. The data will be lost when the power is<br />
turned off. The data will be overwritten when next data is captured.<br />
Check the waveform and, if it is OK, press the File key to save the data (see page 3-36).<br />
If Auto Save is set to On, data will be automatically saved. See Section (2)-4.<br />
Tip This selection can be used for any sampling interval. Specify this selection if you<br />
want to capture data at higher rates than 500 us.<br />
This selection comes in handy for saving the memory space if you check the waveform<br />
of captured data first and save only necessary data.<br />
Captures the measured data to the internal flash memory. The data once captured is<br />
retained even after the power is turned off. This selection cannot be specified if the<br />
sampling interval is from 10 to 500 us. Select a sampling interval lower than 1 ms.<br />
Captures the measured data to the internal flash memory. The data once captured is<br />
retained even after the power is turned off. This selection cannot be specified if the<br />
sampling interval is from 10 to 500 us. Select a sampling interval lower than 1 ms.<br />
Tip Large-capacity USB memory can also be used. The use of USB memory comes<br />
in handy when you want to capture data many times or the capacity of the internal flash<br />
memory is not sufficient for long measurement (Data up to 2 GB can be captured per<br />
data capture).<br />
* Note that you cannot use USB memory with a security function such as fingerprint<br />
authentication.<br />
Data lost after power-off<br />
Data retained after power-off<br />
Measured data<br />
Internal RAM<br />
Saving data<br />
or<br />
Auto Save<br />
Internal flash memory<br />
or USB memory<br />
(2)-3 Number of Capture Points<br />
Specifies the number of data points to be captured to the internal RAM. This item can be set only<br />
when Internal RAM is selected in (2)-2.<br />
Before setting this item, check the time available for data capture ((A) in the figure).<br />
(2)-4 Auto Save<br />
Specifies whether to automatically save data captured to the internal RAM. This item can be set<br />
only when Internal RAM is selected in (2)-2.<br />
Selection<br />
Off<br />
On<br />
Description<br />
Disables auto save of data. Data captured to the internal RAM is lost when the power is turned off or<br />
next data is captured.<br />
If you want to keep data, press the FILE key to save the data.<br />
Enables auto save of data. Data captured to the internal RAM is saved either to the internal flash<br />
memory or USB memory.<br />
3-24