

Repair Kits Available By Part Number Section 2 Page - GAMECO
Repair Kits Available By Part Number Section 2 Page - GAMECO
Repair Kits Available By Part Number Section 2 Page - GAMECO

You also want an ePaper? Increase the reach of your titles
YUMPU automatically turns print PDFs into web optimized ePapers that Google loves.
WARNING: Installation, disassembly, repair and maintenance<br />
must be performed only by qualified personnel.<br />
<strong>Repair</strong> kit 19104-80 is designed to repair the ECII ® 19104-1AB<br />
MultiBonnet ® ONLY. The most visible features of this<br />
MultiBonnet ® include: 1) a circular nameplate identifying the<br />
assembly as a MultiBonnet ® –– located between the body of<br />
the valve and the lower hex of the bonnet, 2) double wrenching<br />
flats and 3) a non-rising stem. Be sure the bonnet to be repaired<br />
has these features. Attempting to repair a standard style<br />
bonnet with this kit would be hazardous and could result in<br />
personal injury and property damage.<br />
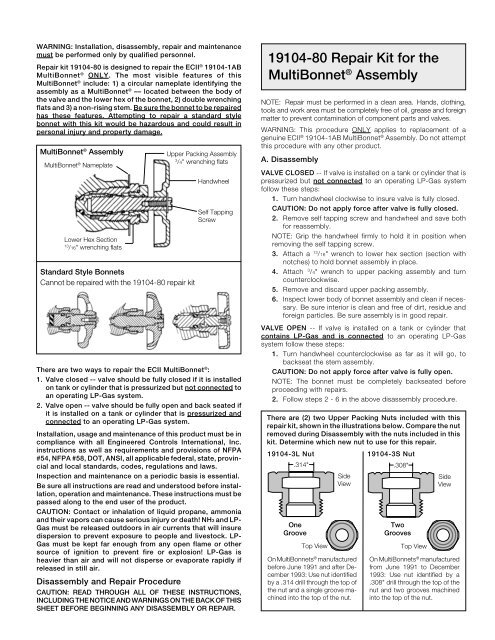
MultiBonnet ® Assembly<br />
MultiBonnet ® Nameplate<br />
Lower Hex <strong>Section</strong><br />
13<br />
/16" wrenching flats<br />
Standard Style Bonnets<br />
Cannot be repaired with the 19104-80 repair kit<br />
Upper Packing Assembly<br />
3<br />
/4" wrenching flats<br />
Handwheel<br />
Self Tapping<br />
Screw<br />
There are two ways to repair the ECII MultiBonnet ® :<br />
1. Valve closed -- valve should be fully closed if it is installed<br />
on tank or cylinder that is pressurized but not connected to<br />
an operating LP-Gas system.<br />
2. Valve open -- valve should be fully open and back seated if<br />
it is installed on a tank or cylinder that is pressurized and<br />
connected to an operating LP-Gas system.<br />
Installation, usage and maintenance of this product must be in<br />
compliance with all Engineered Controls International, Inc.<br />
instructions as well as requirements and provisions of NFPA<br />
#54, NFPA #58, DOT, ANSI, all applicable federal, state, provincial<br />
and local standards, codes, regulations and laws.<br />
Inspection and maintenance on a periodic basis is essential.<br />
Be sure all instructions are read and understood before installation,<br />
operation and maintenance. These instructions must be<br />
passed along to the end user of the product.<br />
CAUTION: Contact or inhalation of liquid propane, ammonia<br />
and their vapors can cause serious injury or death! NH3 and LP-<br />
Gas must be released outdoors in air currents that will insure<br />
dispersion to prevent exposure to people and livestock. LP-<br />
Gas must be kept far enough from any open flame or other<br />
source of ignition to prevent fire or explosion! LP-Gas is<br />
heavier than air and will not disperse or evaporate rapidly if<br />
released in still air.<br />
Disassembly and <strong>Repair</strong> Procedure<br />
CAUTION: READ THROUGH ALL OF THESE INSTRUCTIONS,<br />
INCLUDING THE NOTICE AND WARNINGS ON THE BACK OF THIS<br />
SHEET BEFORE BEGINNING ANY DISASSEMBLY OR REPAIR.<br />
19104-80 <strong>Repair</strong> Kit for the<br />
MultiBonnet ® Assembly<br />
NOTE: <strong>Repair</strong> must be performed in a clean area. Hands, clothing,<br />
tools and work area must be completely free of oil, grease and foreign<br />
matter to prevent contamination of component parts and valves.<br />
WARNING: This procedure ONLY applies to replacement of a<br />
genuine ECII ® 19104-1AB MultiBonnet ® Assembly. Do not attempt<br />
this procedure with any other product.<br />
A. Disassembly<br />
VALVE CLOSED -- If valve is installed on a tank or cylinder that is<br />
pressurized but not connected to an operating LP-Gas system<br />
follow these steps:<br />
1. Turn handwheel clockwise to insure valve is fully closed.<br />
CAUTION: Do not apply force after valve is fully closed.<br />
2. Remove self tapping screw and handwheel and save both<br />
for reassembly.<br />
NOTE: Grip the handwheel firmly to hold it in position when<br />
removing the self tapping screw.<br />
3. Attach a 13 /16" wrench to lower hex section (section with<br />
notches) to hold bonnet assembly in place.<br />
4. Attach 3 /4" wrench to upper packing assembly and turn<br />
counterclockwise.<br />
5. Remove and discard upper packing assembly.<br />
6. Inspect lower body of bonnet assembly and clean if necessary.<br />
Be sure interior is clean and free of dirt, residue and<br />
foreign particles. Be sure assembly is in good repair.<br />
VALVE OPEN -- If valve is installed on a tank or cylinder that<br />
contains LP-Gas and is connected to an operating LP-Gas<br />
system follow these steps:<br />
1. Turn handwheel counterclockwise as far as it will go, to<br />
backseat the stem assembly.<br />
CAUTION: Do not apply force after valve is fully open.<br />
NOTE: The bonnet must be completely backseated before<br />
proceeding with repairs.<br />
2. Follow steps 2 - 6 in the above disassembly procedure.<br />
There are (2) two Upper Packing Nuts included with this<br />
repair kit, shown in the illustrations below. Compare the nut<br />
removed during Disassembly with the nuts included in this<br />
kit. Determine which new nut to use for this repair.<br />
19104-3L Nut 19104-3S Nut<br />
.314"<br />
.308"<br />
Side<br />
View<br />
One<br />
Groove<br />
Top View<br />
On MultiBonnets ® manufactured<br />
before June 1991 and after December<br />
1993: Use nut identified<br />
by a .314 drill through the top of<br />
the nut and a single groove machined<br />
into the top of the nut.<br />
Two<br />
Grooves<br />
Top View<br />
Side<br />
View<br />
On MultiBonnets ® manufactured<br />
from June 1991 to December<br />
1993: Use nut identified by a<br />
.308" drill through the top of the<br />
nut and two grooves machined<br />
into the top of the nut.


