1 Turn off the power of the printer. - Van Mechelen
1 Turn off the power of the printer. - Van Mechelen
1 Turn off the power of the printer. - Van Mechelen
- No tags were found...
You also want an ePaper? Increase the reach of your titles
YUMPU automatically turns print PDFs into web optimized ePapers that Google loves.
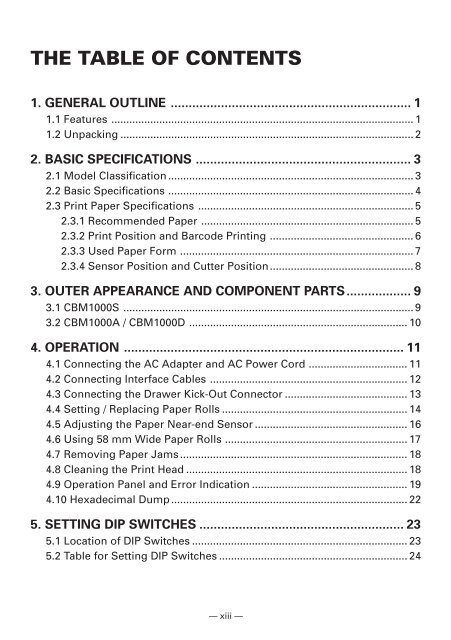
THE TABLE OF CONTENTS<br />
1. GENERAL OUTLINE ................................................................... 1<br />
1.1 Features ..................................................................................................... 1<br />
1.2 Unpacking .................................................................................................. 2<br />
2. BASIC SPECIFICATIONS ............................................................ 3<br />
2.1 Model Classification .................................................................................. 3<br />
2.2 Basic Specifications .................................................................................. 4<br />
2.3 Print Paper Specifications ........................................................................ 5<br />
2.3.1 Recommended Paper ....................................................................... 5<br />
2.3.2 Print Position and Barcode Printing ................................................ 6<br />
2.3.3 Used Paper Form .............................................................................. 7<br />
2.3.4 Sensor Position and Cutter Position................................................ 8<br />
3. OUTER APPEARANCE AND COMPONENT PARTS.................. 9<br />
3.1 CBM1000S ................................................................................................. 9<br />
3.2 CBM1000A / CBM1000D ......................................................................... 10<br />
4. OPERATION .............................................................................. 11<br />
4.1 Connecting <strong>the</strong> AC Adapter and AC Power Cord ................................. 11<br />
4.2 Connecting Interface Cables .................................................................. 12<br />
4.3 Connecting <strong>the</strong> Drawer Kick-Out Connector ......................................... 13<br />
4.4 Setting / Replacing Paper Rolls .............................................................. 14<br />
4.5 Adjusting <strong>the</strong> Paper Near-end Sensor ................................................... 16<br />
4.6 Using 58 mm Wide Paper Rolls ............................................................. 17<br />
4.7 Removing Paper Jams ............................................................................ 18<br />
4.8 Cleaning <strong>the</strong> Print Head .......................................................................... 18<br />
4.9 Operation Panel and Error Indication .................................................... 19<br />
4.10 Hexadecimal Dump ............................................................................... 22<br />
5. SETTING DIP SWITCHES ......................................................... 23<br />
5.1 Location <strong>of</strong> DIP Switches ........................................................................ 23<br />
5.2 Table for Setting DIP Switches ............................................................... 24<br />
— xiii —


