- Page 1 and 2:
DocuPrint CP405 dUser Guide
- Page 3 and 4:
PrefaceThank you for purchasing the
- Page 5 and 6:
ContentsPreface ...................
- Page 7 and 8:
Using the Stored Print Feature.....
- Page 9 and 10:
Managing the Printer ..............
- Page 11 and 12:
Types of ManualsManuals included wi
- Page 13 and 14:
Safety NotesBefore using this produ
- Page 15 and 16:
Always switch off and unplug the ma
- Page 17 and 18:
Locate this product in a well-venti
- Page 19 and 20:
Do not attempt to remove a paper de
- Page 21 and 22:
• Warning and Caution LabelsBe su
- Page 23 and 24:
Regulation•Radio Frequency Emissi
- Page 25 and 26:
Illegal Copies and PrintoutsCopying
- Page 27 and 28:
1SpecificationsThis chapter lists t
- Page 29 and 30:
Supported OSItemsDescriptionStandar
- Page 31 and 32:
2Basic OperationThis chapter includ
- Page 33 and 34:
• Rear View109123876451 Control B
- Page 35 and 36:
Installing Optional AccessoriesYou
- Page 37 and 38:
7 Close the control board cover, an
- Page 39 and 40:
7 Click Apply, and then click OK.8
- Page 41 and 42:
6 Hold the standard 550 sheet tray
- Page 43 and 44:
Updating Your Driver to Detect Opti
- Page 45 and 46:
Thank you for purchasing the Wirele
- Page 47 and 48:
3 Click Wireless Network Kit b/g/n.
- Page 49 and 50:
3 Turn on the printer.If a message
- Page 51 and 52:
5 Insert the two plastic pins on th
- Page 53 and 54:
Updating Your Driver to Detect Opti
- Page 55 and 56:
Turning on the PrinterIMPORTANT:•
- Page 57 and 58:
Power Saver ModeThe printer has an
- Page 59 and 60:
3Printer Management SoftwareUse the
- Page 61 and 62:
CentreWare Internet ServicesThis se
- Page 63 and 64:
Setup Disk Creation Tool (Windows O
- Page 65 and 66:
4Printer Connection and SoftwareIns
- Page 67 and 68:
Connecting Your PrinterYour printer
- Page 69 and 70:
Setting the IP AddressThis section
- Page 71 and 72:
• Assigning an IP Address (for IP
- Page 73 and 74:
Installing Print Driver on Computer
- Page 75 and 76:
• Inserting the CD-ROM• For Ins
- Page 77 and 78:
8 Click OK.9 Select your printer na
- Page 79 and 80:
• For Installing XML Paper Specif
- Page 81 and 82:
Windows Server 2008 R21 Click Start
- Page 83 and 84:
Windows 8, Windows 8 64-bit Edition
- Page 85 and 86:
• For Windows 7, Windows 7 64-bit
- Page 87 and 88:
• For Windows Vista and Windows V
- Page 89 and 90:
• For Windows 8, Windows 8 64-bit
- Page 91 and 92:
• For Windows Vista and Windows V
- Page 93 and 94:
• For Windows 7, Windows 7 64-bit
- Page 95 and 96:
Installing Print Driver on Computer
- Page 97 and 98:
• Setting Up the QueueTo execute
- Page 99 and 100:
• For SUSE Linux Enterprise Deskt
- Page 101 and 102:
• Uninstalling the Print Driver
- Page 103 and 104:
Configuring the Optional Wireless P
- Page 105 and 106:
4 Click Start wireless settings.5 C
- Page 107 and 108:
• Using Non-Wizard Setup to Confi
- Page 109 and 110: Manual SSID Setup1 Press the (Menu)
- Page 111 and 112: Reconfiguring the Wireless Settings
- Page 113 and 114: 5Printing BasicsThis chapter includ
- Page 115 and 116: • Print Media That Can Damage You
- Page 117 and 118: Standard 550 Sheet Tray and Optiona
- Page 119 and 120: SupportedPaperSpecialPaperPaper Nam
- Page 121 and 122: • Loading Print Media in the Stan
- Page 123 and 124: Loading Letterhead in the Standard
- Page 125 and 126: 5 Slide both width guides until the
- Page 127 and 128: Linking TraysWhen the optional 550
- Page 129 and 130: PrintingThis section covers how to
- Page 131 and 132: • Using the Stored Print FeatureW
- Page 133 and 134: • Deleting Stored JobsA job that
- Page 135 and 136: • Duplex PrintingDuplex printing
- Page 137 and 138: • Selecting Printing OptionsThis
- Page 139 and 140: Selecting Options for an Individual
- Page 141 and 142: Defining Custom Paper SizesBefore p
- Page 143 and 144: • Using the Mac OS X Print Driver
- Page 145 and 146: • Checking Status of Print DataTh
- Page 147 and 148: • Printer SettingsYou can select
- Page 149 and 150: • Printer SetupYou can install yo
- Page 151 and 152: • Changing the Encryption Setting
- Page 153 and 154: 6 Enter a password corresponding to
- Page 155 and 156: 6 Select the category from the Cate
- Page 157 and 158: Setting the SSL-use Server Certific
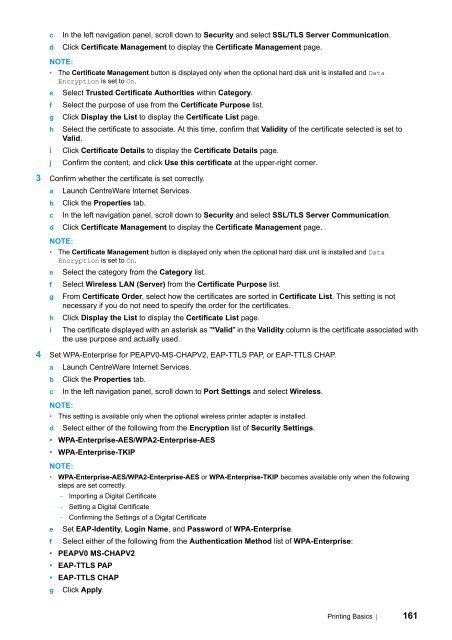
- Page 159: Setting for Wireless LAN WPA-Enterp
- Page 163 and 164: 6Using the Operator Panel MenusThis
- Page 165 and 166: Print MeterPurpose:To print the rep
- Page 167 and 168: • OrientationPurpose:To specify h
- Page 169 and 170: • QuantityPurpose:To set the defa
- Page 171 and 172: • PasswordPurpose:To specify the
- Page 173 and 174: Network SetupUse the Network Setup
- Page 175 and 176: Ad-hocEncryptionTypeWPA-PSK-TKIPWPA
- Page 177 and 178: • ProtocolPurpose:To enable or di
- Page 179 and 180: • Port StatusNOTE:• Port Status
- Page 181 and 182: • Audio TonesPurpose:To configure
- Page 183 and 184: • Banner SheetNOTE:• Banner She
- Page 185 and 186: • Adjust PaperTypePurpose:To spec
- Page 187 and 188: • Adjust ColorRegiPurpose:To manu
- Page 189 and 190: Secure SettingsUse the Secure Setti
- Page 191 and 192: • Bypass TrayPurpose:To specify t
- Page 193 and 194: • Tray1Purpose:To specify the pap
- Page 195 and 196: Tray PriorityPurpose:To set the pri
- Page 197 and 198: Setting the Power Saver Time Option
- Page 199 and 200: 7TroubleshootingThis chapter includ
- Page 201 and 202: • Identifying the Location of Pap
- Page 203 and 204: 5 Remove the jammed paper.6 Insert
- Page 205 and 206: 5 Remove the jammed paper.6 Insert
- Page 207 and 208: 5 Push down the latch to open the r
- Page 209 and 210: • Clearing Paper Jams From the Op
- Page 211 and 212:
• Jam ProblemsThis section includ
- Page 213 and 214:
Regi Jam (Exit Sensor On JAM)Proble
- Page 215 and 216:
Basic Printer ProblemsSome printer
- Page 217 and 218:
Printing ProblemsNOTE:• If Panel
- Page 219 and 220:
• The Output Is Too LightProblemT
- Page 221 and 222:
• Random Spots/Blurred ImagesProb
- Page 223 and 224:
• Streaks Appear on the OutputPro
- Page 225 and 226:
• Vertical BlanksProblemThe print
- Page 227 and 228:
• FogProblemThe printed result is
- Page 229 and 230:
• BandingProblemThe printed resul
- Page 231 and 232:
• Damage on the Leading Edge of P
- Page 233 and 234:
• Images Are SkewedProblemThe pri
- Page 235 and 236:
Adjusting Color RegistrationThis se
- Page 237 and 238:
Slow ScanOn the Chart 2 of the colo
- Page 239 and 240:
Digital Certificate ProblemProblemT
- Page 241 and 242:
Other ProblemsProblemCondensation h
- Page 243 and 244:
016-923 Press the button, or wait f
- Page 245 and 246:
Getting HelpThis section includes:
- Page 247 and 248:
8MaintenanceThis chapter includes:
- Page 249 and 250:
3 Open the side cover.4 Turn the wa
- Page 251 and 252:
10 Reinsert the belt unit into the
- Page 253 and 254:
3 Grasp the handle on the waste ton
- Page 255 and 256:
11 Close the side cover.Maintenance
- Page 257 and 258:
• Replacing the Toner CartridgesF
- Page 259 and 260:
4 Close the front cover.Maintenance
- Page 261 and 262:
Removing the Drum Cartridges1 Open
- Page 263 and 264:
Installing the Drum Cartridges1 Unp
- Page 265 and 266:
13 Turn the waste toner box lock le
- Page 267 and 268:
Removing the Fusing Unit1 Turn off
- Page 269 and 270:
• Replacing the Belt Unit, the 2n
- Page 271 and 272:
4 Grasp the handle on the waste ton
- Page 273 and 274:
Installing a Belt Unit1 Unpack a ne
- Page 275 and 276:
Installing a 2nd BTR1 Unpack a new
- Page 277 and 278:
Installing a Retard Roller in the S
- Page 279 and 280:
Removing the Waste Toner Box1 Open
- Page 281 and 282:
Ordering SuppliesThis section inclu
- Page 283 and 284:
Storing Print MediaTo avoid potenti
- Page 285 and 286:
Managing the PrinterThis section in
- Page 287 and 288:
Checking Page CountsThe total numbe
- Page 289 and 290:
Removing OptionsIf the printer loca
- Page 291 and 292:
7 Close the control board cover, an
- Page 293 and 294:
4 Remove the two screws joining the
- Page 295 and 296:
5 Open the control board cover comp
- Page 297 and 298:
5 Open the control board cover comp
- Page 299 and 300:
9Contacting Fuji XeroxThis chapter
- Page 301 and 302:
Online ServicesYou can find detail
- Page 303 and 304:
IndexNumerics2nd BTR ..............
- Page 305 and 306:
LCD panel .........................
- Page 307 and 308:
SafetySElectrical .................
- Page 310:
DocuPrint CP405 d User GuideFuji Xe


