
You also want an ePaper? Increase the reach of your titles
YUMPU automatically turns print PDFs into web optimized ePapers that Google loves.
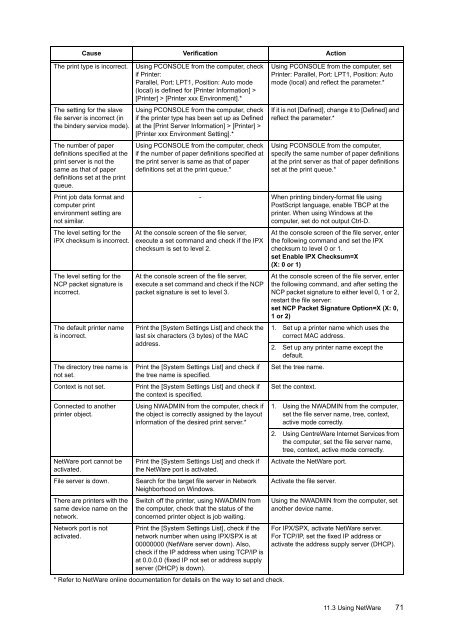
The print type is incorrect.The setting for the slavefile server is incorrect (inthe bindery service mode).The number of paperdefinitions specified at theprint server is not thesame as that of paperdefinitions set at the printqueue.Print job data format andcomputer printenvironment setting arenot similar.The level setting for theIPX checksum is incorrect.The level setting for theNCP packet signature isincorrect.The default printer nameis incorrect.The directory tree name isnot set.Context is not set.Connected to anotherprinter object.NetWare port cannot beactivated.File server is down.There are printers with thesame device name on thenetwork.Network port is notactivated.Cause Verification ActionUsing PCONSOLE from the computer, checkif Printer:Parallel, Port: LPT1, Position: Auto mode(local) is defined for [Printer Information] >[Printer] > [Printer xxx Environment].*Using PCONSOLE from the computer, checkif the printer type has been set up as Definedat the [Print Server Information] > [Printer] >[Printer xxx Environment Setting].*Using PCONSOLE from the computer, checkif the number of paper definitions specified atthe print server is same as that of paperdefinitions set at the print queue.*Using PCONSOLE from the computer, setPrinter: Parallel, Port: LPT1, Position: Automode (local) and reflect the parameter.*If it is not [Defined], change it to [Defined] andreflect the parameter.*Using PCONSOLE from the computer,specify the same number of paper definitionsat the print server as that of paper definitionsset at the print queue.*- When printing bindery-format file usingPostScript language, enable TBCP at theprinter. When using Windows at thecomputer, set do not output Ctrl-D.At the console screen of the file server,execute a set command and check if the IPXchecksum is set to level 2.At the console screen of the file server,execute a set command and check if the NCPpacket signature is set to level 3.Print the [System Settings List] and check thelast six characters (3 bytes) of the MACaddress.Print the [System Settings List] and check ifthe tree name is specified.Print the [System Settings List] and check ifthe context is specified.Using NWADMIN from the computer, check ifthe object is correctly assigned by the layoutinformation of the desired print server.*Print the [System Settings List] and check ifthe NetWare port is activated.Search for the target file server in NetworkNeighborhood on Windows.Switch off the printer, using NWADMIN fromthe computer, check that the status of theconcerned printer object is job waiting.Print the [System Settings List], check if thenetwork number when using IPX/SPX is at00000000 (NetWare server down). Also,check if the IP address when using TCP/IP isat 0.0.0.0 (fixed IP not set or address supplyserver (DHCP) is down).* Refer to NetWare online documentation for details on the way to set and check.At the console screen of the file server, enterthe following command and set the IPXchecksum to level 0 or 1.set Enable IPX Checksum=X(X: 0 or 1)At the console screen of the file server, enterthe following command, and after setting theNCP packet signature to either level 0, 1 or 2,restart the file server:set NCP Packet Signature Option=X (X: 0,1 or 2)1. Set up a printer name which uses thecorrect MAC address.2. Set up any printer name except thedefault.Set the tree name.Set the context.1. Using the NWADMIN from the computer,set the file server name, tree, context,active mode correctly.2. Using CentreWare Internet Services fromthe computer, set the file server name,tree, context, active mode correctly.Activate the NetWare port.Activate the file server.Using the NWADMIN from the computer, setanother device name.For IPX/SPX, activate NetWare server.For TCP/IP, set the fixed IP address oractivate the address supply server (DHCP).11.3 Using NetWare 71