Installation Manual
Installation Manual
Installation Manual

You also want an ePaper? Increase the reach of your titles
YUMPU automatically turns print PDFs into web optimized ePapers that Google loves.
Chapter 4 ������������ ��� �������<br />
_<br />
_<br />
_<br />
c<br />
h<br />
a<br />
n<br />
g<br />
e<br />
-<br />
b<br />
e<br />
g<br />
i<br />
n<br />
_<br />
_<br />
_<br />
_<br />
_<br />
_<br />
c<br />
h<br />
a<br />
n<br />
g<br />
e<br />
-<br />
e<br />
n<br />
d<br />
_<br />
_<br />
_<br />
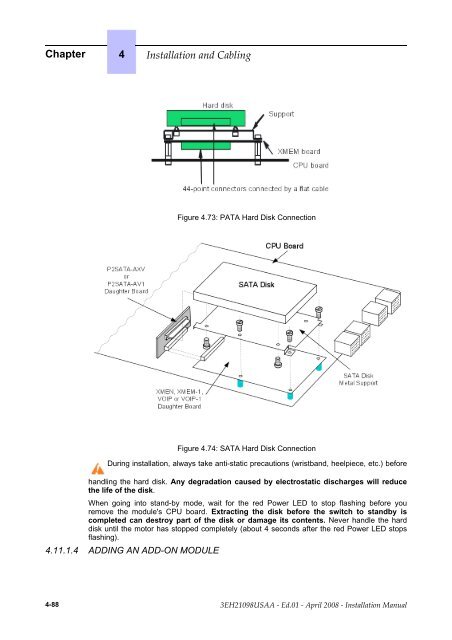
Figure 4.73: PATA Hard Disk Connection<br />
Figure 4.74: SATA Hard Disk Connection<br />
During installation, always take anti-static precautions (wristband, heelpiece, etc.) before<br />
handling the hard disk. Any degradation caused by electrostatic discharges will reduce<br />
the life of the disk.<br />
When going into stand-by mode, wait for the red Power LED to stop flashing before you<br />
remove the module's CPU board. Extracting the disk before the switch to standby is<br />
completed can destroy part of the disk or damage its contents. Never handle the hard<br />
disk until the motor has stopped completely (about 4 seconds after the red Power LED stops<br />
flashing).<br />
4.11.1.4 ADDING AN ADD-ON MODULE<br />
4-88 ������������ � ����� � ����� ���� � ������������ ������