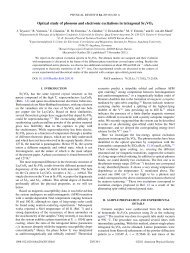
software to fit optical spectra - Quantum Materials Group
software to fit optical spectra - Quantum Materials Group
software to fit optical spectra - Quantum Materials Group

You also want an ePaper? Increase the reach of your titles
YUMPU automatically turns print PDFs into web optimized ePapers that Google loves.
The model file s<strong>to</strong>res information about the parameters in the internal RefFIT format,<br />
which cannot be viewed or accessed by other programs. However, every time a model is saved,<br />
an extra file is created au<strong>to</strong>matically, which lists all parameter values and error bars in the text<br />
format, that can be opened, e.g, by the Notepad program. This file has the same name as the<br />
model file, but the extension “ASC”. For instance, after saving a model under file name<br />
“MOD12.RFM”, a text file “MOD12.ASC” is created. Note, that error bars are not calculated,<br />
unless the corresponding <strong>fit</strong>ting option is specified (section 4.10.2).<br />
There is another ‘side’ action, which accompanies model saving. Namely, a new line is<br />
added <strong>to</strong> a file called “PAR.DAT”, which lies in the current direc<strong>to</strong>ry. This line has the<br />
following format “ModelFileName Chi-Square Einf Wo[1] Wp[1] G[1] Wo[2] Wp[2] G[2]<br />
Wo[3] Wp[3] G[3] …”, where ModelFileName is the filename of the model saved, Chi-Square<br />
is the current value of the <strong>fit</strong>ting chi-square, Einf is the value of ε ∞ , Wo[1], Wp[1] and G[1]<br />
are the values parameter ω 0 , ω p and γ from the first row in the Lorentzian table, Wo[2],<br />
Wp[2] and G[2] are the parameters from the second row and so on. File “PAR.DAT” is very<br />
useful, when, for example, the <strong>spectra</strong> for different temperatures are <strong>fit</strong>ted in a cycle and for<br />
each temperature the model is saved under a different name. Then one can easily plot the<br />
temperature dependence of model parameters, such as plasma frequency or conductivity gap,<br />
using any standard scientific graphics package (see an example in section 3.3.2).<br />
A saved model can be loaded in<strong>to</strong> an existing model window. One should create a new<br />
model window or activate the existing one and press the F3 but<strong>to</strong>n. After that the model file <strong>to</strong><br />
be loaded has <strong>to</strong> be selected. It is a good idea <strong>to</strong> save models after each modification (e.g.,<br />
<strong>fit</strong>ting run) <strong>to</strong> avoid the potential loss of data.<br />
4.5.2. Editing models<br />
The rows in the ‘Lorenzian’ section can be added and deleted by the but<strong>to</strong>ns and<br />
, or, alternatively, by the Insert and Delete keys. A row can be moved up and down by<br />
clicking and . They can also be sorted in different ways by mouse clicking on the<br />
column headers. For instance, in order <strong>to</strong> sort the Lorenzians by increasing transversal<br />
frequencies one should click on the first column header “Wo”.<br />
4.5.3. Model types<br />
The meanings of parameters and output <strong>optical</strong> <strong>spectra</strong> depend on the model type. At the<br />
moment there exist several types of models. The most common one is the “Dielectric Function”<br />
type (see section 4.6). Each newly created model is assumed <strong>to</strong> be of this type. In this case the<br />
meaning of the parameters exactly corresponds <strong>to</strong> the text labels in the Model window.<br />
Initially the “Dielectric Function” was the only model type in RefFIT, but recently other<br />
types were introduced (see section 4.7). Due <strong>to</strong> technical reasons it was easier <strong>to</strong> keep the same<br />
appearance of the Model window for other model types and use special ‘tricks’ in order <strong>to</strong><br />
explain RefFIT that the model type is not “Dielectric Function”.<br />
According <strong>to</strong> the convention, the way <strong>to</strong> change the model type is <strong>to</strong> put a negative<br />
integer number (code) in<strong>to</strong> the parameter “Einf” and make this parameter fixed (look red on the<br />
screen). The code -1 corresponds <strong>to</strong> the extra (special) model type 1, code -2 corresponds <strong>to</strong> the<br />
Guide <strong>to</strong> RefFIT Page 55